Four factors are crucial to successful and accurate sample collection -- personal health and safety, collecting a representative sample, quality control of overall sampling process, and complete and accurate records. Personal health and safety recommendations are included in the Safety section below. Collecting a representative sample has been introduced and will be discussed again. Quality control will be reviewed in the Quality-Assurance Plans and Quality-Control Samples section. Record keeping will be discussed in this section.
The basic steps in establishing a new site include locating and describing the sampling station in the data records or database by physical positioning, determining station coordinates, and photographing the station. The location and identification number of a water-quality sampling site should be accurately marked on a USGS topographic quadrangle. Drawing site sketches which show roads, buildings, and other landmarks not on the topographic maps helps locate remote sites for others. Establishing and documenting a new sampling site (if necessary) should be the first step in record keeping.
Finding the physical location could be necessary if the sampling site is not shown on a map. Establish the location of the site by measuring the horizontal distance between the sampling site and other physical features, transfer that distance to a map, and mark the location. Reference features on topographic quadrangles may be roads, buildings, power lines, and water bodies. Methods and devices used to measure distances, in order of decreasing accuracy are: (1) triangulation, (2) electronic distance measurer, (3) tape measure, (4) hip-chain distance measurer, (5) distance measuring wheel, (6) range finder, (7) global positioning system (GPS) (depending on accuracy or sensitivity), (8) pacing, and (9) vehicle odometer.
Station/sampling site coordinates in degrees, minutes, seconds, and fractions of seconds of latitude and longitude should be determined as accurately as practically feasible. Ways to determine coordinates, from least to most expensive, include: using topographic quadrangles, professional land surveying, and digitizing from maps using geographic information system (GIS) technology and/or using portable GPS devices.
Station sites should be photographed on a regular basis for site documentation. On the first visit to the site, take enough photos to establish a complete photo record of the site and its surrounding. Take photos from established and constant photo points such as large trees or boulders. Describe these photo points in the field notes and improvise landmarks (for example, with a pile of rocks) if naturally occurring ones are not available. Include a person in the photo to show scale. Ideally, two photos should be taken of the site -- one from upstream of the sample point looking downstream at the sample point and the other from downstream of the sample point looking upstream at the sample point. Take additional photos if you notice any significant change in the site area. The photographs taken over the lifetime of the site should help document the physical influences and changes that could impact water quality (Arizona Water Resources Research Center, 1995, p. 10-13).
The use and maintenance of field folders ensures that all necessary information about the sampling site can be found at all times in one single file. Using field folders as a repository for all information pertinent to the operation of a surface-water-quality sampling station/site is a common practice in some agencies. A field folder should contain most if not all of the following information when feasible: associated data or historical information from other databases maintained by Federal, State, and local agencies; land-use information, including aerial photographs; published and unpublished reports; studies and data; geologic maps; and water-table contour maps. An extensive checklist is included in Appendix A.
Field notes are important to the sample-collection process because they are often the only written record of field measurements. Recorded field measurements, site observations, and variances from standard sampling procedures are important documentation for QA/QC and data interpretation. These records could be offered as official and legal documents and should be as legible and complete as possible. Field measurements and observations recorded with indelible ink during each visit to an individual station can include but are not limited to the following:
Field measurements are the determinations of physical properties or chemical constituents that are measured onsite, as close as possible in time and space to the media being sampled. Measurements of water temperature, pH, alkalinity, DO, and specific conductance could change dramatically within a few minutes or hours after sample collection. Therefore field measurements of these properties are required if representative results of in-stream conditions are to be obtained. Field measurements, field notes on sampling methods or equipment used, site observations, and calibration information should be recorded on field forms for later reference. These field forms or notes may vary in format.
Instrument logbooks also should be used to track instrument performance, maintenance, and calibration. These logbooks should be maintained and reviewed before each field trip. The operation and calibration of all field instruments (including back-up meters and electrodes) should be checked to ensure that all are in good working condition. Test each instrument (meter and sensors) before leaving for the field. Practice your measurement technique if the instrument or measurement is new to you. Make field measurements only with calibrated instruments. Calibrate instruments according to manufacturer guidelines or operations manual.
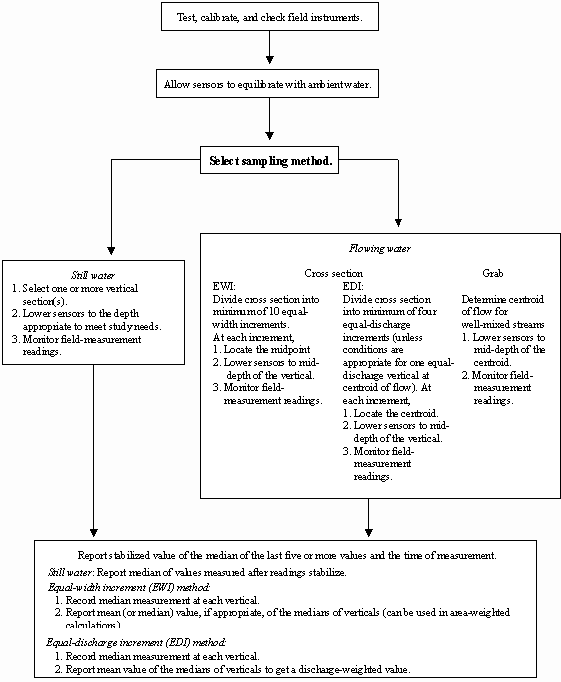
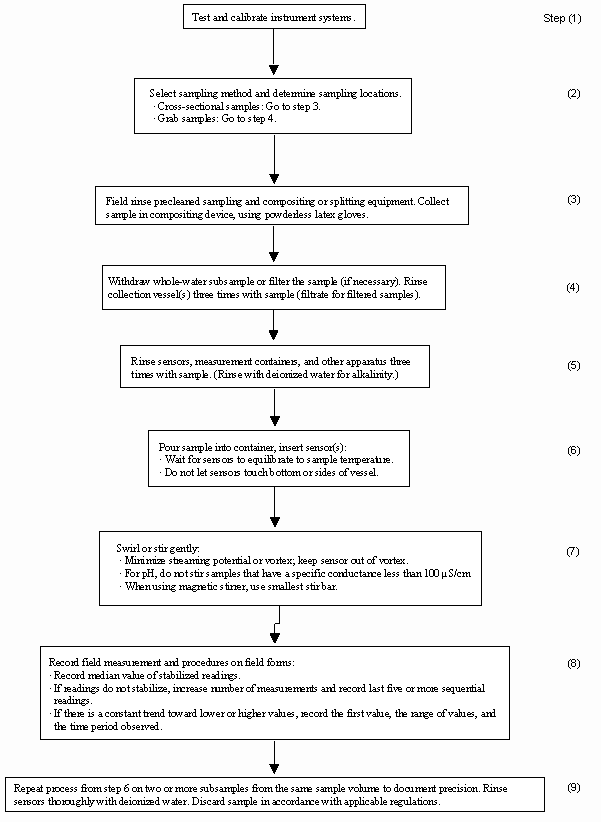
Before making field measurements, sensors must be allowed to equilibrate to the temperature of the water being monitored. Allow at least 60 seconds (or follow the manufacturer guidelines) for sensors to equilibrate with sample water. Sensors have equilibrated adequately when instrument readings have stabilized. Record the median of the final three or more readings as the value to be reported for that measurement point. When field measurements are made with a multiparameter instrument, it is preferable to place the sonde in the water body to be sampled and allow it to equilibrate in the DO mode while the streamflow is measured. Field measurements should be made in-place if possible (at the centroid of flow) if the stream visually appears to be completely mixed from bank to bank. In-place measurement is necessary to avoid changes in chemical properties of anoxic water. Subsample measurements are necessary for alkalinity determinations. Flowcharts of general in-place and subsample field-measurement procedures are shown in figures 1 and 2.
If the water depth for a grab sample is less than 1.5 ft, field measurements should be made at a depth equal to one-third of the water depth measured from the water surface. If the water depth at the sampling point is greater than 1.5 ft but less than 5 ft, temperature, pH, DO, and specific conductance should be measured at 1 ft below the surface. If the water depth at the sampling point exceeds 5 ft, a vertical profile of temperature, pH, DO, and specific conductance should be made using a multiparameter instrument. When it is not possible to do a profile of field measurements, these measurements should be reported at a water depth of 1 ft. When sampling reservoirs, bays or estuaries, and barge or ship channels that are 5 to 9 ft deep, measurements should be recorded at depths of: 1 ft below the surface, mid-depth, and 1 ft above the bottom. For the same water bodies that are 10 ft or greater in depth, measurements should be recorded at 1 ft below the surface and at each 5-ft interval below the surface. If the distance from the last measurement to the bottom is greater than 5 ft, take a measurement at 1 ft above the bottom. If the distance is equal to or less than 5 ft, do not take another measurement. If the total depth exceeds 60 ft in reservoirs, intervals can be extended to 10 ft. All intervals should be equal. In coastal ship channels that are 10 ft or greater in depth, measurements should be recorded at 1 ft below the surface and at each 10-ft interval below the surface. If the distance from the last measurement to the bottom is greater than 5 ft, take a measurement at 1 ft above the bottom. If the distance is equal to or less than 5 ft, do not take another reading.
StreamflowFor sites where a flow measurement is necessary, always measure flow, read the USGS or IBWC flow gage, or obtain a flow value at a later date from the USGS or IBWC. Measure and record flow after recording visual observations. Do not collect water samples in the area disturbed during a flow measurement. At sites with a USGS or IBWC flow gage, observe and record the gage height to the nearest hundredth of a foot in the field logbook. Contact the office responsible for the gage and obtain the flow (in cubic feet per second) that corresponds to the gage height. If there is any doubt about the accuracy of the gage-height reading, sampling personnel should measure the flow if possible. USGS gage heights can be measured by one of the three methods: staff gage, wire weight, or bubble gage. Staff gages are black and white steel plates with the appearance of large measuring tapes bolted to a stable structure. Gradations in feet, tenths of a foot, and two-tenths of a foot should be recorded (where the water level hits the gage) to the nearest hundredth of a foot. Wire-weight gages house a weight attached by wire cable to a graduated reel (gradations are tenths and hundredths of a foot) with a counter at one end. The weight should be lowered to touch the surface of the water (causing a slight ripple). At that position, the counter value should be recorded to the nearest whole number and the point indicated by the stylus on the graduated reel to the nearest hundredth of a foot. The wire-weight gage could be a movable type to accommodate braided streams. If the gage needs to be moved, use the correction value on the bridge near the repositioned gage location.
Bubble gages are installed in USGS gage houses, which are locked with a USGS key. The bubble gage uses a data logger attached to a pressure transducer system to indicate gage height in feet. Gage houses can also contain stilling wells with staff gages on the inside wall of the well. If no nearby USGS flow gages can be accessed to determine streamflow, personnel should measure flow. A summary description of the USGS conventional current-meter flow-measurement procedure is included here for general guidance (mid-section method to determine discharge). A current-meter measurement is the summation of the products of individual subsection areas of the stream cross section and their respective average velocities. In the mid-section method of computing a flow measurement, it is assumed that the velocity sample at each vertical represents the mean velocity in the individual subsection areas.
Flow-measurement equipment required includes: (1) current meter or flowmeter, (2) top-setting wading rod (marked in tenths of a foot), and (3) tape measure or tagline (marked in tenths of a foot). The current meter or flowmeter brands or equivalent can be: Marsh-McBirney electronic, Montedoro-Whitney electronic, Price pygmy (with timer and beeper), Price meter, or Type AA (with Columbus weight).
The first step in streamflow measurement is selecting a cross section across the total width of the stream. Select a straight reach where the streambed is uniform and relatively free of boulders and aquatic growth. The flow should be uniform and free of eddies, dead water near banks, and excessive turbulence. If necessary and possible, modify the measuring cross section to provide acceptable conditions by building dikes to cut off dead water or removing rocks, weeds, and debris in the reach of the stream 1 to 2 m upstream from the cross section. After modifying a streambed, allow the flow to stabilize before starting the flow measurement. Determine the width of the stream by stringing a measuring tape from bank to bank at right angles to the direction of flow. Next, determine the spacing or width of the verticals. Space the verticals so that no subsection has more than 5 or 10 percent of the total discharge within it (according to agency guidelines). If the stream width is less than 5 ft, use vertical spacing widths of 0.5 ft. If the stream width is greater than 5 ft, the minimum number of verticals is 10 or 25 (according to agency guidelines). The preferred number of verticals is 20 to 30. At the first vertical in a stream greater than 2.5 ft deep, face upstream (stand at least 1.5 ft downstream and off to one side of the flow sensor) and lower the velocity meter to the channel bottom; record its depth, then raise the meter to 0.8 and 0.2 of the distance from the stream surface, measure the water velocities at each level, and average them. The top-setting wading rod allows the user to easily set the sensor at 0.8 and 0.2 of the total depth by using the markings on the rod. Each single mark represents 0.10 ft, each double mark represents 0.50 ft, and each triple mark represents 1.00 ft. If the depth is less than 2.5 ft, only one measurement is required at each vertical measurement section, at 0.6 of the total depth.
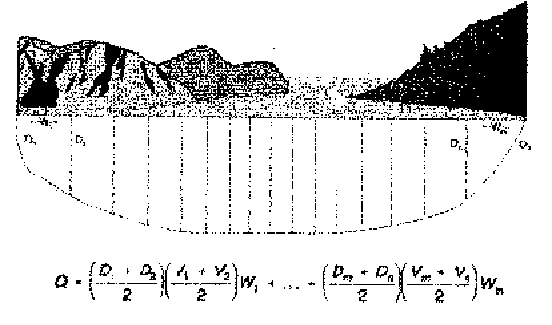
The wading rod should be kept vertical and the flow sensor kept perpendicular to the tape rather than perpendicular to the flow while measuring velocity with an electronic flowmeter. When using a pygmy meter, the instrument should be perpendicular to the flow. Move to the next vertical and repeat the procedure until you reach the opposite bank. Once the velocity, depth, and distance of the cross section have been determined, the mid-section method can be used for determining the discharge (formula in fig. 3). Compute the discharge in each increment by multiplying the averaged velocity or single velocity in streams less than 2.5 ft deep in each increment by the increment width and averaged depth (or single depth in streams less than 2.5 ft deep). (Note that the first and last increments are located at the edge of the stream and have a depth and velocity of zero.) Add the discharges for each increment to compute total stream discharge. Record the flow in liters (or cubic feet or cubic meters) per second in your field book.
Field measurements of temperature should include both air-temperature and water-temperature readings. Because of possible environmental contamination if broken, mercury-filled thermometers should not be used. Field temperatures should be determined using a thermistor. A thermistor is an electrical device made of a solid semiconductor that has a high temperature coefficient of resistivity. Thermistor calibration should be checked in the laboratory or office using an American Society for Testing and Materials (ASTM) thermometer. Air-temperature readings should be made by placing a dry thermistor in a shaded area protected from strong winds, but open to adequate air circulation. Avoid areas that might have radiant heat such as near metal walls or sides of vehicles. Allow the thermistor to equilibrate 3 to 5 minutes before recording the temperature. Water temperatures should represent the mean temperature of the stream at the time of the observation. A horizontal and vertical cross-section profile will determine the variability, if any. Streams with highly variable temperature profiles should have several readings averaged to use as the mean, and those variations should be documented. Streams with fairly uniform temperatures (less than 2 �C variance 95 percent of the time) generally will have one measurement that can be made and reported as the stream temperature. In wadeable streams, stand so that a shadow is cast upon the site for the temperature measurement. Hold the thermistor or probe by its top and immerse it in the water. Allow it to stabilize for at least 1 minute, then read and record the temperature to the nearest 0.1 �C without removing from the water. When temperature cannot be measured in-stream, it should be measured in the container used for the collection of water samples. The following conditions must be met when measuring temperature from a container.
Calibrate the pH sensor according to manufacturer directions. The pH function should be calibrated each day of use for multiparameter instruments. To detect any drift in instrument reading during the course of sampling, postcalibration often is recommended.
In-Place MethodPreferably, pH is measured directly in-stream at the depth(s) specified earlier in this section. Allow the pH probe to equilibrate for at least 1 minute before pH is recorded to the nearest 0.1 standard unit.
Subsample MethodIf pH cannot be measured in-stream, it should be measured in the container used for water-sample collection. The precautions that must be taken when using a container to make field measurements of pH are the same as those specified in the Temperature section above.
If the pH-meter value does not stabilize in several minutes, out-gassing of carbon dioxide or hydrogen sulfide, or settling of charged clay particles might be occurring (Wells and others, 1990).
Measuring alkalinity in the field is useful because it can be used to check the cation-anion balance of a solution. When all major cations and anions have been determined, the sum of the cations, in milliequivalents per liter, should equal the sum of the anions expressed in the same units. In almost all natural waters, alkalinity can be assigned entirely to bicarbonate and carbonate, two of the three major anions. Alkalinity, which refers to the acid-neutralizing capacity (ANC) of solutes in a water sample, is reported in equivalents (or milliequivalents or microequivalents) per liter and consists of the sum of titratable carbonate and noncarbonate chemical species in a filtered water sample. Alkalinity and concentrations of bicarbonate, carbonate, and hydroxide species are determined using either the inflection point titration (IPT) method or the Gran function plot method to analyze the titration data. The IPT method is adequate for most waters and study needs. The IPT and Gran methods require electrometric titration of a sample with incremental additions of sulfuric acid (H2SO4) of specified normality. A digital titrator is popular because it is more convenient and less fragile than a buret and keeps the acid in a virtually closed system. The following equipment and supplies are used for alkalinity digital titrations:
Note: Most natural waters require 0.1600N acid, and common sample volumes are 50 or 100 mL in 100 or 150 mL beakers, respectively.
The following steps summarize alkalinity titration procedures:
If pH is greater than 8.1, titrate slowly (to determine carbonate species) in small increments, to less than 8.1 pH.
Slowly add titrant in replicate increments no greater than 2 to 3 digital counts until pH of the sample is about 8.0, to determine the carbonate inflection point. Record pH and digital counter reading after each addition of the titrant. Larger increments can be used for samples containing high carbonate concentrations.
If pH is less than 8.1, titrate rapidly, in large increments, to pH of 5.5 (for specific conductance less than 100 �S/cm) and pH not less than 5.0 in carbonate systems. Continue titration in small increments to 4.0 pH.
If pH is less than 5.0, titrate cautiously, in increments of 1 to 3 digital counts from pH 5.0 to 4.0. The most sensitive part of the titration is between pH 4.8 and 4.3 for many natural waters. Titrate to lower pH if noncarbonate contribution is large.
Compute alkalinity in the field using the following equation:
| Alkalinity (meq/L) = | mLacid x N (meq/mLacid x 1,000 mL/L) | . |
|
|
||
| mLsample |
To determine concentrations of carbonate alkalinity and contributing species, plot the change in pH divided by the change in digital counts against the digital counts of the titrant or the tabulate the change in pH divided by the change in digital counts. The factors and equations used for the 0.1600N titrant cartridges (commonly used for natural systems) are as follows:
(Note: milliliters of acid used is shown as digital counts for HachTM titrator)
| Alkalinity (meq/L) = | B (D3) (Cacid) | , |
|
|
||
| mLsample |
| Carbonate (mg/L as CO3) = | A (D1) | , |
|
|
||
| mLsample |
| Bicarbonate (mg/L as HCO3) = | (B - 2A) (D2) | , |
|
|
||
| mLsample |
| Hydroxide (mg/L as OH) = | (A - C) (D4) | , and |
|
|
||
| mLsample |
| Alkalinity (mg/L as CaCO3) = | B (D3) | . |
|
|
||
| mLsample |
where
| mLsample | = | volume of the sample, in milliliters, |
| A | = | digital count from the initial pH to the inflection point near 8.3, |
| B | = | digital count from the initial pH to the inflection point near 4.5, |
| C | = | digital count from the inflection point near 8.3 to the inflection point near 4.5, |
| D | = | digital titration factor, and |
| Cacid | = | concentration of the acid. |
D1 for 0.1600N titrant = 12.0; D2 = 12.2; D3 = 10.0; and D4 = 3.4. (Note: D can be recomputed by powers of 10 depending on the normality of the titrant from 1.600N to 0.01600N; for example, D1 for 1.600N titrant would be 120, and so forth.)
Dissolved OxygenDissolved oxygen (DO) is the oxygen freely available in water. DO can be measured either by the Winkler tritration method or with a DO meter, preferably in place at the depth(s) specified earlier in the Field Folders/Field Measurements section. Refer to instrument manual for specific calibration requirements.
Multiprobe InstrumentCalibrate the DO sensor on the multiprobe instrument. The DO probe must equilibrate for at least 90 seconds before DO is recorded to the nearest 0.1 mg/L. Care must be taken at profile stations to ensure that the reading is stable for each depth. Because DO takes the longest to stabilize, record this parameter after temperature, pH, and specific conductance. If the DO probe has an operable, automatic stirrer attached, the DO probe does not have to be manually stirred. However, if the probe is not equipped with an automatic stirrer, manual stirring must be maintained by raising and lowering the probe at a rate of 1 ft/s without agitating the water surface. If the stream velocity at the sampling point exceeds 1 ft/s, the probe membrane can be pointed upstream into the flow and manual stirring can be avoided (Wells and others, 1990). To detect any drift in instrument readings during the course of sampling, postcalibration often is recommended.
Winkler Titration MethodIf the electronic DO probe is inoperable, DO should be measured by Winkler titration (Texas Natural Resource Conservation Commission, 1997). A Winkler titration kit includes:
The following steps summarize Winkler titration procedures:
Samples prepared with the addition of sulfamic acid can be stored for 4 hours before completion of the Winkler titration. Samples can be stored for a maximum of 6 hours in the dark if the bottle is stored at the temperature of collection or water-sealed by putting water around the lip and kept at 10 to 20 �C (American Public Health Association, 1995).
As soon as the precipitate has completely dissolved as a result of acidification, the sample is ready to titrate.
The total volume (in milliliters) of PAO used in the titration is equal to the DO concentration, expressed in milligrams per liter. The DO concentration from the titration should be recorded to the nearest 0.1 mg/L. For a 200-mL sample, the volume of titrant added is directly proportional to the DO concentration in milligrams per liter. To compute DO for a sample greater or less than 200 mL, use the following formula:
| DO (mg/L) = | 200 | . |
|
|
||
| sample volume x titrant added (in mL) |
Some DO meters report measurements that are not compensated for salinity. Field DO measured with meters that are not salinity compensated and that are measured in waters with specific conductance exceeding 1,800 �S/cm, must be corrected. This correction is made by multiplying the field DO concentrations by a correction factor, which is computed from the following formula:
| F = 1 - | [0.003439 + 0.361] | x | C | , |
|
|
|
|||
| (22.1 + T)2 | 1,000 |
where
| F | = | adjustment factor; |
| T | = | water temperature in degrees Celsius; and |
| C | = | specific conductance in microsiemens per centimeter, |
Corrected DO = field DO x F.
The sample collector should record the corrected DO concentration.
Specific ConductancePreferably, specific conductance is measured directly in-stream at the depth(s) specified in the previous section, Field Folders/Field Measurements. Calibrate the conductivity meter in the lab or field as indicated by agency guidelines. Standards of known conductivity are required for calibration of multiprobe instruments. Conductivity standards should be high enough to encompass expected stream conductivities. This can be obtained from historical data or general knowledge of an area. Allow the conductivity probe to equilibrate for at least 1 minute before specific conductance is recorded to three significant figures (if the value exceeds 100). The primary physical problem in using a specific conductance meter is entrapment of air in the conductivity probe chambers, which is indicated by unstable specific conductance values fluctuating to as much as 100 �S/cm. The entrapment of air can be minimized by slowly, carefully placing the probe into the water; when the probe is completely submerged, move it through the water quickly to release any air bubbles. To detect any drift in instrument readings during the course of sampling, postcalibration often is recommended.
If specific conductance cannot be measured in-stream, it should be measured in the container used for collection of water samples using the precautions outlined in the Temperature section.
Chlorine ResidualChlorine residual should be analyzed on samples collected downstream of chlorinated effluent discharges or in areas where the presence of chlorine is suspected. Chlorine has an effect on fecal coliform samples, BOD, cyanide, and pesticides/herbicides. If chlorine is present in samples to be analyzed for BOD, cyanide, or pesticides/herbicides, the samples must be treated with sodium thiosulfate to remove the chlorine. Chlorine residual should be analyzed on a grab sample using the N,N-diethyl-p-phenylenediamine (DPD)-ferrous ammonium sulfate (FAS) titration or using the DPD colorimetric procedure.
Chlorine residual DPD-FAS titration procedure:
A standard solution of FAS must be made up fresh monthly and stored in a cool, dark place. It is recommended that small amounts of the standard solution be carried into the field and replaced daily. The following is the procedure for making FAS:
Make a small amount of (1:3) sulfuric acid (H2SO4) by adding 5 mL of concentrated H2SO4 to 15 mL of water in a 200-mL beaker. CAUTION: ALWAYS ADD ACID TO WATER. A large beaker is required so that the heat generated by the mixing of acid to water will dissipate. This solution can be stored in an amber glass bottle.
In a 1,000-mL volumetric flask, add approximately 500 mL of distilled water and then add 1 mL of (1:3) H2SO4. Add 1.106 g of FAS crystals to this solution. After the crystals are completely dissolved, add enough distilled water to bring the volume to exactly 1,000 mL. Transfer the FAS solution to a dark plastic bottle. Invert the bottle several times to mix the solution. Store in a cool, dark place.
Analysis for Chlorine ResidualMeasure 100 mL of sample in a graduated cylinder and transfer to a 250-mL Erlenmeyer flask or beaker. Add the contents of four DPD powder pillows for total chlorine analysis. If chlorine is present, a red or pink color should develop. High chlorine residuals might produce a temporary red color followed by a yellow color. If this occurs, perform the analysis using a smaller volume of sample diluted to 100 mL with distilled water.
Fill a pipette with FAS and titrate until the red color disappears. Record the volume of FAS used. Disregard the reappearance of the pink color after a few minutes.
If manganese is present in the sample, it will interfere with the chlorine residual analysis and must be corrected. Collect the same volume of sample (100 mL) and add 0.5 mL of sodium arsenite solution (5 g/L) and four DPD powder pillows for total chlorine analysis. Wait 3 minutes, then titrate until the red color disappears and record the volume of FAS used.
To compute the chlorine residual, use the following formula:
mg/L of total chlorine = mL FAS used x 100 mL of sample used.
Fecal indicator bacteria are used to assess the quality of water because they are not typically disease causing but are correlated to the presence of several waterborne disease-causing organisms (pathogens). The concentration of indicator bacteria (the term "indicator bacteria" is used synonymously with fecal indicator bacteria in this document) is a measure of water safety for contact recreation or for consumption. The identification and enumeration of indicator bacteria measure the sanitary quality of water.
To collect samples for indicator bacteria in flowing streams, dip the sample container (sterile, unrinsed) to a depth of about 4 in. with the open end facing upstream. Push the mouth of the container upstream at this depth until the container is nearly full. The mouth of the container should at all times be upstream of the sample collector, sampling apparatus, and any disturbed sediments. To collect samples for bacteria in reservoirs and coastal waters, dip the container to a depth of about 4 in. The mouth of the container should be pushed at this depth away from the boat, sample collector, sampling apparatus, and any disturbed sediment. Leave enough airspace (5 to 10 mL) in the top of the sample container to help mix the sample when it is shaken just before filtration. Bacteriological samples should be collected at the same locations as field measurements and water-quality samples.
Always use a sterile container such as a new Whirlpak bag or precleaned (autoclaved) plastic or glass bottle to collect the sample. Immediately chill samples in an ice chest or refrigerator at 1 to 4 �C. Do not freeze samples. Begin analyses as quickly as possible, preferably within 1 hour but not more than 6 hours after sample collection, to minimize changes in indicator bacteria density.
The membrane filtration (MF) and most probable number (MPN) methods are used for the identification and enumeration of indicator bacteria. For general use, the MF method is preferable to the MPN method because it is easy to do, does not require a formal laboratory setting, and can be used to process samples in the field. Portable incubators that run off car batteries are available for analyzing fecal coliform samples in the field. MF analysis requires several types of media and reagents, which are dependent on the indicator. The necessary media and reagents include sterile buffered water (buffer), agar- or broth-based selective and differential growth media, and media and reagents for additional biochemical identification. Buffer is used to dilute samples and to rinse the MF apparatus and utensils. It can be purchased from laboratories of use. Culture media (usually available in premeasured packages or ampules) can be obtained from certain laboratories or supply companies. Follow instructions for storage and use.
The following steps summarize the MF method:
Note: Always refrigerate bacterial media until it is expired and avoid exposure to warm temperatures in a vehicle.
The following sterilization procedure is best performed when filtering is finished for the day. If the apparatus has been sterilized in this manner before storage, this step does not need to be done at the beginning of the next filtering exercise.
To run a blank, follow the same procedure as above but use about 20 mL of buffer. The blank helps monitor the effectiveness of the method. If colonies appear on the blank, all data from samples that were filtered at the same time as the blank should be discarded. A minimum of one blank should be run per group of samples analyzed.
Record the volumes of samples filtered each time, the time and the date the samples were collected and filtered, and the initial temperature of the incubator. Incubate the fecal coliform samples for 22 to 24 hours at 44.5 �C � 0.2 �C. At the end of the incubation period, record the incubator temperature and the time the samples were removed from the incubator.
The field sheets or field logbook should contain the following information about the bacteriological analyses:
Count and record the number of individual, distinct, round, blue colonies on each filter. Counting colonies is preferably accomplished with a dissecting microscope or a hand-held magnifying lens. The ideal number of colonies on the plate is 20 to 60. Often in the summer months, a pink, thermophilic bacteria can overgrow the coliform colonies. The only way to cope with this is to reduce the volume filtered to about 5 mL.
Occasionally, the culture plate will produce many very small blue colonies that range in size from 1/50 to 1/10 of the size of coliform colonies. Do not count these "pretenders." Compute the density of fecal coliform bacteria in the original samples and record the value as the number of cols./100 mL. For ideal plate counts, report bacteria density by the following guidelines:
| 1st sample |
|
20 cols. | 2nd sample |
|
55 cols. | = | 75 cols. | . | |
|
|
|
|
|||||||
| 5 mL | 20 mL | 25 mL |
| 75 cols. | = | 3 cols. | = | 300 cols. | . (Report this density.) |
|
|
|
|
|||
| 25 mL | 1 mL | 100 mL |
For counts where one sample has less than ideal colony counts (20 to 60 cols.), report the density computed from the plate with 20 to 60 cols. For plate counts less than 20 cols., compute and report a combined fecal coliform density for the sample. For example:
| 0 cols. | + | 3 cols. | = | 3 cols. | = | 0.1 col. | x 100 mL = | 10 cols. | . |
|
|
|
|
|
|
|||||
| 10 mL | 20 mL | 30 mL | 1 mL | 100 mL |
For plate counts greater than 60 cols., make the following evaluations:
If you can make an accurate count of discrete fecal coliform colonies on one or both filters, compute and report the density of the colonies. Usually when the density on the filter exceeds 100 cols., competition for space and nutrients suppresses growth, giving erroneously low counts. Thus the count should be expressed as 'greater than' whatever the count reveals. If growth is confluent, report a minimum estimated value by assuming a count of 60 cols. on the basis of the smallest volume filtered (Myers and Wilde, 1997).
If no colonies appear on the plates, report a value, dependent upon the volume filtered, that represents the method detection limit. Combine the two volumes filtered to maximize the sample size. Report the fecal coliform density as less than the value computed by this procedure, using the symbol "<" for less than the detection limit.
The fecal coliform test is performed according to a universally standard procedure. The data are useful only for comparison to other data obtained using the same procedure or to standards criteria. If the test cannot be performed successfully, then no result should be reported. However, the field sheet or field logbook should indicate by notes (interference by competing organisms, exceeded holding time, exceeded incubation time, and so forth) that the test was attempted.
Sampling equipment should be assembled, checked, and calibrated just before a sampling trip. This includes assuring that every piece of equipment that might be needed is available, the equipment is in good working order, power supplies/batteries are fresh, and meters hold their calibrations. If meters or equipment are in questionable shape, bring along a replacement. An extensive checklist of sampling equipment and supplies is listed in Appendix B. Always clean and/or decontaminate equipment before use. Consult with your agency about cleaning procedures for various sampling protocols and their respective analytical accuracy requirements such as parts per million and parts per billion. To avoid cross contamination during transport to the sampling site(s), wrap inorganic equipment in plastic and organic equipment in aluminum foil.
Before attempting to collect water-quality samples, be aware of the applicable health and safety requirements. Often, samples are collected at contaminated sites or in remote, rugged country far from immediate medical attention. For these and other safety concerns, field personnel should consider the following recommendations:
The selection of water-quality sample-collection equipment is dependent on and should be appropriate to the desired DQOs and their respective suggested methods as outlined in tables 1 and 2. If a grab sample is suggested, select a nonisokinetic sampler on the basis of physical/environmental/mechanical constraints and safe operation of the equipment. If a cross-sectional sample is suggested, select isokinetic samplers on the basis of safety and physical/environmental/mechanical constraints. Appendix C contains general guidelines for selecting sampling equipment on the basis of construction material and target analyte(s). If you are sampling for the presence of heavy metals, do not use samplers with metal components. When sampling for organics, avoid using samplers with plastic components, as the plastic may adsorb and contaminate the samples. Do not forget to decontaminate equipment before use. Once the equipment is decontaminated, wrap inorganic equipment in plastic and organic equipment in aluminum foil for transport to the site.
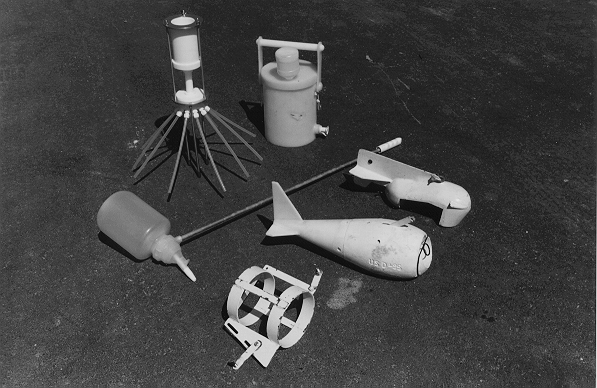
Generally water-quality samplers are either isokinetic or nonisokinetic. Isokinetic means the sampler operates in such a way that the water-sediment mixture moves into the sampler with no change in velocity as it leaves the ambient flow and enters the sampler intake. Isokinetic depth-integrating samplers (used for cross-sectional sampling) are either hand-held samplers or cable-and-reel samplers. Appendix D lists various isokinetic samplers and their operational ranges, which are based on maximum velocity and depth available from FISP. Figure 4 shows several types of water-quality sampling equipment.
A detailed discussion of water and suspended-sediment samplers is given in Edwards and Glysson (1998). Nonisokinetic samplers (used for grab sampling) include open-mouth samplers, such as hand-held bottles, disposable bailers, buckets, or cubitainers; weighted bottles; and BOD and volatile organic compound (VOC) samplers. Thief-type samplers, such as the Kemmerer or Van Dorn, are used to collect instantaneous discrete (point) samples primarily from lakes, reservoirs, and bays and estuaries. Single-stage samplers such as the U-59 and U-73 were designed to obtain suspended-sediment samples from streams at remote sites or from streams where rapid changes in stage make it impractical to use a conventional isokinetic depth-integrating sampler. Automatic pumping samplers that have fixed-depth intake(s) sometimes are used to collect samples at remote sites; from ephemeral, small streams; or from urban storm drains where stage rises quickly.
The goal of equipment cleaning is equipment decontamination -- the removal from new equipment of residues from construction and machining and the removal of substances adhering to equipment from previous exposure to environmental and other media. Equipment used for sampling (sample collection, processing, and handling) must be cleaned before being used. The level of cleaning with extensive soaking and rinsing is dependent on the analytical precision level required in the sampling plan.
A brief overview of the major steps of equipment cleaning is included in this manual. More specific equipment cleaning procedures should be obtained from the sample collector's agency. Most standard procedures require that all sampling equipment is cleaned before use; that equipment is recleaned directly after sample collection before use at the next site to avoid cross contamination between sampling sites; and that field-rinsing of equipment with the water to be sampled, which is not appropriate for all equipment, does not replace cleaning or decontamination procedures.
Before assembling cleaning materials and supplies, determine the materials that the equipment is constructed of (for example, metal, glass, or plastic) and the chemical analytes for which the equipment will be used. For inorganic analytes use cleaning supplies composed of uncolored or white polypropylene, polyethylene, or some other suitable nonmetallic material. Do not use cleaning supplies that can leach metals if equipment will be used for collecting and processing samples to be analyzed for metals and metalloids. For organic analytes use cleaning supplies composed of metal, glass, or polyfluorocarbon materials. Do not use cleaning supplies that can leach organic substances if equipment will be used for collecting and processing samples to be analyzed for organic compounds. Appendix E lists basic cleaning items typically used for cleaning field equipment for water-quality sampling. If possible, prepare separate sets of precleaned equipment for use at each site. Return heavily contaminated equipment to the office for rigorous cleaning before reuse instead of field cleaning. Generally the sequence for cleaning equipment for sampling organic and/or inorganic analytes can be summarized as follows: detergent wash; tap/DIW rinse; check equipment for metal parts; no metal--acid soak; metal parts--DIW soak; methanol rinse; and air dry.
The following detailed equipment cleaning procedures currently (1999) are used for "clean" protocols including "clean hands/dirty hands" (CH/DH) techniques with cross-sectional depth-integrated sampling: