
Topographic Surveying Using the
Sokkisha SET2 Electronic Total Station
With the NEC MOBILE PRO 780 Computer
by Lisa A. Lassner 1and Jeffrey E. Lucius 1
Open-File Report 01-231
2001
This report is preliminary and has not been reviewed for conformity with U.S. Geological Survey editorial standards or with the North American Stratigraphic Code. Any use of trade, firm, or product names is for descriptive purposes only and does not imply endorsement by the U.S. Government.
U.S. DEPARTMENT OF THE INTERIOR
U.S. GEOLOGICAL SURVEY
1
Denver, ColoradoCONTENTS
INTRODUCTIONINTRODUCTION
This report discusses the use of the Sokkisha SET2 electronic total station for topographic surveying. The SET2 is a tacheometer, a device that can rapidly measure distance by optical means. The SET2 EDM (electronic distance measurement unit) utilizes an infrared light beam to calculate distance to a reflecting prism. The SET2 also functions as a theodolite measuring azimuth and zenith angles internally. A NEC MOBILE PRO 780 hand-held computer is attached to the EDM by means of an interface and transforms distance to the target, and its azimuth and zenith relative to the EDM, into x-y-z coordinates. The use of this equipment greatly simplifies topographic surveying and shortens the amount of time spent in the field.
Preliminary considerations, such as equipment inspection and battery care, are discussed first. Next, operating procedures in the field are explained in detail. The remainder of the report discusses the computer program that drives the EDM and equipment and data storage. The appendices contain diagrams of the EDM parts, a listing of the computer program, and addresses of the equipment manufacturers.
The information in this report has been carefully checked and is believed to be accurate. However, no responsibility is assumed for inaccuracies. Users should read through the SET2 Operators Manual, which should be in the SET2 case, especially chapter 16 on precautions and maintenance, before using the SET2 for the first time.
PRELIMINARIES
Equipment inspection
To take full advantage of the "EDM-NEC MOBILE PRO 780 system" bring the equipment listed below into the field.
The following equipment is optional but still very important.
Check the equipment before going into the field. The EDM and NEC Mobile Pro 780 should be connected together through the interface and turned on to verify that all components are working together properly. It is not necessary to actually take measurements but the NEC Mobile Pro 780 should be able to control the EDM. Pack all accessories for the EDM, such as the thermometer, altimeter, instructions and tables, with the EDM in the carrying case. Always transport the EDM in the supplied carrying case. The SET2 is an expensive and delicate instrument. Check the prisms for any cracks, broken glass, stripped threads, etc. Examine the EDM tripod and prism pole for stripped threads, broken parts, etc. Also, check all optional equipment, such as the radio transceivers, portable printer and flash card reader for good operating condition.
Batteries deserve special attention. Nearly every piece of the electronic field equipment requires a battery for operation. It is particularly important, then, that all batteries should be fully charged before going into the field. Charge the batteries several days before leaving so that if new batteries need to be purchased or other problems resolved, there is time to do so. The battery pack in the NEC Mobile Pro is rechargeable as are the batteries in the EDM and (typically) the radio transceivers.
The NEC Mobile Pro runs directly from ROM and therefore if the Mobile Pro does crash the data stored in the system should be intact. There is a risk of data loss when changing the batteries, for the NEC Mobile Pro. To avoid data loss be sure to connect the Mobile Pro to the AC power supply and replace the main battery before disconnecting the supply. There is a back up internal battery in case of emergency but this will only last for a few hours. If the main battery has not been charged for a long time be sure to allow ten hours to recharge both the main and backup batteries. Replace or recharge the main battery immediately if the power of the NEC Mobile Pro turns off. To back up data in case of an emergency, the use of flash cards is recommended. (More information on how to remove or insert battery packs can be found in the NEC Mobile Pro users manual.)
Clearly state the goals of the topographic survey before leaving the office. One of the first considerations should be the precision required. If the data will be used for map production then discuss the range of map sizes and scales that will be utilized. Minimum width of the plotting pens and map scale decide the resolution attainable in the final product. If the survey data are to be used for geophysical data reduction, then as great an accuracy as possible may be necessary. Though the EDM can measure distance fairly accurately, +/- 3 mm + 2 ppm per kilometer, the angular measurement is only accurate to 2" of arc, or 10 ppm (10 mm per km). Knowing the information above, the surveyor can determine the amount of time and care that should be devoted to accurate and precise location of field stations.
Unless there is unlimited time and funding, prioritize the field work. Gather the most important and essential data first. Then as time permits, survey the remainder. If survey data will be used by several parties, discuss their individual needs and requirements. Also, allow extra time for bad weather and other delays. A few moments spent planning in the office before the site visit or in the motel room may save hours of wasted or ill-spent time in the field.
FIELD PROCEDURES
Introduction
The EDM can be used in the field in either of two modes, successive measurement or tracking. In the tracking mode, the EDM takes measurements in centimeters, at first after six seconds then every 0.4 to 1 second, as the reflecting prism is moved slowly, but continuously, along a course. In the successive measurement mode, the prism is moved from station to station with a measurement taken at each station. There is a switch on the front panel of the telescope to select the mode.
The most commonly employed mode in topographic surveying is the successive measurement mode, which is the one discussed in the remainder of this report. In general, follow the procedure below when using the Sokkisha SET2 EDM and the NEC MOBILE PRO 780 computer to survey a site. A known point is any station for which the coordinates already are accurately known. A transfer point is the station at which the EDM is set up to take measurements. Refer to figure 1 for a possible surveying situation.
1. Select the origin and x-axis direction for the coordinate system.
2. Set up and initialize the EDM on the origin (or other known point) and the prism on the x-axis (or some known point).
3. Connect the NEC Mobile Pro 780 to the EDM, and execute the program EDMXYZ on the NEC. This allows the computer to control the EDM.
4. As necessary, move the prism from station to station and follow computer program prompts. The NEC Mobile Pro 780 takes measurements directly from the EDM.
5. As necessary, move the EDM to a transfer point and repeat steps 2 through 4.
6. When finished, or as convenient, backup the data by printing out a copy on the portable printer and by copying the files to the portable disc drive.
7. If the project will continue for more than a day, charge batteries over night.
Selecting a coordinate system
It is important to select a convenient and useful coordinate system, especially if this is the first time that the site will be surveyed. The origin should be a location that is easily found again and somewhat permanent in nature if possible. A USGS benchmark would be ideal. Wells, road intersections, concrete pads also can be used. A metal or wooden stake can be driven into the ground to mark the origin. Likewise, the reference point that establishes the x- or y-axis should also be a feature easily found again and somewhat permanent. It is not necessary that the axes be aligned north-south and east-west because coordinates can be transformed to match any other coordinate system back at the office.
If this is not the first time on the site then the EDM and REFerence stations can be any two locations for which the coordinates are accurately known. If it is not convenient to set up the EDM on a known point, then the EDM can be set up at an arbitrary location (a new origin) and several of the old surveyed points can be re-surveyed. Back at the office the new coordinate system can be transformed to match the old one.
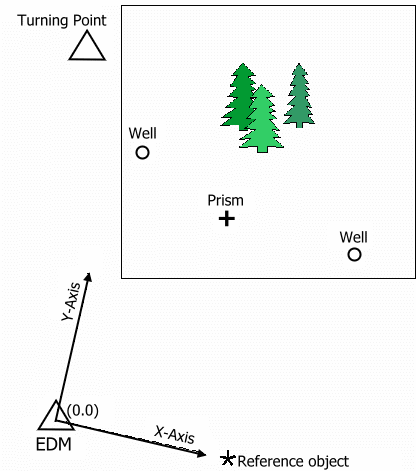
Figure 1. This diagram shows a typical surveying situation. The EDM is set up at an arbitrary but advantageous position to survey in stations inside of a rectangular area. A reference object was determined and the X axis was established in that direction. Two wells are located in or near the survey area. The wells are surveyed to determine their position in the new coordinate system. If the wells are also located in another coordinate system, such as latitude-longitude or UTM, then the new coordinate system established here can be transformed. At least two stations with locations established in another coordinate system are required to transform the new X-Y-Z coordinates. The prism is moved from station to station in the survey area. A few trees are blocking some stations from being seen by the EDM so a turning point must be established (located and surveyed). When the EDM is moved to the turning point, the first EDM location, or the wells, can be used as the reference point to keep the coordinate system consistent. The new stations that are surveyed from the turning point will have the same coordinates as the earlier ones.
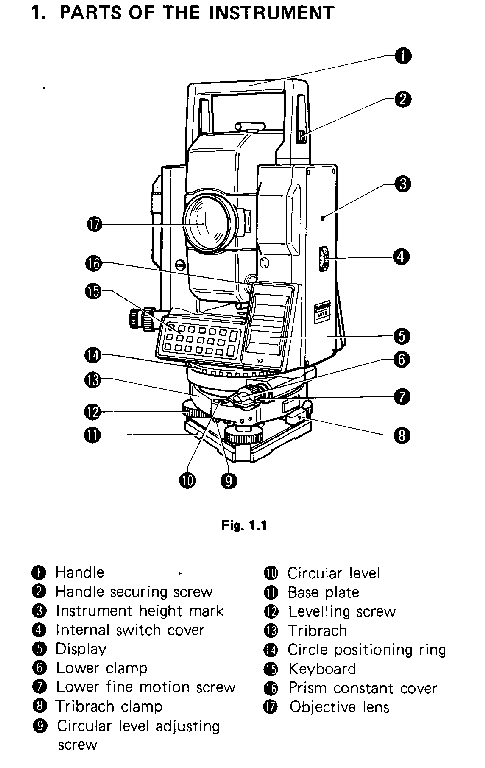
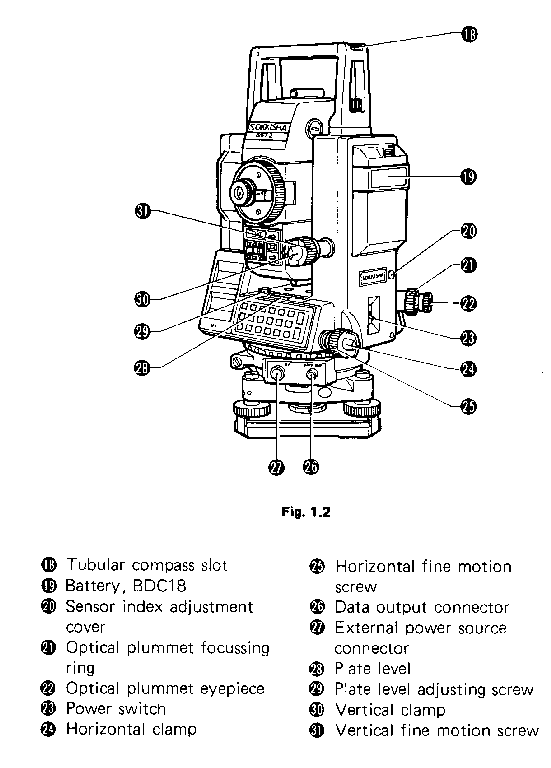
Setting up the EDM.Setting up the EDM involves three things: centering the EDM vertically over the station, leveling the EDM, and initializing the EDM. Refer to the figures in Appendix A for descriptions of the EDM parts. It is assumed that the internal switches and prism constant are set correctly. (See the SET2 Operator's Manual.)
Start by separating the legs of the tripod so that it will stand securely and center it over the station. Place the bracket for the Lietz interface on the tripod head and add the brass extension screw to the base plate knob. Attach the EDM securely to the tripod head, centering the EDM base plate on the tripod. Tighten the base plate knob. The leveling screws on the EDM should be in the middle of their adjustment range. Use the sight (optical plumb) on the side of the EDM to position it over the station. There is a focusing ring on the eyepiece. Move the tripod legs as necessary. Look at the circular level on the tribrach of the EDM to see if it is roughly leveled. Adjust tripod legs accordingly. When close to being centered, the tripod shoes should be pushed firmly into the ground to avoid settling that will disturb the level. It may take several tries to get it right, but leveling the EDM is one of the most important steps in surveying. The EDM must be level and set up exactly over the station to get the most precise and accurate results. The center of the station should be well marked so that the EDM can be positioned to within millimeters.
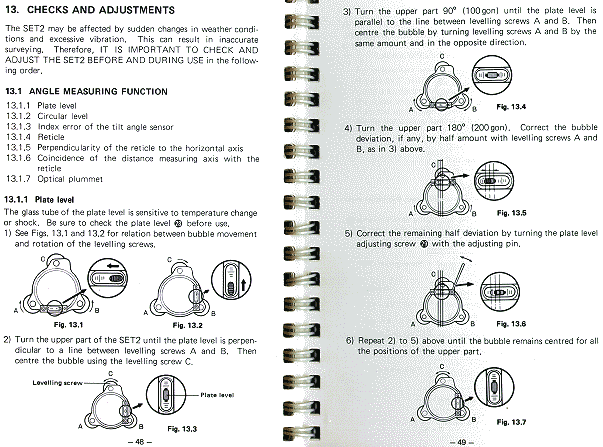
To level the EDM, first use the circular level on the tribrach, moving the tripod legs as necessary to keep the EDM centered over the station. Adjust the tripod legs and leveling screws as necessary. Next use the tubular plate level, which is much more sensitive, to "fine tune" the level. Place the plate level parallel to any two leveling screws. Bring the bubble to the center of its run by turning the two screws by the same amount but in opposite directions. Turn the instrument 90o and use the third screw to bring the bubble back to the center of its run. Repeat these two steps until the bubble remains centered (or close to it) in both positions. If the EDM is now slightly off center of the station, loosen the base plate knob a little and carefully slide the EDM to the correct position and tighten the knob. Recheck the level. The figure below from Section 13.1.1 in the Sokkisha SET2 Operator's Manual illustrates the relationship of the plate level and the movement of the leveling screws.
To initialize the EDM, turn it on. (Note: when installing a battery in the EDM, be sure that the power switch is off.) Loosen both the vertical and horizontal clamps. Do not loosen the lower clamp. In fact, never loosen the lower clamp or adjust its fine motion screw when surveying using the methods described in this report. This will cause loss of azimuthal referencing. Using the telescope plunging knob, rotate the telescope so that the objective lens crosses the horizontal plane. This indexes the vertical circle (zenith angle) so that 0o is straight up, 90o is horizontal and 180o is down. An audio signal is given when the vertical circle is indexed.
Set the atmospheric correction factor by adjusting the part per million (ppm) switch on the telescope. The correction factor can be found from the atmospheric correction chart supplied with the EDM using the current temperature and barometric pressure. Use the real barometric pressure, not the corrected-to-sea-level value given in weather reports. The barometric correction for elevation is approximately 25.4 mm (one inch) of mercury (Hg) for every 305 m (one thousand ft) above sea level. Temperature and pressure control the refractive index of air which is inversely proportional to the velocity of light through the atmosphere. The exact values for temperature and pressure are not critical, but to maintain an accuracy of 2 ppm, temperature must be measured to within 1o C (1.8o F) and pressure to within 5 mm (0.2 in) Hg. Adjust the atmospheric correction factor during the day if there is a substantial change in temperature or barometric pressure.
The last item to initialize is the horizontal angle or azimuth. Line up the telescope on the center of the reference target. Use the peep sight on top to find the target. Often, the prism can be the target positioned at the reference location. However, any object will do. Press the SET button on the EDM. This references the horizontal angle to zero at this position of the telescope.
Finally, press the CA button on the EDM to put it in the proper mode to take measurements. The displays on the EDM should clear. The EDM is now ready to take measurements using the NEC Mobile Pro 780.
Note: to extend battery life, turn the signal audio switch to off.
If the NEC Mobile Pro 780 and the EDM are not attached, do so now. Plug the cables into the NEC Mobile Pro 780 and the EDM and make sure that they are joined with the gender changer. Plug the end of the into the "DATA OUT" connector on the EDM.
Now open the case for the NEC Mobile Pro 780, the unit should start automatically. If not press the POWER button on the upper right hand corner of the keyboard. This program is written for both the WinCE platform used on the Mobile Pro 780, and the Windows 98 platform. The program is written in an object-oriented style using Visual C++ 6.0 Professional Edition and the Win CE toolkit for Visual C++ 6.0. Both programs are available from the author
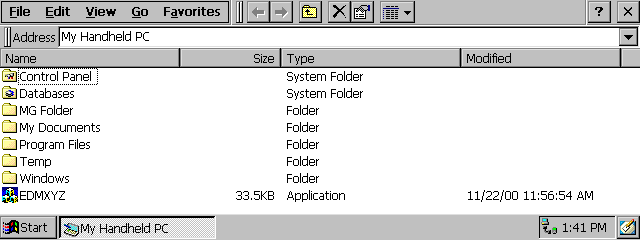
The program EDMXYZ is run from a short cut in the My Handheld PC window below. This window can be opened by double-clicking on the My Handheld PC icon on the desktop of the MobilePro.
To run the program use the stylus to double-click on the EDMXYZ icon or use keystrokes on the keyboard.
Once the program is launched the following window appears:
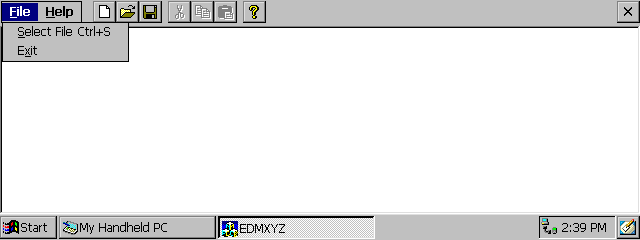
Open the File drop down menu by clicking on the File menu option with the stylus, or by typing Alt-F. Launch the program by clicking on the Select File option, or by typing S. This launches the Output File Selection Dialog box. This dialog gives two options: to append data to an old file, or to create a new file.
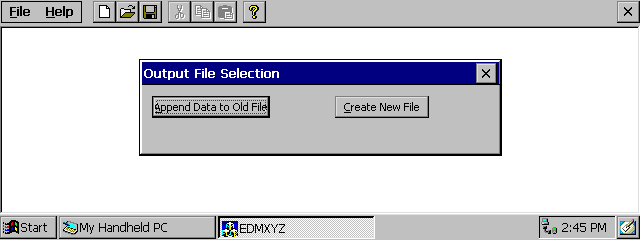
Select one of the two options. This can be done using the stylus, by typing an A for the append option, a C for the create option, or by using the tab and enter keys to select one of the options. Next the File Browser will appear.
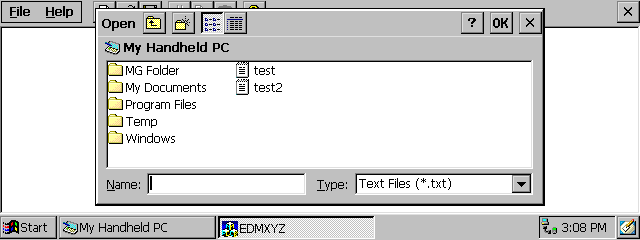
Input the name of the file to be created or opened. This can be done by clicking on a file that already exists with the stylus, or by typing the name into the Name: field. If the create a new file option has been selected but the file name entered already exists new data will be appended to the file. After inputting the name of the file, use the enter key or click on the ok button with the stylus to exit the dialog.
The next window is the setup window for the Reference. Enter in appropriate values for the Reference Comment, Reference X, Y, Z coordinates, the height of the prism(Ref height), and the belt height of the prism carrier. These settings will be used to calculate the X,Y and Z coordinates of the data points.
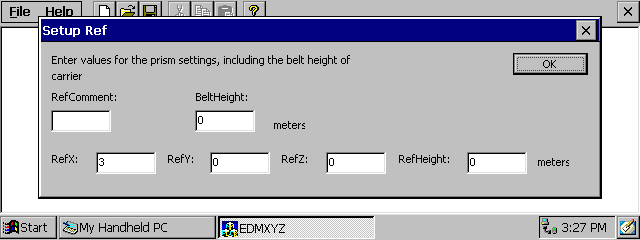
Here are appropriate values for the variables in the Setup Ref dialog:
"RefComment"-- some comment that will help identify the point later
"RefX"-- some positive value, true value not needed
"RefY"-- 0, the reference is on the x-axis
"RefZ"-- any value, true value not needed
"RefHeight"-- the actual measured height of the prism from the bottom of the pole to the center of one of the lenses, in meters.
"BeltHeight"-- the actual measured height of the belt of the prism carrier in meters.
The EDM setup window appears next.
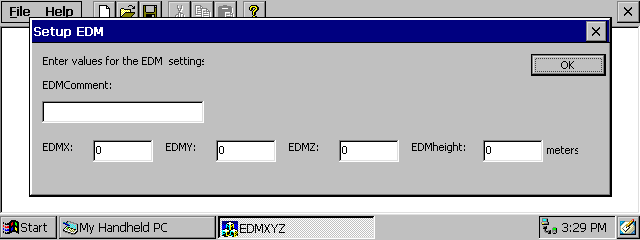
Here are appropriate values for the variables in the Setup EDM dialog:
"EDMComment"-- something appropriate to identify the station
"EDMX"-- 0, or the known value
"EDMY"-- 0, or the known value
"EDMZ"-- 0, or the known value
"EDMHeight"-- the measurement from the benchmark or landmark to the instrument height mark on the EDM standard opposite the battery (this is the center of the telescope pivot)
Only for the initial visit to a site is it necessary to supply true values for the REFerence location. In the calculation of x-y-z coordinates, only the direction to the REFerence is needed, not the actual location. Because the EDM is set up on the origin and the REF on the x-axis, the true values for x and z are not needed (y, of course, must be equal to zero). However, if the EDM and REF are not at these initial locations, then the true values are required.
After the above information is entered, the program is ready to start taking measurements. Place the prism pole on the first station. Use the circular level on the pole to hold the prism vertically above the station. Loosen the vertical and horizontal clamps on the EDM and sight the telescope on the prism. There is a peep sight on top of the telescope to aim it in the general direction. There is an adjusting ring on the telescope eyepiece to focus the cross hairs. Use the telescope focusing ring to focus on the prism. Tighten the clamps and use the vertical and horizontal fine motion screws to sight directly on the prism center. Again, be careful not to disturb the lower clamp or lower fine motion screw as this will cause loss of horizontal angle indexing.
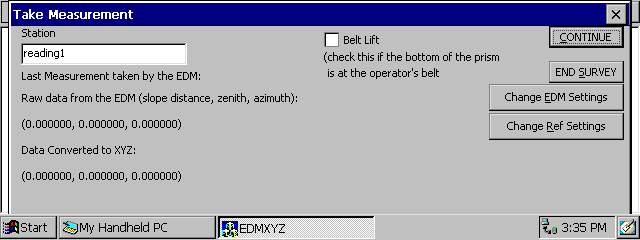
The next window is the Take Measurement window. From this dialog the EDM is given instructions to take measurements. From this dialog the user can specify if a reading is taken with the prism at belt height, change the EDM settings, change the Ref Settings and signal the EDM to take a reading.
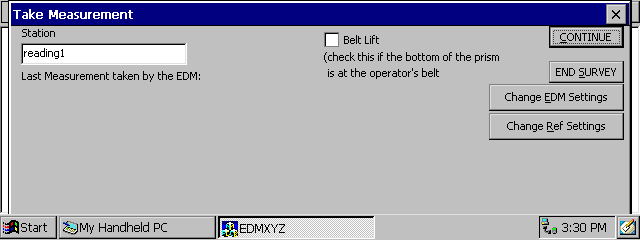
Enter an appropriate comment to identify the station in the box under "Station." If the reading is being taken at belt height check the "Belt Lift" Box. To take a reading hit the "CONTINUE" button with the stylus or type "c". This will give the EDM instructions to take a reading. The data from the reading will appear in the dialog under "Last Measurement Taken by the EDM:." A slope distance of zero, indicates that the laser did not hit the prism correctly. The measurement will need to be retaken in this case.
When the EDM is finished taking a measurement and the results are displayed on the computer screen, signal the prism pole operator to move to the next station. If the stations are more than a few tens of meters from the EDM, radio transceivers makes communication between parties much easier. Assign each station a unique ID string in the "Station" field. A unique identifier string facilitates searching through the data file and reduces confusion if a large number of stations are measured.
To change the EDM or Ref Settings simply click on the corresponding button or hit "e" or "r" accordingly. This will bring up either the Setup EDM or Setup Ref dialogs from the beginning. The values in these dialogs can be changed and will then be used to calculate the data until new values are entered.
To end the survey click on the "END SURVEY" button or hit "s". The data collected by the program has now been entered into the text file that was named at the beginning. This data file can now be opened on the handheld device, saved to the flash card, or transmitted to a PC or laptop by connecting it to the NEC Mobile Pro, and using the data transfer program Active Sync. It can also be printed using an infrared printer connected to the mobilepro.
Here is a sample of the data file:
3.0000 0.0000 0.0000 0.0000 0.0000 0.0000 Ref:
0.0000 0.0000 0.0000 0.0000 0.0000 0.0000 EDM:
0.0000 0.0000 -0.0000 -0.0000 -0.0000 -0.0000 reading1
The first line of the file contains the X, Y, Z coordinates for the reference, the reference height in the slope column and the height of the carrier’s belt in the zenith column followed by a zero in the azimuth column and the ref comment. The following line contains the X, Y, Z coordinates for the EDM, and the height under the slope column followed by two zeros and the EDM comment. This is the format for any line that contains information about the edm or the reference. The lines which contain data from readings will have the data under the appropriate headings and the station comment at the end.
Eventually it may be necessary to move the EDM to survey more stations. When this time comes, the prism pole operator should select an advantageous site to set up the EDM. The site should be accurately marked using a stake, pin or even a rock. Use a pen to mark the center of the station. The prism operator should inform the EDM operator that this station will be the next transfer point (or turning point) so that it can be noted in the ID string for that station. Likewise, a reference point can be selected, carefully marked, and the EDM operator informed so appropriate comments can be made in the computer file. If it is convenient, the present EDM station can be used as the REF for the next EDM station. But this is not required. It is only necessary that the EDM and REF (the prism) be at known points. It may be convenient to write down the transfer point coordinates so that they don’t have to be searched for using the program.
After the new EDM location and REF points are surveyed, move the EDM. It is not necessary to end the program, it will continue to run in suspend mode when the case of the NEC Mobile Pro is closed. Close the case and turn off the EDM. If the move is not far, check that the base plate knob is tight then pick up the EDM, tripod and all, collapse the legs and walk to the transfer point. (This method of transport is not recommended in the SET2 Operator's Manual.) If the move is not short then detach the EDM from the tripod and return the EDM to the carrying case. Repeat the setup procedures discussed above. Be sure that the EDM is positioned exactly over the "X" marking the center of the transfer point to get the most accurate and precise measurements.
Select the Change Ref and Change EDM settings options, and enter in the true values for these locations. An appropriate comment will be made in the data file to identify these points.
You will see that as the size of the data file increases it also takes longer to find stations at the end of the file. Start new files after about every hundred stations or as convenient. Give meaningful names to the files.
Survey the REF station and compare the coordinates with those stored in the program. If the results are different (by more than a few millimeters) then double check that the correct values were entered for the REF and EDM coordinates, and also that the prism is indeed set on the REF point and the EDM on the transfer point.
Backing up the dataThe data can be backed up in several ways. First it can be transferred to a flash card. In this case it is important to have a flash card reader. Simply open the data file and save the data to the flash card. The data can also be transferred to a laptop or PC using the PC-Mobile Pro connector cable which was used to connect the Mobile Pro to the EDM, and the program Active Sync. Instructions on how to use this program will be in the owner’s manual and supplemental materials obtained with the Mobile Pro.
Charge all batteries over night so that they will be fresh for use the next day. Observe the battery charging precautions listed in the EDM operator's manual. Follow the instructions on the individual chargers. The batteries in the NEC Mobile Pro are recharged using the AC adapter.
Equipment Storage
Place the equipment in the appropriate storage cases when transporting. A specially molded plastic case is supplied with the EDM.
After returning from the field, inspect the equipment for good condition, clean if necessary and return to the appropriate storage areas. Fully charge all batteries before storage. Report any problems with the equipment and take appropriate action. Double check that all data files have been backed up onto portable data storage media.
CONCLUSION
This report has presented only one way in which the SET2 EDM can be utilized for topographic surveying. The EDM is capable of providing much more information from its measurements, such as slope reduction, remote elevations, northing and easting coordinates, horizontal distance and height difference between two target points and stake out by distance or coordinates. The SET2 Operator's Manual contains examples of how to use these and
other features.
.
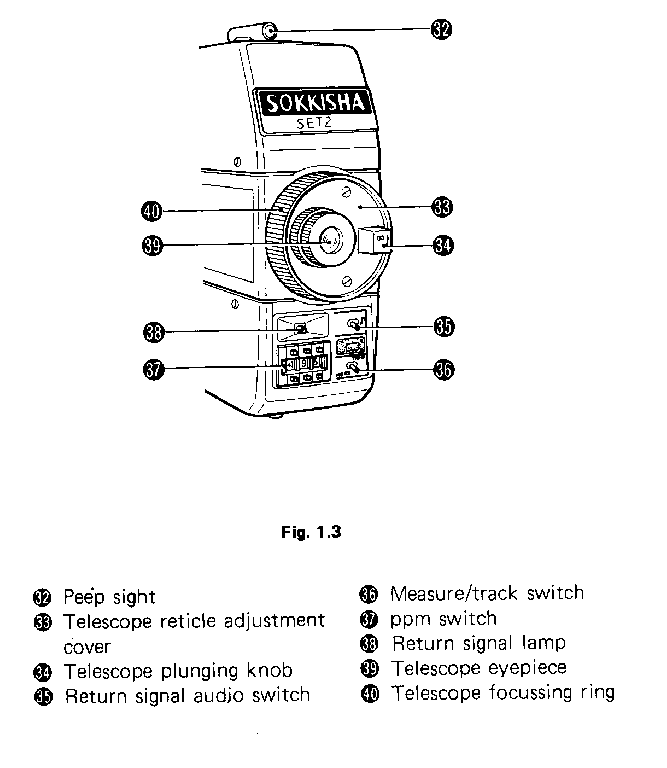
APPENDIX A
Parts of the EDM (copied from the Sokkisha SET2 Operator's Manual).
APPENDIX B
List of Manufacturers
SOKKISHA CO., LTD.