A USGS Marine and Coastal Studies Skill Training Module
Section 2. Analysis of the vibracores
The analysis of the vibracore samples in the lab can be broken down into four key processes. Each process is discussed in the videos and outlined below.
Vibracore Analysis Diagram:
2A. Cutting the barrel
Core barrel
Cut
2A. Cutting the barrel
- Video 2A1.
* Place the barrel into a cutting guide.
* Collect the necessary equipment:
- Safety goggles
- Ear protectors
- Wire splitting tool with handles
- Spatula for splitting core
- Wire cutters
- Circular saw
* A good choice in circular saws is a battery powered model with a multi-tooth blade.
* Design the guide to assure cutting the diagram exactly in the middle.
* Make sure that you have labeled both halves of the barrel.
* Set the depth of the saw blade to assure it just cuts through the aluminum of the
barrel.
* Have an assistant help to hold the barrel and guide while cutting.
- Video 2A2.
* After the first cut, have an assistant help to rotate the barrel 180 degrees and place
it back into the guide. Avoid twisting the barrel during rotation. Complete the cutting
process.
- Video 2A3.
* After both sides of the barrel have been cut, clean the aluminum debris from the area to
avoid contaminating the core.
* Remove the barrel from the guide. Take care to assure the barrel halves stay together in
place.
* Remove the guide from the table.
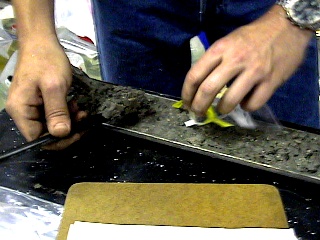
2B. Splitting the core
- Video 2B1.
* Prepare to cut the core using the wire splitting tool.
* If shell or rock fragments are in the core, be prepared to use a spatula to cut around
the obstruction instead of pushing the debris up the sediment sample.
* Work with the wire tool from the bottom of the core to the top. Work your way around and
through the core catcher. Use a wire cutter to cut through the core catcher if necessary.
* Have the assistant hold the barrel tight to avoid the barrel prematurely splitting and
ruining the core sample.
- Video 2B2.
* After the wire tool has cut through the core sample, carefully split the two pieces.
* Be sure both halves are marked.
* Prepare to archive one half of the sample by slightly wetting it and placing it into a
special plastic bag (along with the barrel).
2C. Describing
- Video 2C1.
* Be sure to clean the surface of the core to be sampled. Use a spray bottle and water to
dampen the surface.
* Use a spatula to smooth the core surface.
* Run a tape measure down the length of the core for a reference point for the
description.
- Video 2C2.
* Visual description of the core is based on parameters that are outlined on a vibracore
description sheet that is referenced on the intervals based on the tape measure.
2D. Sampling & archiving - Video 2D.
* Be sure to know ahead of time (before approaching the core) what kind of analysis you
will be doing. This is important since it relates to the intervals to be marked on the
core.
* In this example, where we are doing grain size analysis, the samples will be taken in
two centimeter intervals down the length of the core.
* Be sure to have the core description sheet handy for reference.
* Mark two centimeter intervals in line with the tape. Be as accurate as possible.
* Be sure to sample in the center of the core. This will avoid distortions along the sides
of the core and any contaminates that may have penetrated the core during the barrel
cutting operation. Also, be sure not to penetrate the sample too deeply for the same
reasons.
* Carve out the sample interval using a tool like a spatula.
* Sub sample the sediment into a two ounce sample bag. Be sure to label each bag just
prior to sampling.
* Depending on the analysis be sure to get sufficient quantity of sample. As an example in
a fine grain size analysis, five grams wet weight is sufficient. For course grain analysis
it is important to increase the sample quantity. In this case increase the sample
interval.
* Remember to wear gloves when a chemical analysis is required to avoid contamination of
the sample.
* In grain size analysis be sure to keep your hands clean to avoid contaminating the
samples.

2B. Splitting the core

2C. Describing
2D. Sampling
Sample area
First |
Previous |
Next |
Credits |
Index |
Exit |