A USGS Marine and Coastal Studies Skill Training Module
1A. Core catcher preparation
The manufacture and preparation of the core catcher can are broken down into four major steps. Each step is discussed in detail and outlined in the text below.
Core Catcher Diagram
1A1. Manufacture - Video 1A1.
* The core catcher is installed in the core barrel and is used to keep the sediment
from falling out of the barrel as the core is pulled out of the sediment.
* Use brass shim for the raw material (recommended thickness is 0.01 - 0.015).
* Cut shim lengths dependant on the barrel diameter. e.g. a three inch barrel will use a
shim 9.25" to 9.50" long ( with 12 fingers) for the correct overlap during
fastening to the barrel.
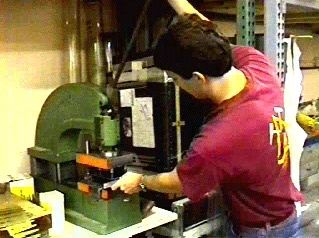
* Punch out the core catcher fingers using a hydraulic punch. Note: The number of fingers
can vary with the type of sediment to be sampled. For example, close spacing is better for
sand and clay. Pre-mark the desired finger length measurement on the punch to facilitate
stamping.
1A2. Preparation - Video 1A2.
* Bend the core catcher into a curl to fit the barrel.
* Next bend the fingers down towards the center of the curvature. Use two bends instead of
just one and assure that the fingers just meet in the center of the curvature when
inserted in the barrel.
* Be sure to overlap the ends of the shim as it is inserted into the barrel. Push the shim
into the barrel until the bottom edge is flush with the end of the barrel.
* Use vice grips to secure the shim to the barrel.
1A3. Insertion - Video 1A3.
* Be sure to clamp the shim to the opposite side of the overlap. This will facilitate a
good flush fit of the shim to the barrel and prevent buckles.
* Use 1/8" pop rivet of medium length to fasten the shim to the barrel.
* Use an 1/8" drill to drill the holes through the barrel and the shim. Ream out the
hole slightly.
Note: be sure the hole is about .25 inches in from the barrel edge or about 1/2 way
from the edge of the shim to the base of the core catcher fingers.
* Pop rivet the first hole and proceed with drilling the next hole.
* As a rule of thumb use six rivets on a 3" barrel. The number of rivets is usually
determined by the time available for fabrication.
1A4. Final attachment - Video 1A4.
* As you come to the overlap care must be taken to assure a proper riveting operation
through the overlap.
* Clamp the lower part of the overlap first and then the upper part.
* Drill through the barrel and overlapping shim. If the shim bends down, use a vice grips
to reposition it correctly and re-drill.
* After pop riveting the overlap, inspect your installation to assure it is properly
completed.
2. Preparation
3. Insertion in barrel

4. Final attachment
Note: during the drilling process, the holes
should be about 1/2
way between the edge and the base of the core catcher fingers.
First |
Previous |
Next |
Credits |
Index |