LandView IVLandView IV is a public domain desktop mapping system used to perform database access and and spatial data display. This system is designed to browse and display detailed Census TIGER/Line® 98 Data (such as roads, rivers, place names), U.S. EPA data on Superfund and hazardous waste sites, USGS data from the Geographic Names Information System (schools, hospitals, churches, and cemeteries), and more. LandView IV runs as a desktop application from the CD-ROM. It is not accessible through the Web version of this publication. If you are accessing this document online, you may obtain a copy of the CD-ROM version of this publication through the USGS Earth Science Information Center (ESIC), either by calling 1-888-ASK-USGS or by visiting the ESIC Web site at http://mapping.usgs.gov/esic. For information about LandView IV or to obtain the full LandView IV DVD-ROM containing over 8GB of Federal spatial information, see http://landview.census.gov. This CD-ROM includes a customized version of LandView IV containing all data from the state of Louisiana, plus the sediment database of the current Lake Pontchartrain Basin study in a FileMaker Pro (Version 5.5) relational database format. The data in these relational tables can be exported from FileMaker Pro into any of 10 different data formats. These data also may be mapped in conjunction with spatial data referenced above. Installing LandView IV from the CD-ROM The installation of LandView IV must be performed directly from the CD-ROM. It will run in both the Windows and Macintosh environments. On the disc, follow instructions in the README.HTM file (browser) or the README.TXT file (text viewer). Both of these files are located in the root of the CD-ROM for specific Windows or Mac installation. The entire LandView IV application will require about 30MB of space on your hard disk. Getting started in LandView IV Once you have installed LandView IV on your Windows or Mac system, you should see a folder on your hard drive named LakePont. The LandView IV files and specific views you create (user maps) are stored there, with the majority of the data remaining on the CD-ROM. Therefore, any time you want to run LandView IV and view these data, you will need to have access to both your hard drive and the CD-ROM. The LandView IV system is composed of two modules: Database and MARPLOT. The Database module (implemented in FileMaker Pro) performs all of the various database functions such as searching, display, and exporting records. The MARPLOT module provides the means to select and map any or all of the database points along with a variety of other spatial data layers. Thus, the two modules function together, as in any GIS, to allow the user to query the database and map selected features or vice versa. The below quick-start tutorial uses the Pontchartrain sediment database as a starting point. However, a means has also been provided to directly invoke the MARPLOT mapping module by executing a shortcut named MARPLOT located in the standard Windows Start>Programs menu sequence. A Quick-Start Tutorial on using LandView IV To start the LandView IV application in Windows, click on the Start>Programs menu sequence and then run the Lake_Pontchartrain application. This will invoke the database component of LandView IV (developed in FileMaker Pro 5.5) and open a corresponding window labeled Database. On the Mac, simply double-click on the Database application in the LakePont folder. The Database Window: The Database application window will first display a single button labeled "Lake Pontchartrain Basin: Bottom Sediments Database." Clicking on this button will then display the Main Menu screen where any of the 8 different Sediment Database tables can be opened. This same menu allows "Other Databases" to be opened as well as "Notes" associated with the 8 Sediment databases. The 8 tables are "color-coded" and have corresponding control buttons near the bottom of the screen to provide immediate access to any particular table. Also, several tables have an "Add'l Data" button near the top center of the display, indicating additional data screens. Located directly below the 8 table buttons are 6 function buttons labeled Field Info, Find, Select Fields, Display Fields, Map, and Main Menu. These buttons enable the user to query, examine, and map the data. A "help button" (labeled with a red question mark) on each of these function buttons provides additional information on its use. To begin, open the Station Data Table by clicking the corresponding button. The first of 1,593 records in the Station Data table is seen. Clicking on the upper and lower portions of the "Rolodex" icon to the left of the display screen steps backward and forward through the records in this table. Our search will involve locating sediment records with particular concentrations of Silver (Ag). To begin, click on blue button labeled "Inorganic" to jump to the fields in that table. The first of two screens displaying the fields in the Inorganic table will appear. Click in the fourth field down in the first column, labeled "AG_UG_G" (currently containing a value of 0.157) and then click on the function button at the bottom of the screen labeled "Field Info" to see an expanded definition of that particular field. Click the "Return to Database" button to return to the field screen. To actually perform a search of the database, we will use the "Find" function button. Once the actual Find button is clicked, an option window is presented allowing previous criteria to be kept to facilitate iterative searching. For now, click the "No" button and all of the fields will be blanked, ready for search criteria to be entered. Let's assume were interested in finding all records where the concentration of silver is greater than 0.2 ug/g. To do this, simply enter the "greater than" symbol (>) followed by 0.2 in the field labeled "AG_UG_G." Once this has been done, simply click on the "Continue" button on the gray panel at the left to initiate the search. The first of 64 records of inorganic data that meet the ">0.2 ug/g" criteria are shown. To select fields from this or any of the other tables, use the next function button labeled "Select Fields." Click on the actual "Select Fields" button. To remove fields from the right window, click either on the "Clear All" button or highlight a field and click the "Clear" button. Now let's select several fields from the current "Station Data" file (the "USR" extension is part of the database naming convention) by simply double-clicking on the field name in the left window. Using this technique, select the first four fields (UNIQUE_ID, ORIGNL_ID, ORIGL_FILE, and LATITUDE). Now jump down a bit and additionally select the LONGITUDE field. We add several fields from the Inorganic table. To do this, first click on the drop-down menu at the top of the left window to reveal the other tables in the Sediment Database. Click on the "Inorganic" table and its associated fields will now appear in the left window. Double-click on the three fields that begin with "AG" (specifically, AG_UG_G, AG_Q, and AG_DL) to move these to the right window. When this is all done, click on the "Export" button under the right window to the 64 records containing these selected fields to a holding file. The fields in the holding file can now be displayed and manipulated in a spreadsheet-like manner without leaving the FileMaker application. To do this, first click on the "Display Fields" function button (again, the associated Help Button is available, if needed). You will notice the 8 selected fields from the first of the 64 found records listed on a blank screen. Click on the "View" pull-down menu at the top of the screen and then select the "View as Table" option. Maximize this window by clicking on the middle icon in the upper right corner of the display window. Once in this mode, you may sort any column by simply right-clicking on the column heading or adjust column widths by dragging the column dividers right or left. You can also easily change the order of the data columns by simply left-clicking and dragging the desired column heading to another position and then releasing it. In addition to creating a holding file for manipulation within the FileMaker application, the 64 found records can also be exported to any of ten different record formats. For example, to export a Excel-compatible file, click on the "File" pull-down menu and then the "Export Records" option. Enter any desired file name and then select the "mer" file type to preserve the column headings. As before, select the fields you wish to export from any of the 8 database tables by moving them from the left to the right display windows. Finally, click the Export button to create the file. We now need to return to the Inorganic data screen. Minimize the current export screen by clicking on the minimize icon (the "underscore") in the upper right of the display screen. This will once again reveal the inorganic data screen and the 8 table buttons and 6 function buttons. (If the Inorganic data screen window is not maximized, click on the maximize button at in the top right corner of the screen.). These function buttons will allow us to proceed to the mapping functions. The MARPLOT Window: To map the 64 sediment data points found in the previous search, click on the "Map" button. Before actually displaying the map, you are presented with three options: showing only the records in the "found set," showing all the records in the database and highlighting the found set, or simply showing the single record that is currently displayed. For our example, click on the "Only" button to display only our 64 points. The MARPLOT software module will be activated and the following map should appear on your screen with purple dots representing the sediment sample locations: Example of LandView IV's MARPLOT map window:
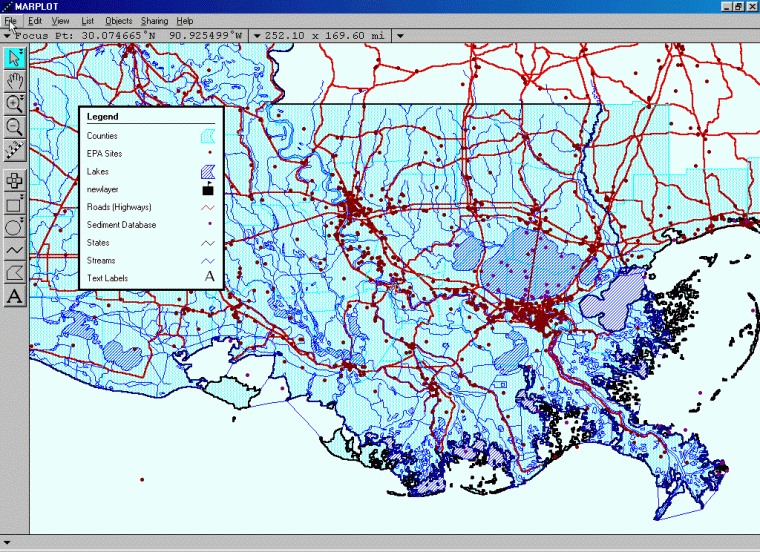
The MARPLOT software module runs in its own window and allows the user to selectively show or hide any of the various spatial data layers from a variety of federal sources. The display of data layers is controlled by the "List" pull-down menu and the "Layer List" menu option. Select these options to open the Layer List window. At the top of this list, you will see the two data layers, Sediment Database and EPA Sites, along with check marks in the corresponding "control columns" to "show" the Sediment Database layer and to "hide" the EPA Sites. Below these two individual layers are four additional "groups" of layers, labeled Water Features, Federal Lands, Minerals Database, and Other Data Layers. Clicking on the right-pointing triangle next to any of these group names will reveal all of the various layers in that group that can be displayed on the map. Clicking again on the same triangle will hide the individual layers. Let's display the EPA site locations on the map. On the layer named EPA Sites, click in the column marked "Show" to turn on this data layer. Clicking the "OK" button at the bottom left of the Layer List dialog box will redraw the map, this time showing the EPA sites, represented by brown dots. Note that pressing the escape key on your keyboard at any time will immediately suspend the drawing of any map. To change which data layers are being displayed or to change how they are symbolized, again choose "List" and then "Layer List" from the menu. Locate the EPA Sites layer and then click in the "Hide" column to turn that layer off again. The symbol and/or color of the displayed objects or map features can be changed by clicking on the Default graphics "Set..." button. Also, you can always return the map layers to their original settings by clicking the button labeled "Set To Default Settings" at the top of the Layer List dialog box. The following map is an example of what can be done when a variety of data layers are shown. In addition to displaying existing layers, MARPLOT allows new layers to be added by clicking "New" on the Layer List dialog window. Once a new layer is specified, several additional tool icons appear on the left panel, allowing for the creation of five different object types as well as text annotation. MARPLOT map window with additional layers shown: (click for full view)
Any displayed map (or objects on that map) can be adjusted and re-sized through the use of the five tools in the upper left portion of the map window represented by the following icons that, when selected with a left mouse click, turn from gray to turquoise:
The topmost icon (the arrow) is used to select map objects. For example, click on this icon to select it (notice the turquoise color) and then click on a map object such as one of the purple points representing a sample point from the Sediment database. Notice that MARPLOT indicates a "selected" object by surrounding it with four small red rectangles. The object's name (or identifying number), as well as the corresponding layer and map names for that object will appear at the bottom of the MARPLOT window. The next icon (the hand) is used to "pan" or slide the entire map in any desired direction. The next two icons (the "plus" and "minus" magnifying classes) zoom the map in and out, respectively. In addition, the zoom-in tool (the plus magnifying glass) can be used to quickly zoom into any portion on the map by left-clicking the mouse and dragging a box around the desired area. When the mouse button is released, the new zoomed in area is shown. The last icon (the ruler) is simply used to measure distances and angles on the map. When you exit MARPLOT by clicking either the File>Exit sequence or the "X" to close the window, MARPLOT retains the last set of data layer display settings. If at any time you wish to return to the original settings, simply click on the "Set To Default Settings" button at the top of the Layer List window. In the future, if you want to go directly back into MARPLOT, you can use the shortcut named MARPLOT located in the standard Windows Start>Programs menu sequence. Returning to the Database Once any object has been selected on the map using the arrow icon, its corresponding record can be displayed in the Database window. In fact, more than one object can be selected with the arrow icon by dragging a box around all of the desired objects and then choosing the appropriate layer name from the resulting dialog box. Once the desired object or set of objects has been selected, (as before, they'll be surrounded by small red rectangles), the corresponding database records can be displayed by first clicking on the "Sharing" pull-down menu followed by selecting the "Sediment Menu" and "Get Info" options. Exporting Data To export objects from MARPLOT for use in another mapping program, the object(s) must first be selected. As before, use the arrow icon to draw a selection box around the desired object(s) and choose the layer(s) from which these objects should be selected. Once the desired objects have been selected, choose "Export" from the "File" menu and you will be given three format options in which to save this set: MARPLOT import/export format (MIE), MARPLOT simple point format (text), or ARC/INFO Generate format. To export records from the database tables, you must first switch back to the Database window and have the appropriate records displayed as the "Found" set. At this point, simply choose the "File" pull-down menu and then the "Export Records" option. Then choose a file name followed by file type and finally choose "Save" to bring up the dialog window for selecting the actual fields to be exported. When these fields have been selected, clicking the "Export" button will actually create the desired export file. Importing Data The MARPLOT software module allows geo-coded "point" data to be imported as a new data layer and displayed on the map along with the existing data layers. These points can be contained in something as simple as a tab-delimited record containing three fields: the name of the point, its latitude, and its longitude (both in decimal degrees). Such records can readily be created from most spreadsheets. MARPLOT can also import line and polygon data, but they must be in MARPLOT's Import/Export (MIE) format. This ASCII file format is well defined in the documentation. A (Windows only) utility program called shp2mie.exe is provided on the CD-ROM in the folder named \install\windows to convert ArcView Shapefiles into the required MIE format. After copying this utility program to your hard disk, execute it and follow the dialog boxes to convert a desired Shapefile into an MIE file. Once this is done, the MIE file can be imported into MARPLOT by clicking on the File pull-down menu and selecting the Import option. For more help, check the manuals LandView IV Help, and MARPLOT Help (in PDF format). Help files are also available from within the programs.
|