

RoadxStr User’s Guide—For Collection of Road-Stream Crossing Assessment Field Observations
Links
- Document: Report (15 MB pdf) , HTML , XML
- Download citation as: RIS | Dublin Core
Acknowledgments
We thank our co-production team and collaborators who helped develop the RoadxStr survey, including resource managers from the Pacific Northwest and nationally. Detailed feedback from Nathan Chelgren, Jeff Duda, Dave Hu, and Daniel Wieferich, U.S. Geological Survey; Christine Hirsch and Brian Staab, U.S. Forest Service; Michael Brown, Emily Johnson, Scott Miller, Timothy Monfort, and Mellissa Rutkowski, Bureau of Land Management; Michael Bailey and Shannon Boyle, U.S. Fish and Wildlife Service; James Neighorn, Federal Highway Administration; Kathleen Hoenke, Southeast Aquatic Resources Partnership; Daniel Dauwalter, Trout Unlimited; and Bex Gottlieb, Oregon Department of Fish and Wildlife greatly improved this assessment and user’s guide. We also thank the many field crew members working with and contracted by the U.S. Geological Survey in 2022–23 who helped field test and provided constructive feedback on the RoadxStr survey.
Abstract
Intersections of drainage networks and road networks represent a critical nexus between natural waterways and human infrastructure. Managing these systems involves decisions related to management of infrastructure, hydrologic and geomorphic processes, and ecological connectivity. Interactions among these systems influence multiple values, including the intactness of transportation networks, public safety, water quality, and ecosystem function that collectively amount to billions of dollars. Despite the importance of road-stream crossings, there are countless gaps in knowing where and what they are. These gaps limit the degree to which managers can inventory and assess stream and road networks to inform decisions. To address this first-level need, we developed RoadxStr (road-stream crossings): a survey tool that effectively characterizes road-stream crossings across the full stream and drainage network. This document describes the RoadxStr Field Form, available within a mobile application, which is designed for rapid and standardized data collection involving assessment of a road-stream crossing, including the road, crossing structure(s), and the nearby hydrologic channel. This document provides instructions on how to (1) access and download the RoadxStr Field Form within the mobile application service and (2) use and complete a RoadxStr Field Form survey.
Introduction
Road networks are widely distributed across nearly all lands in the United States and indeed worldwide. Road networks were constructed with human transportation needs in mind, but increasingly hydrologists and ecologists are engaged in managing roads because they can strongly influence hydrology, geomorphology, and ecosystems (Forman, 2003; van der Ree and others, 2015). Accordingly, to fully address roads, it is important to consider drainage networks and road networks as a single system, as the two intersect frequently and can strongly influence each other (Yu and others, 2024). Understanding of feedback between transportation and drainage networks is critical for assessing landscape and watershed condition (app. 1; Luce and Wemple, 2001). It is often the case, however, that inconsistent and incomplete information limits the ability of scientists and managers to address the road-stream nexus. For example, most classifications of drainage networks and flow conditions within them are decades out of date (Hafen and others, 2020). Similarly, lack of accurate information on roads and road-stream crossings limits the degree to which their interactions can be evaluated, or even to understand basic status or trends of road infrastructure or watershed condition (Dunham and others, 2023).
Lack of consistent and accurate information on streams, roads, and road-stream crossings motivated development of the new feature mapping tool described herein: RoadxStr (road-stream crossings). RoadxStr is designed specifically to efficiently document key features of streams, roads, and road-stream crossings, and intended as a rapid survey that can cover thousands of locations within a single-season survey that employs just a handful of surveyors. RoadxStr is not a substitute for more detailed evaluations, but it can identify where investments in such efforts are warranted. Furthermore, RoadxStr is designed to capture ground-based features of road-stream crossings that are not easily or reliably captured using other data sources (for example, remote sensing or terrain analysis). Importantly, RoadxStr provides basic information that can be integrated into existing assessments and decision tools that track aquatic organism passage, road-stream interactions, or the condition of existing road-stream crossings and maintenance needs (Dunham and others, 2023).
The design of RoadxStr involved meetings with a Pacific Northwest regional team and a national team of partners across the United States representing diverse perspectives, including experience with road engineering, aquatic ecology, hydrology, and geomorphology. Since the initial prototype of RoadxStr was developed, over 10,000 observations have been recorded across the Pacific Northwest and Great Basin of the western United States. Feedback from users of RoadxStr in the process of generating these observations also contributed to additional development and refinement of RoadxStr. The main purpose of this document is to provide a full description of RoadxStr and how to use it anywhere that complete and accurate information on roads, streams, and road-stream crossings is needed.
What is RoadxStr?
The RoadxStr survey is available on the Survey123 mobile application (ArcGIS online, https://www.esri.com/en-us/arcgis/products/arcgis-online/overview). Survey123 operates on a variety of mobile devices, including laptops, tablets, and cell phones. The application is designed to facilitate location-aware data collection in the field (offline) and on the web. The RoadxStr survey, hereinafter referred to as RoadxStr, can be easily and quickly used to collect data via mobile devices and to securely upload the input data to a publicly available master database in the ArcGIS Online (AGOL) environment. RoadxStr focuses on the rapid collection of a set of simple visual observations and measurements that can be recorded within 10 meters (m) of the inlet and outlet of a crossing structure.
What is a RoadxStr Observation?
A RoadxStr Observation occurs at any intersection of a drainage network1 and a road. The RoadxStr Field Form includes metrics for assessment of road characteristics, crossing structure characteristics, and stream characteristics. RoadxStr is focused on mapping stream features in 10 m stream reaches upstream of road-stream crossings.
As used here, “drainage network” refers to all potential pathways through which water is routed through a landscape, including natural and human-constructed features that facilitate or impede runoff. For the purpose of a RoadxStr survey, survey locations are generally focused on visible surface features where roads and such features intersect. For example, crossings of roads and natural stream channels (with or without surface flows) or human-constructed drainage features (for example, canals, ditches, cross-drains, pipes, or other waterways).
Disclaimers
No warranty, expressed or implied, is made by the U.S. Geological Survey (USGS) or the U.S. Government in general, as to the functionality of the application and related material nor shall the fact of release constitute any such warranty. The RoadxStr Field Form is provided on the condition that neither the USGS, U.S. Fish and Wildlife Service, nor the U.S. Government shall be held liable for any damages resulting from the authorized or unauthorized use of the RoadxStr Field Form.
The contributions to the RoadxStr Database by non-USGS users of the RoadxStr Field Form are published as they were submitted. Contributions provided entirely by non-USGS or non-U.S. Forest Service (USFS) users do not represent the views or position of the USGS, the USFS, or the U.S. Government and are published solely as part of the larger RoadxStr Database.
Unless otherwise stated, all data, metadata, and related materials are considered to satisfy the quality standards relative to the purpose for which the data were collected. No warranty expressed or implied is made regarding the display or utility of the data for other purposes, nor on all computer systems, nor shall the act of distribution constitute any such warranty. Any use of trade, firm, or product names is for descriptive purposes only and does not imply endorsement by the U.S. Government.
Data Use and Sharing
The following data use and sharing terms apply to all data uploaded to the RoadxStr Database. These terms are subject to change. By collecting and submitting RoadxStr data, users agree to the terms that follow.
Data Storage
Data uploaded to the RoadxStr dataset are stored in a secure, enterprise-level database. The RoadxStr Database has been constructed to be modified, with data collection, within AGOL via Esri data collection applications Survey123 and Field Maps. Any data uploaded to the AGOL RoadxStr Database (hosted feature layer) via the RoadxStr data collection survey, in Survey123 or Field Maps, will be temporarily stored in AGOL until data can be processed and released as publicly available shapefiles in ScienceBase (https://www.sciencebase.gov/about/content/about-sciencebase), a USGS-trusted digital repository. RoadxStr Database users are responsible for managing permissions for their personal and shared project files and data they upload and manage within the RoadxStr AGOL Database.
After data is uploaded to the AGOL RoadxStr Database, project members are not able to edit or delete data. Contact the RoadxStr management team (gs-roadxstr@usgs.gov) if edits are necessary. Please note that all data uploaded to the RoadxStr Database items will be visible to the RoadxStr management team.
Internal Data Usage
By contributing data to the RoadxStr Database, the RoadxStr management team staff at USGS will have access to all data contributed to the program for the following uses: database management and maintenance; published and unpublished annual and multi-annual assessments and reports; analyses for program assessment and development; and program education and outreach materials.
All data uploaded to the RoadxStr Database will be reviewed and processed to meet USGS data release publishing standards. Data processing will include the following actions: review of all reported data (including observations, survey notes, and images), removal of any erroneous or “test” data, adjustments to any obvious logical inconsistencies within reported answers to survey questions, edits to any requested data, and removal of any photos that do not meet USGS data standards (see below). All project items and data (including audio, image, and video files) submitted to RoadxStr will be visible and accessible to RoadxStr management team staff for reprocessing for consistency, research, and development, and testing of digital data processing methodologies.
All photos uploaded with observational data in the RoadxStr survey are subject to review to confirm they meet the following data standards:
Access to Project Data by Project Members
Access to the RoadxStr project’s monitoring data is restricted to registered users whose project-specific access is defined by the RoadxStr management team. It is the responsibility of the RoadxStr management team to add members with whom they wish to share detailed project information, files, and data from their database project. The RoadxStr management team is not responsible for any modifications or additions of data made by project members with written permissions to a database project. Registered users may download data from any project for which they are members.
Freedom of Information Act
The RoadxStr management team at USGS will comply with the Federal Freedom of Information Act (FOIA; 5 U.S.C. §552). The FOIA is a Federal statute that allows individuals to request access to federal agency records, except to the extent records are claimed as exempt from disclosure under one or more of the nine exemptions of the FOIA:
-
• Exemption 1 protects properly classified information;
-
• Exemption 2 protects records that are, “related solely to the internal personnel rules and practices of an agency;”
-
• Exemption 3 protects information that has been, “specifically exempted from disclosure by statute;”
-
• Exemption 4 protects, “trade secrets and commercial or financial information obtained from a person and privileged or confidential;”
-
• Exemption 5 protects, “inter-agency or intra-agency memorandums or letters that would not be available by law to a party other than an agency in litigation with the agency;”
-
• Exemption 6 protects, “personnel and medical files and similar files [where] the disclosure of which would constitute a clearly unwarranted invasion of personal privacy;”
-
• Exemption 7 protects certain types of law enforcement information;
-
• Exemption 8 protects matters, “contained in or related to examination, operating, or condition reports prepared by, on behalf of, or for the use of an agency responsible for the regulation or supervision of financial institutions;” and
-
• Exemption 9 protects, “geological and geophysical information and data, including maps, concerning wells.”
Examples of relevant exemptions that relate to RoadxStr include section 100707 of title 54 of the United States Code (specific to the National Parks Service), which falls under Exemption 3 and states:
“Information concerning the nature and specific location of a System resource that is endangered, threatened, rare, or commercially valuable, of mineral or paleontological objects within System units, or of objects of cultural patrimony within System units, may be withheld from the public in response to a request under section 552 of title 5 unless the Secretary determines that—(1) disclosure of the information would further the purposes of the System unit in which the resource or object is located and would not create an unreasonable risk of harm, theft, or destruction of the resource or object, including individual organic or inorganic specimens; and (2) disclosure is consistent with other laws protecting the resource or object.”
Dependencies
Use of RoadxStr requires a mobile device with the Survey123 mobile application and RoadxStr v2 Field Form survey, as well as a high accuracy GPS. For the purposes of RoadxStr data collection when this user’s guide was written, a high accuracy GPS is considered to have a rated horizontal accuracy of 3 m or less. It is possible to collect RoadxStr Observations using the built-in or integrated GPS on a mobile device (such as a smartphone or tablet); however, the positional accuracy of these can be highly variable and at times be very poor depending on the location, thus limiting the usefulness of the data.
This user’s guide was developed for the following equipment and software versions:
-
• Tablet: Samsung Galaxy Tab Active Pro, Android version 11;
-
• GPS: Bad Elf Flex Mini Standard, firmware version 1.1.0, accuracy rating: 1.5 m horizontal;
-
• Laser rangefinder: TruPulse 200i;
-
• Survey123 for ArcGIS Application, version 3.21.64; and
-
• Organizational Esri ArcGIS Online Account.
The accuracy of this guide for use on other equipment and (or) other software versions is not guaranteed. If using other equipment, consult official product manuals for proper setup and operation.
Joining RoadxStr as a Data Contributor
To access RoadxStr and the online hosted feature layer that stores submitted RoadxStr Observations, individual users must have an organizational AGOL account and request to be added to the RoadxStr AGOL Group.
The RoadxStr AGOL Group is housed within the USGS ArcGIS Online environment and contains both the RoadxStr Field Form and the RoadxStr Database, which serves as a direct repository for all collected RoadxStr data.
To request access to RoadxStr:
-
• Send an email request that includes your AGOL username to gs-roadxstr@usgs.gov requesting to join the RoadxStr AGOL Group.
-
• An administrator will send you an invitation to join the RoadxStr Group in AGOL. This will be confirmed by a response email from the RoadxStr management team with details on how to accept the AGOL invitation, along with other information.
-
• To accept the invitation, log into the user’s AGOL account in a web browser and select the notification bell at the top right corner of the screen (fig. 1). Accept the invite.
-
• The RoadxStr AGOL Group will be accessible under the GROUPS page, and the RoadxStr Field Form will be accessible in the Survey123 application while logged into the added account.
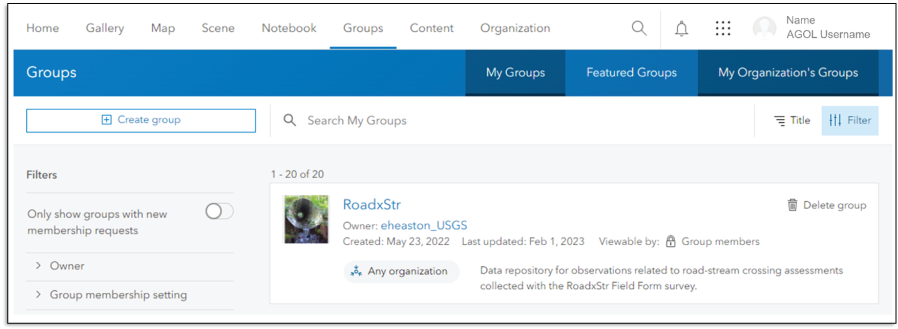
Screen capture showing use of organizational ArcGIS Online account to access the RoadxStr Group.
Equipment List for Conducting a RoadxStr Survey
Gear list includes required and recommended gear for data collection using the RoadxStr Field Form in the Survey123 mobile application:
-
• Mobile data collection device (tablet or smartphone);
-
• Bluetooth enabled high accuracy GPS unit (like Bad Elf Flex Mini Standard);
-
• Measuring stick (folding substrate ruler or other measuring tool);
-
• Measuring tape (25 m or longer);
-
• Laser rangefinder (that measures inclination and distance; like TruPulse 200i, which has a minimum ranging distance of 50 centimeters—less than 5 m is necessary);
-
• Stadia rod, monopod, or walking stick with specific height measurements; and
-
• Appropriate personal protection equipment and other safety-related accessories and protocols as dictated by user needs.
Establishing Global Positioning Satellite Connection
Establish a connection between the mobile device and the high accuracy GPS prior to collecting data. The GPS unit and the mobile device should be properly connected and working to ensure all the needed GPS data are collected. To establish the initial GPS connection, it is helpful, and often necessary, to be outside with a view of the sky.
Proper GPS data is necessary for RoadxStr data integrity and for accurate spatial representation of the observation and crossing feature. Please take proper time to set your device up before heading to the field for data collection, and while collecting data, take time to ensure the observation GPS location information is as accurate as possible. Without accurate locations, it is difficult to associate observations with streams or roads represented in other geospatial assets. To accomplish those associations, the desired GPS horizontal accuracy when collecting data is 5 m or less.
Although the horizontal accuracy of a GPS location may improve throughout the duration of a survey, it is sometimes not possible to attain the desired GPS accuracy under field conditions in a reasonable amount of time. The GPS instructions below will provide more details and tips on how to improve the accuracy of a GPS location when collecting data in variable in-field conditions.
Collecting Accurate GPS Location Information
The RoadxStr Field Form can be completed using the integrated (in other words, built-in) GPS on a mobile device; however, the accuracy of recreational grade integrated GPS hardware in a mobile device will typically not provide the necessary location accuracy needed to snap (in other words, associate) collected points to a mapped portion of the stream or road network. This is especially challenging in areas with high densities of streams or roads, or in locations close to stream confluences where an inaccurate point could be snapped to the wrong tributary segment.
Things that worsen the accuracy of GPS location information include thick canopy cover or large trees that block out the sky, steep surrounding topography, and other natural or manmade structures that block the GPS unit’s view of the sky and thus access to satellites.
When collecting data, we recommend the GPS stay in a static location during satellite acquisition for at least 60 seconds (a standard to acquire enough satellites and [or] their geometry for accurate location information). This could be accomplished by attaching the GPS to a tripod or setting it on the ground in a safe location above the structure being surveyed. The GPS can be left in that location while the rest of the survey data are collected.
Before submitting a RoadxStr Field Form observation, we recommend that the GPS location point be manually refreshed. This can be done by tapping the target location icon in the ‘Location of Observation’ of the survey (fig. 2).
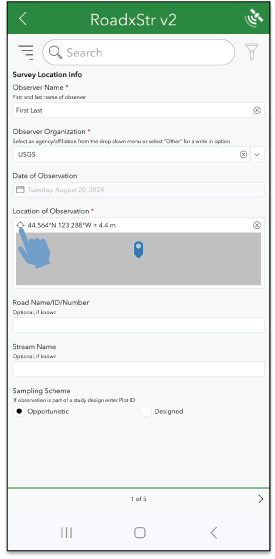
Screen capture showing how to manually refresh the location information of a RoadxStr observation.
Global Positioning System Unit Setup
The following steps outline the usual process for connecting a Bluetooth enabled GPS unit with a mobile device, tablet, or smartphone. These steps will work for most high accuracy Bluetooth enabled GPS units. However, manufacturer provided instructions should be consulted for both your GPS and mobile device when pairing or troubleshooting this process. Some specifics may vary for both the mobile device and GPS unit brand or operating system.
-
• Ensure both the GPS unit and the mobile device are turned on.
-
• Enable Bluetooth pairing on the GPS unit.
-
• Pair the GPS unit to the mobile device:
-
• On the mobile device, select Settings > Connections > Bluetooth.
-
• Make sure Bluetooth is turned on.
-
• Select Pair new device so that the mobile device will begin searching for nearby Bluetooth devices.
-
• When the GPS unit is listed on the mobile device as an available device, select the GPS unit and let it pair.
-
• Follow any final prompts to finish the pairing process.
-
• If necessary, select PAIR on the GPS unit (both devices will usually display the same pairing code).
The Bluetooth GPS may be listed under Paired devices on the mobile device’s Bluetooth settings page. Most GPS units will not show up as connected Bluetooth devices until they are actively being used by the Survey123 application when collecting data.
RoadxStr in Survey123
Survey123 Setup
This section details how to download the Survey123 mobile application, connect to and configure a Bluetooth GPS in Survey123, and access the RoadxStr Field Form within the application.
The following steps require access to the RoadxStr AGOL Group and must be completed before leaving for the field, while the mobile device is connected to the internet.
For help accessing the RoadxStr AGOL Group, see the above section titled “Joining RoadxStr as a Data Contributor.”
-
• Install the Survey123 mobile application from the mobile device’s app store.
-
• Open the Survey123 application on the mobile device and sign in to the user’s AGOL account using the user’s organizational account credentials (fig. 3).
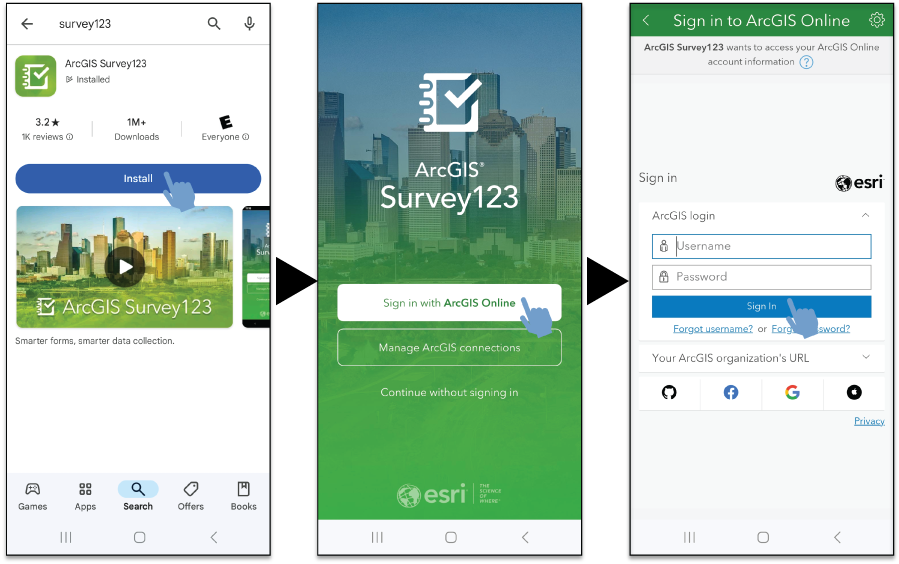
Screen captures of how to install and sign into the Survey123 mobile application. Beginning on the left, the screen depicts a download of ArcGIS Survey123. In the center and right, the process of signing in to ArcGIS Survey123 is illustrated.
Configure the GPS in Survey123 (fig. 4).
-
• Select the Location Status icon (a satellite) in the upper right corner.
-
• Select Settings by clicking the icon (a cog symbol) in the upper right corner.
-
• Select + Add location provider, a clickable tab at the bottom of the screen.
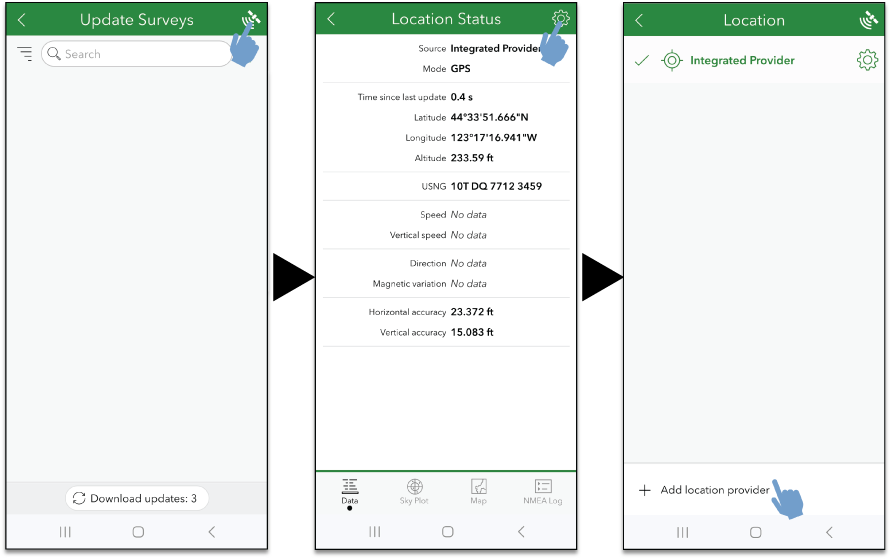
Figure 4. Screen captures of how to configure a global positioning system in ArcGIS Survey123.
-
• Select the Connection Type (like Bluetooth) and allow Survey123 to find and connect to nearby devices by ensuring the ‘Discover’ option at the top of the screen is enabled.
-
• Select the GPS unit that you would like to use for data collection (fig. 5).
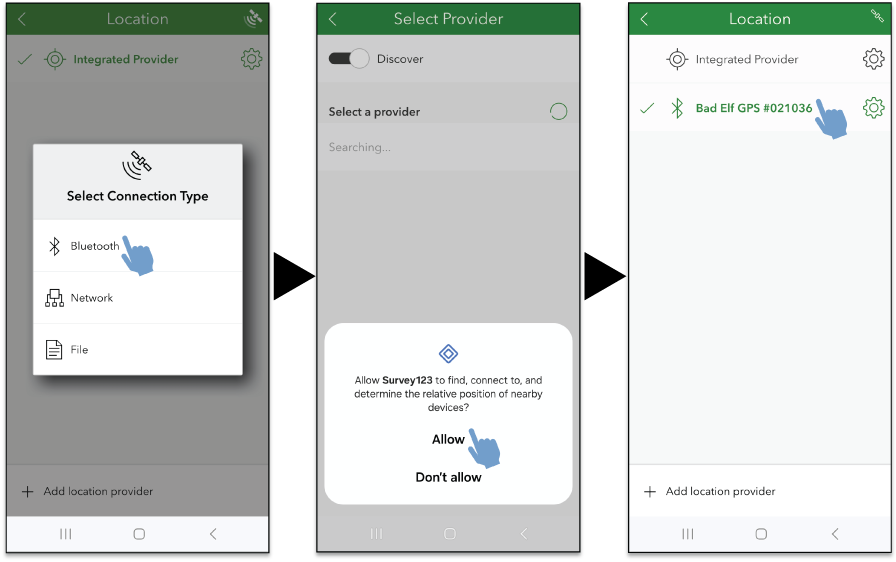
Screen captures of how to select a global positioning system in ArcGIS Survey123.
The GPS should now be visible in the Location menu and be bolded green, signifying that it is selected to provide location information.
-
• Next, select the gear icon to the right of the connected GPS.
-
• Select Alerts and turn off the Audio and Vibrate alerts. All of these can be turned off, but it is recommended to leave Visual alerts on in case the external GPS is disconnected while data are being recorded (fig. 6).
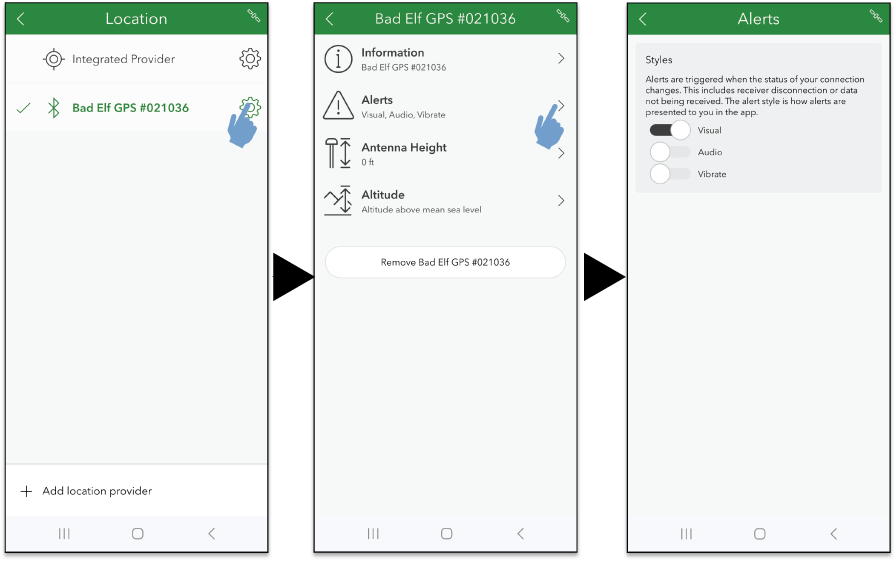
Screen captures illustrating how to change the alert settings of a global positioning system in ArcGIS Survey123.
Download the RoadxStr Field Form in Survey123 (fig. 7).
-
• In the search bar, type RoadxStr. The RoadxStr Field Form should show up in the available survey list, but if it does not, select Download surveys.
-
• Select the download icon to the right of the ‘RoadxStr Field Form’ survey title.
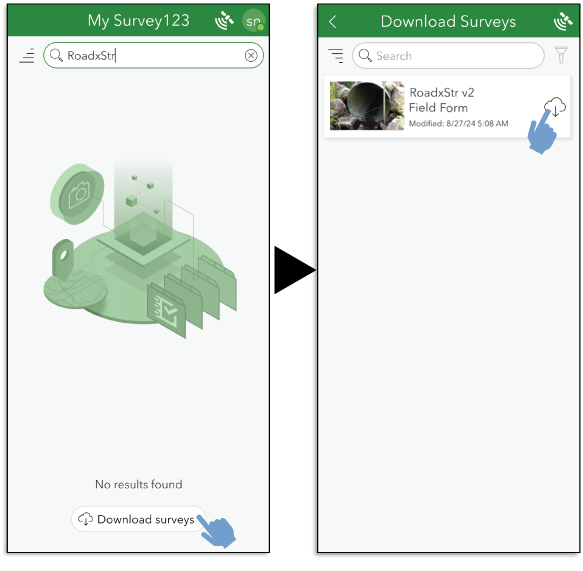
Screen captures illustrating a download of the RoadxStr Field Form in the ArcGIS Survey123 mobile application.
Collecting RoadxStr Data in Survey123
Prior to attempting these steps, be sure to complete the instructions in the “Establishing Global Positioning Satellite Connection” and “Survey123 Setup” sections of this report. Please also ensure that any external GPS unit being used is powered on and paired with the mobile device.
In the Survey123 application, select the survey titled RoadxStr Field Form and select Collect at the bottom of the screen (fig. 8).
Double check the Bluetooth GPS unit is connected and that the Survey123 application is receiving data from the external device.
This will open the Location Status page. The GPS unit name should be listed as the source, and the location information should be updating (the coordinates and the accuracy values will be visibly changing).
-
• Select the back arrow to return to the RoadxStr Field Form (fig. 8).
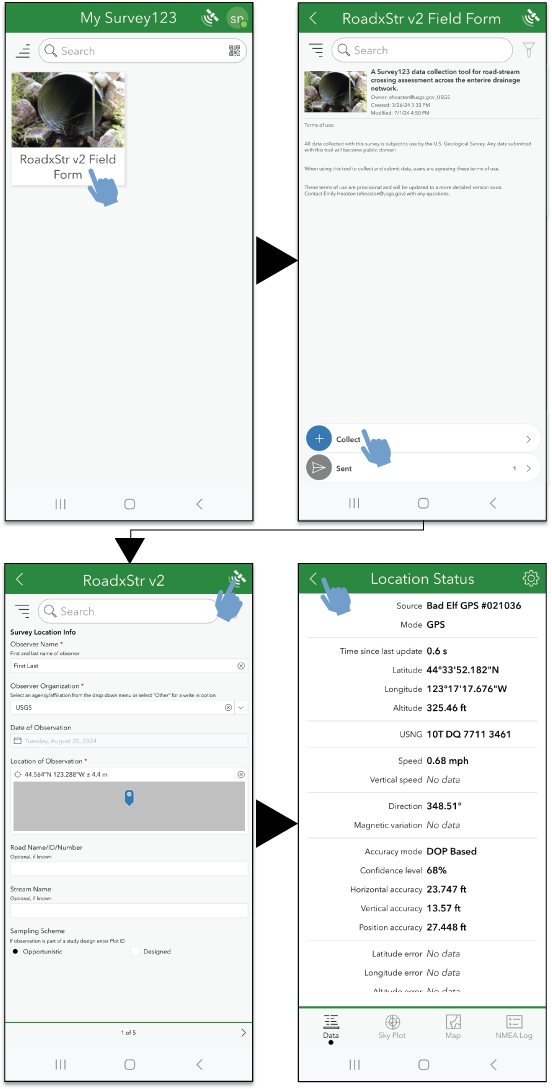
Screen captures of how to start a new RoadxStr Survey and check that the linked global positioning system is properly updating location information. Note that units shown here are English, but actual recorded coordinates are in metric.
Fill out the form (see “RoadxStr Field Form in Survey123” for detailed instructions). After all the survey questions have been completed and the GPS location information manually refreshed, select the submit button (check mark) in the bottom right corner of the survey screen.
-
• Select Save in outbox if you are collecting data without an internet connection. If the mobile device does have a stable internet connection, select Send now (bottom right of screen).
When working offline in the field, data will be saved in the Outbox and can be uploaded after returning to an internet connection. Once the device is connected to an internet connection, data saved in the outbox can be batch uploaded (fig. 9).
-
• From the RoadxStr Field Form survey homepage, select Outbox at the bottom of the screen.
-
• Select Send now in the bottom right of the screen. Sending multiple RoadxStr Observations may take a few minutes.
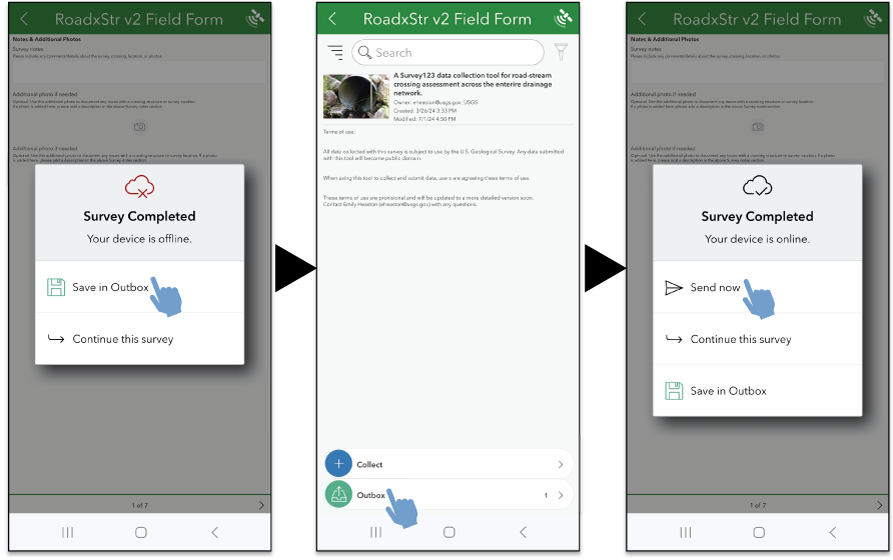
Screen captures of how to save and send a survey form offline and online.
RoadxStr Field Form in Survey123
The following steps describe RoadxStr data collection and key terms in the RoadxStr Field Form.
Observer and Location Information
-
1. Observer Name: Enter the first and last name of the observer, here defined as the person taking the RoadxStr Observation (multiple names can be listed here).
-
2. Observer Organization: Select one of the options from the drop-down menu, or select Other to open a text box to write in an organization that is not listed.
-
3. Date of Observation: Automatically collected. Date and time of observation cannot be changed.
-
4. Location of Observation: Automatically collected and cannot be manually changed. Location coordinate information is recorded as latitude and longitude in decimal degrees. A horizontal accuracy of 5 m or less is optimal for the location information.
-
a. The location information can be refreshed manually by tapping the target icon next to the location coordinates. We recommend doing this just before submitting the survey data, so that the external GPS has had time to gain a better connection to satellites, resulting in more accurate location data.
-
b. The location should be acquired on the shoulder of the road, on the inlet side of the structure, for optimal consistency. When the view of the sky is heavily obstructed above the inlet, the location can be acquired on the shoulder of the road above the outlet. In those instances, this should be written in additional notes at the end of the survey.
-
c. Location positions can be averaged by pressing and holding the target icon for a couple seconds. Release the icon and positions will be averaged until the target icon is tapped again, stopping position averaging. Refreshing the location information will delete the averaged positions information.
-
d. Location coordinates and accuracy will be displayed here. Orange warning text will appear next to the location information if the GPS horizontal accuracy is recorded as greater than 15 m. If possible, wait until the GPS has a more accurate reading before submitting data. Horizontal accuracy of 5 m or less is optimal.
-
e. If the external GPS is not connected, red warning text will be displayed below the location information, warning the user that the integrated GPS is being used, and if possible, connect the external GPS. If not possible, data will still be collected and submitted without interference.
-
f. Review “Establishing Global Positioning Satellite Connection” above for more details and tips on how to maximize the accuracy of a GPS location.
-
-
5. Road Name/ID/Number: If the road name or identifier is known, it can be typed in the provided text box. Road name should be taken from a map or road sign. Numbered roads should be listed as Route, where road number is the route number. When routes overlap at the crossing, separate by a “/.” If the road name is not known, leave blank.
-
6. Stream Name: If the stream name is known, type the name in the provided text box. Preferably, the USGS Geographic Names Information System name. If the stream name is not known, leave blank.
-
7. Sampling Scheme (select one): In some cases, surveyors are collecting data for a designed sampling effort, where they record data at predetermined locations (each with a plot identification number [ID]). This field can be left as opportunistic unless the observer has a plot ID for the sample location.
Road Characteristics
-
8. Road Type (select one)
-
a. Single Lane: Road with up to a single lane in each direction; paved or unpaved; with or without center lines, easily drivable with small cars.
-
b. Multi Lane: Road with two or more lanes of traffic in the same direction.
-
c. Driveway: Paved or unpaved; serving one or two houses or businesses.
-
d. 4WD Road: Unpaved, small roads for all-terrain (four-wheel drive [4WD]) vehicle use; primarily for recreational use rather than through travel.
-
e. Trail: Any path intended for pedestrians only and not motor vehicles (for example, hiking, walking, biking).
-
f. Railroad: With tracks, whether currently used or not.
-
g. Not trafficable: Overgrown or deteriorated to the point where a small all-terrain vehicle (ATV) could not navigate the road. Examples include roads overgrown with large trees and other woody vegetation that cannot easily be knocked over, severely washed-out roads, roads effected by mudslides, and those unsafe to navigate with any vehicle.
-
h. Decommissioned: Road closed to all motorized traffic.
-
-
9. Road Surface (select one)
-
10. User-created Road (select one): Trafficable road that is not part of the formal transportation network and created for use by the general public. This is a unique category that pertains to roads not constructed by a responsible transportation management authority. Typically, a dirt 4WD or ATV track that is not included on any map or the official land management road layer. Visible only when 9-C is selected.
-
11. Road Condition (select all that apply): Specify the condition of the road nearby and at the crossing.
-
a. Good: No major issues.
-
b. Eroded: Eroded from water flowing on surface (scour is evident).
-
c. Washboard: Surface consists of waves or rills that are perpendicular to the long axis of the road.
-
d. Rutted: Rutted with tire tracks from repeated use while muddy.
-
e. Rocky: Large rocks that make driving difficult (not coarse gravel but larger boulders).
-
f. No data/Unknown
-
-
12. Decommissioned Road Condition (select one, only visible when Decommissioned is selected for Road Type)
-
a. Recontoured (returned to natural hillslope contour)
-
b. Ripped (road surface has been obviously plowed to loosen up surface)
-
c. Road surface left as-is (blocked by boulders, berm and pothole, or another barrier)
-
d. Road replaced with formally constructed trail
-
e. Other (enter text)
-
f. No data/Unknown
-
-
13. Road Vegetation Cover Type (select one)
-
a. None: Clear of significant amount of vegetation growing in road.
-
b. Grass/herb: Grass or herb vegetation growing on the road surface (on the center or drivable portion of the road).
-
c. Woody vegetation: Larger trees or thick vines growing on the road surface make driving difficult.
-
d. Overgrown sides: Woody vegetation, branches, or vines are significantly overgrown from sides of road, making driving road difficult.
-
e. Thick overhanging branches: Woody vegetation, branches, or vines are hanging into road from overhead, making driving road difficult.
-
f. Straw, wood chips, mulch, or other organic cover: Usually placed on recontoured road cuts or recently altered slopes for erosion control.
-
g. Organic debris: Significant amount of natural organic debris covering road (leaves, dead grass, pine needles, and so on).
-
-
14. Roadside Ditch
-
15. Photo of Roadway (take in Survey123 application): Photo of the road surface, which is part of or atop the structure crossing.
Crossing Characteristics
-
16. Crossing Type (select one)
-
17. Number of Structures (enter number, default is 1, visible only when Multiple culverts is selected for Crossing Type): Number of structures (in other words, culverts) that make up the single road-stream crossing being assessed.
-
a. The number entered here will automatically update the rest of the form to represent the number of structures at the crossing, up to four.
-
b. Structure 1 should be identified as the structure capturing the most flow.
-
c. If more than four structures are present at the single crossing, utilize the Survey Notes and Additional Photos (see numbers 60 and 61 in this list) to describe the additional crossing structures. Usually, multiple structures or culverts are installed at a crossing to capture high flows, and additional structures or culverts are very similar in shape, size, and function.
-
-
18. Structure Alignment with Stream Flow (select one, only visible when Culvert, Multiple culverts, Bridge, Ford, or Buried stream is selected for Crossing Type; fig. 10): Flow aligned if stream approaches the crossing at less than a 45 degrees (°) from the centerline of the crossing structure. Skewed if angle is greater than (>) 45°.
-
19. Flow Diversion Potential (select one, only visible when Culvert, Multiple culverts, Ford, or Buried stream is selected for Crossing Type): Potential of a stream to erode around the crossing structure.
-
20. Overflow direction—Flow diversion potential (select one, only visible when Culvert, Multiple culverts, Ford, or Buried stream is selected for Crossing Type): Estimated overflow direction if high water flows exceed the capacity of the structure and road fill.
-
21. Structure Type (select one)
-
a. Round culvert (circular cross section): Visible when Culvert/Multiple culverts selected for Crossing Type.
-
b. Pipe arch culvert (oval in cross section, bottom intact): Visible when Culvert/Multiple culverts selected for Crossing Type.
-
c. Open bottom arch (no bottom): Visible when Culvert/Multiple culverts selected for Crossing Type.
-
d. Box culvert (square or rectangular cross section): Visible when Culvert/Multiple culverts selected for Crossing Type.
-
e. Bridge—armored: With abutments or wingwalls. Visible when Bridge selected for Crossing Type.
-
f. Bridge—not armored: No structures supporting road fill under bridge or channel margins. Visible when Bridge selected for Crossing Type.
-
g. Ford—supported: Human placed material or structure to support water flow over roadway. Visible when Ford selected for Crossing Type.
-
h. Ford—not supported: Visible when Ford selected for Crossing Type.
-
-
22. Structure Material (select one, only visible when an applicable Structure Type is selected): Select the most dominant material that the structure is composed of. Some structures will have reinforcements or internal structures made from a non-dominant material. What is the structure that is holding up road fill and letting water pass under the road primarily made from?

Crossing Characteristics—Outlet
If there are multiple structures at a single crossing (number of structures >1) then this and the next sections will automatically duplicate for the number of structures up to four.
If there are more than four structures at a road-stream crossings, please fill out another RoadxStr Field Form starting with structure five and make a comment on this in the Notes section.
Questions in this section are conditionally visible based on the answer to Crossing Type. Only those questions needed or applicable for the selected Crossing Type will be visible.
-
23. Outlet Photos (take in Survey123 application)
-
24. Outlet Grade (select one)
-
25. Outlet Configuration (select one; fig. 11)
-
a. At streambed elevation
-
b. Cascaded
-
c. Freefall into pool
-
d. Freefall into cascade
-
e. Flow onto apron
-
f. Other (enter text): If outlet configuration is not listed above, write in a brief description.
-
g. No data/Unknown
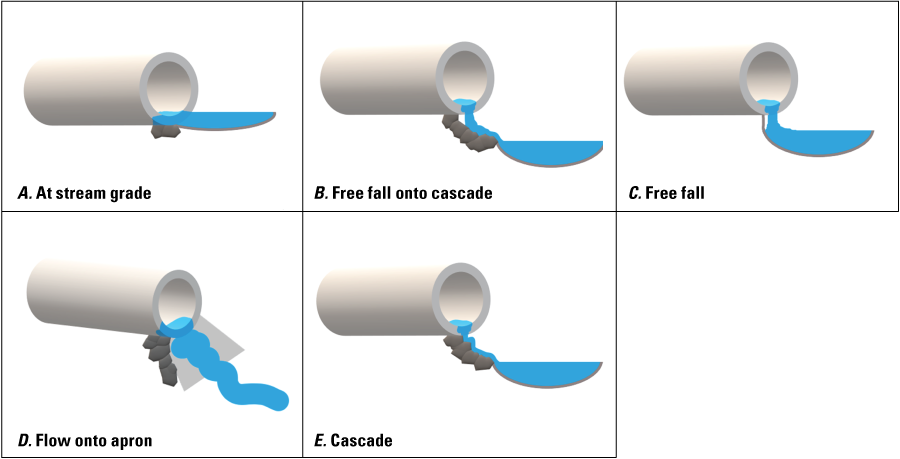
Figure 11. Outlet configuration diagrams. A, At stream grade: outlet bottom is at streambed elevation. B, Freefall onto cascade: water falls onto rocks or substrate that make a cascade, rather than a pool, and outlet bottom elevation is higher than the streambed substrate. C, Free fall: water falls from outlet into a pool, outlet elevation is higher than the streambed substrate. D, Flow onto apron: water flows from outlet onto a constructed apron, usually made of concrete. E, Cascade: flow from outlet lands on rocks or stream substrate and cascades down into the streambed elevation.
-
-
26. Outlet Condition (select one; fig. 12)
-
a. Good condition
-
b. Blockage
-
c. Backwatered
-
d. Perched (outlet drop present)
-
e. Embedded: Outlet partially or fully buried in stream channel; substrate is blocking flow of water through culvert.
-
f. Other (enter text): If outlet condition is not listed above, write in a brief description.
-
g. No data/Unknown
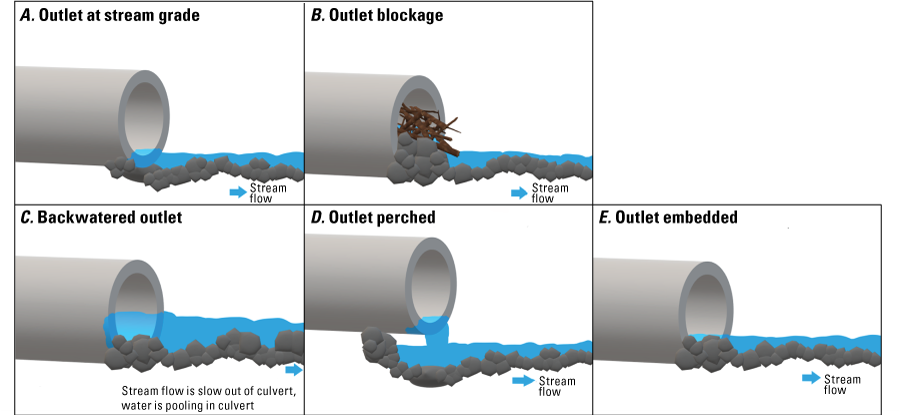
Figure 12. Diagrams showing outlet condition options. A, Outlet at stream grade: usually at stream grade where streambed substrate and outlet are at the same elevation. B, Outlet blockage: outlet is blocked by debris; limits flow through the structure and can cause pooling of water inside structure. C, Backwatered outlet: water is pooling at outlet from downstream, flow is slow through end of structure. D, Outlet perched: there is an outlet drop present, and outlet bottom is at a higher elevation than the streambed substrate. E, Outlet embedded: substrate has piled up at outlet, causing the structure to be embedded at the outlet, and streambed has a higher elevation than the structure.
-
-
27. Culvert Corrugations (select one, visible when Culvert or Multiple culverts is selected for Crossing Type)
-
28. Flow Status in Structure (select one)
-
a. Continuous flow: Surface water (flowing or standing) is present along the full length of the crossing structure flow path.
-
b. Discontinuous flow: Surface water (flowing or standing) is present, but a portion of the crossing structure length is dry across the full width of the water flow path.
-
c. Dry: No surface water is present in or along the full length of the crossing structure.
-
d. No data/Unknown: User cannot accurately assess if water is present in or along the crossing structure.
-
-
29. Outlet Width (maximum, enter number, in m)
-
30. Outlet Height (maximum, enter number, in m)
-
31. Outlet Drop to Water’s Surface (enter number, in m; fig. 13)
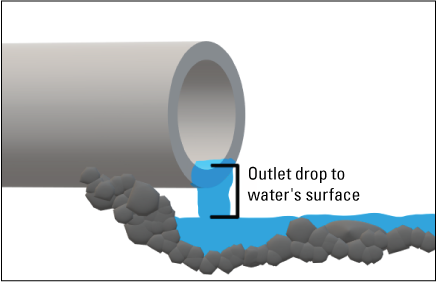
Figure 13. Outlet drop to water’s surface diagram. Measured from bottom inside of structure’s outlet to the stream’s water surface at base of outlet drop.
-
32. Structure Length (enter number, in m): Total length of structure, measured at its longest point.
-
33. Slope of Structure (optional, enter number, as a percent slope value; fig. 14)
-
a. Always recorded as a percent value and measured from the outlet to the inlet, facing upstream.
-
b. If it is not possible to collect slope from the outlet to the inlet, do not collect it.
-
c. Slope values in most cases will be positive; however, if the culvert is sloped backwards, then a negative number is possible and can be recorded as such.
-
d. Measured from one end of structure to other end of structure. Record the measurement at approximately the same level on the structure from one end to the other when using a laser rangefinder.
-
e. Use the slope (or inclination) mode on the TruPulse 200i laser rangefinder. Also, be sure to use the reflective targets when measuring slope for best accuracy.
-
f. Use two people for a more accurate reading. One on each end of the crossing structure.
-
• Person 1 is using the laser rangefinder, and Person 2 is holding the reflective target.
-
• Be sure to hold the target and the laser rangefinder at the same height above the bottom of the structure. Stadia rods, trekking poles, or substrate rulers are very helpful for this.
-
• If a very small culvert, and observers can see each other across road when standing at the ends of the culvert, slope can be recorded above road (by shooting across).
-
• With a larger structure that is easier to see through or with a road fill that is too tall to see across when standing at each end of the structure, shoot slope through the structure.
-
• When shooting the rangefinder through the structure, ensure you utilize a landmark within the structure to measure from and to (such as the bolt line common within metal culverts) so the measurement is in line with the structure.
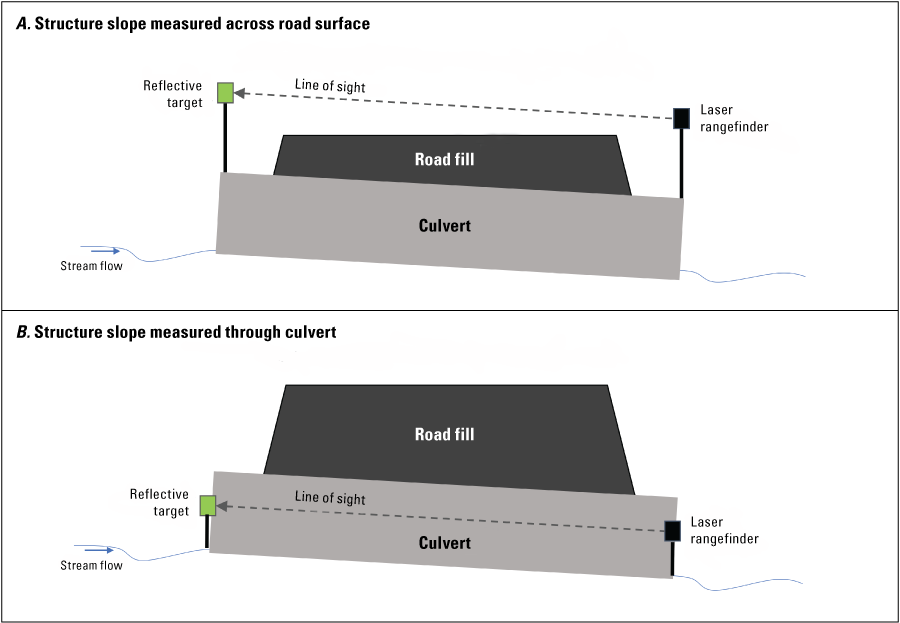
Figure 14. Slope measurement methods illustration. A, Structure slope measured across road surface. B, Structure slope measured through culvert.
-
-
-
34. Slope Units (select one)
-
35. Slope Measurement Method (select one)
-
36. Apron Material (select one, only visible if Flow onto apron is selected for Outlet Configuration)
-
37. Apron Length (enter number, in m, only visible if Flow onto apron is selected for Outlet Configuration)
-
38. Apron Slope (select one, only visible if Flow onto apron is selected for Outlet Configuration): Visual estimate of consistency between culvert slope and apron slope.
-
39. Apron Drop to Water’s Surface (enter number, in m, only visible if Flow onto apron is selected for Outlet Configuration)
Crossing Characteristics—Inlet
Questions in this section are conditionally visible based on the answer to Crossing Type. Only those questions needed or applicable for the selected Crossing Type will be visible.
-
40. Photos (take in Survey123 application)
-
41. Inlet Grade (select one; fig. 15)
-
a. At stream grade
-
b. Inlet drop/embedded
-
c. Inlet perched
-
d. Inlet clogged/collapsed
-
e. No data/Unknown
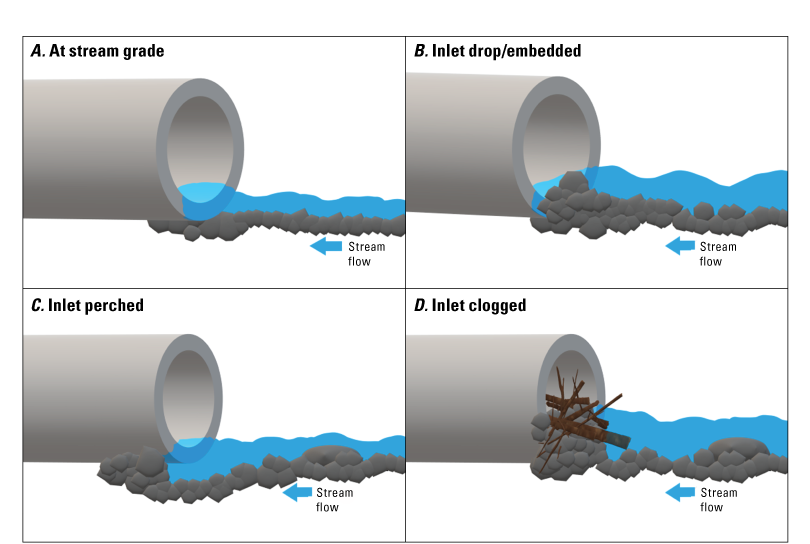
Figure 15. Diagram showing inlet grade options. A, At stream grade: stream bed and bottom of structure inlet are at the same elevation. B, Inlet drop embedded: stream substrate has piled up at inlet, causing a drop into the structure. C, Inlet perched: substrate has eroded from under inlet, causing the inlet bottom to be at a higher elevation than the streambed. D, Inlet clogged: debris has clogged the inlet, restricting flow and causing water to pool at inlet.
-
-
42. Inlet Configuration (select one; fig. 16)
-
a. Projecting
-
b. Mitered to slope
-
c. Headwall
-
d. Wingwalls
-
e. Headwall and wingwalls
-
f. Other (enter text): If inlet configuration is not listed above, write in a brief description.
-
g. No data/Unknown
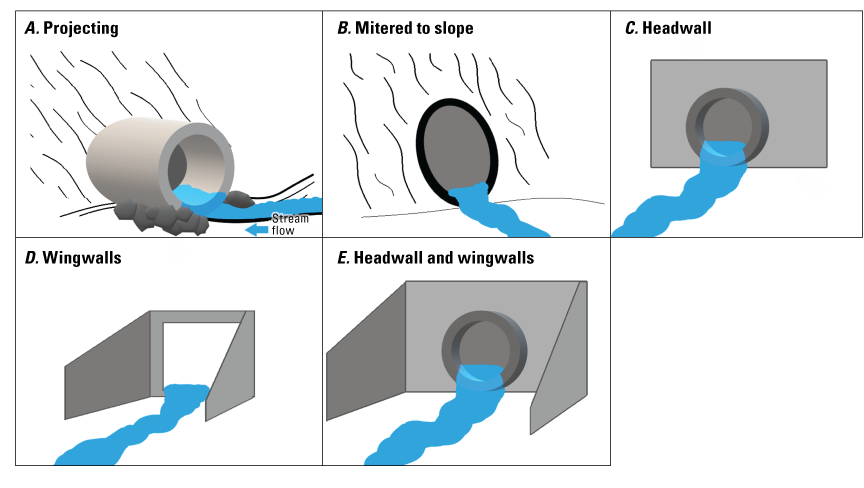
Figure 16. Inlet configuration diagrams. A, Projecting: the pipe projects out from the road fill. B, Mitered to slope: the pipe inlet is angled with the road fill slope. C, Headwall: supports the road fill around the inlet. D, Wingwalls: direct flow into the inlet and keep road fill from eroding (usually on box culverts). E, Headwalls and wingwalls enable flow direction into the inlet and protect the road fill from erosion.
-
-
43. Inlet Condition (select one)
-
a. Inlet in good condition
-
b. Scour around inlet
-
c. Water pooling at inlet
-
d. Inlet embedded: Partially or fully buried within the stream channel; substrate is blocking the flow of water into culvert.
-
e. Blockage at inlet
-
f. Inlet damaged
-
g. Other (enter text): If inlet condition is not listed above, write in a brief description.
-
h. No data/Unknown
-
-
44. Structural Issues (select one)
-
a. None
-
b. Breaks in structure
-
c. Fill eroding on sides of structure, including footings/foundations
-
d. Blocked/plugged with debris
-
e. Bent/damaged inlet
-
f. Bent/damaged outlet
-
g. Bottom of culvert worn through
-
h. Water flowing under structure
-
i. Deformation/damage in other parts of structure
-
j. No data/Unknown
-
-
45. Physical Barriers (select one): Potential barriers to aquatic organism passage.
-
46. Internal Structures (select one): These structures are to facilitate aquatic organism passage through the crossing structure.
-
47. Substrate2 in Structure (select one): If there is any substrate in the structure, select the best option.
-
a. No substrate or < 5 percent coverage of culvert bottom
-
b. Continuous substrate: There is substrate throughout the entire culvert.
-
c. Discontinuous substrate: Only part of the culvert is covered with substrate.
-
d. No data/Unknown: Unable to view the inside of structure to see if there is substrate.
-
-
48. Substrate Type in Structure (select one, only visible when Continuous substrate or Discontinuous substrate is selected for Substrate in Structure)
-
a. Coarse: Sand or larger substrate (gravel, cobble, or larger), usually 2 mm or larger. Will feel gritty when rubbed between fingers.
-
b. Fine: Smaller than sand, like silt or organic materials. Will feel slimy when rubbed between fingers.
-
c. Unknown: Not able to visually assess the substrate of the stream channel; no observation made.
-
d. No data/Unknown
-
-
49. Inlet Width (enter number, in m)
-
50. Inlet Height (enter number, in m)
-
51. Rust Line Height (if present, enter number, in m, only visible when Metal is chosen for Structure Material): Recorded as height from the bottom of the structure to the top of the rust line on the inside of the structure. Only relevant with metal structures and usually only culverts. If substrate is present in structure, measure from top of substrate to top of rust line.
-
52. Road Fill Height (optional, enter number, in m; fig. 17): Measured from the top of the road surface to the top of the crossing structure(s).
Substrate refers to silt, sand, gravel, cobbles, or boulders present in culverts, whether delivered by natural processes or placed by humans.
Best measured with two people. For crossings with multiple structures, record the average fill height of all structures (fig. 12).
Measuring Road Fill Height with a Laser Rangefinder
Taking measurements in 1-shot vertical distance targeting mode:
If the road surface is flat and the top of the culvert or crossing structure is visible while standing on the road, the fill height of the road can be measured with a single shot in vertical distance targeting mode.
-
a. Person 1 (with the rangefinder) stands on the road surface, as close as possible to the center of the road, while still having a clear view of Person 2 (with the reflective target).
-
b. Both observers have their trekking poles set to the same height and set on the surface of the road (for Person 1) and the top of the crossing structure (Person 2).
-
c. Person 1 sets the rangefinder on the top of their trekking pole, and Person 2 sets the reflective target on top of their trekking pole.
-
d. Person 1 measures the vertical distance in one shot with the laser rangefinder by sighting in the reflective target (see TruPulse 200i Quick Reference Guide for more details on how to measure vertical distances with the laser rangefinder).
-
e. The height measurement (in m) is recorded in the RoadxStr v2 Field Form.
Taking measurements in 2-shot missing line targeting mode:
Reflective targets can be set on the top of the culvert or crossing structure and in the middle of the road. A clear line of sight is required to measure road fill height in this targeting mode.
-
a. Person 1 (with the rangefinder) stands on the road surface off to the side of the road, where there is a clear view of both the top of the structure (close to the road fill as possible) and the road surface.
-
b. Refer to the TruPulse 200i Quick Reference Field Guide for detailed instructions on how to measure the height with the 2-shot missing line vertical distance targeting mode.
-
c. The height measurement (in m) is recorded in the RoadxStr v2 Field Form.
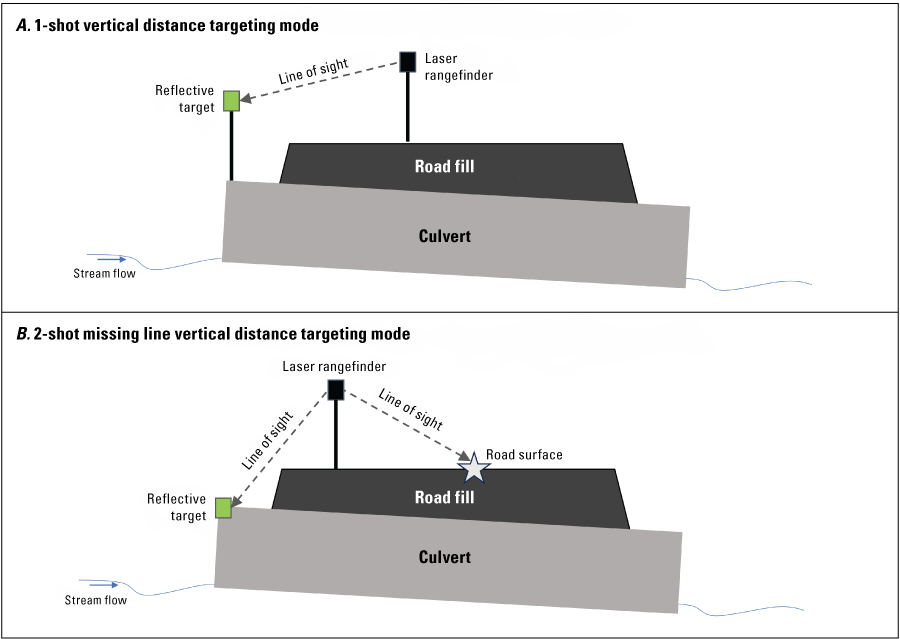
Figure 17. Illustration of setup for measuring road fill height with the laser rangefinder using two methods. A, 1-shot vertical distance targeting mode. B, 2-shot missing line vertical distance targeting mode.
-
53. Crossing Condition3
-
a. Ok: Crossing is in good and functional condition; most crossings will fall under this category.
-
b. Poor: Crossing is NOT in good, functional condition. Structural issues or damage or something impeding the flow of water through the crossing would be cause for poor condition.
-
c. Failing: Crossing is completely non-functioning and failure could threaten road integrity and public safety. Significant roadway, road fill, or embankment damage or erosion observed. Water is not able to flow through crossing, resulting in damage to road infrastructure and decreased trafficability.
-
d. New: Crossing structure looks very new and is in pristine condition.
-
e. No data/Unknown: Crossing cannot be surveyed to determine condition.
-
For more detailed information on crossing condition ratings, refer to the Culvert assessment and decision-making procedures manual (Haber and Graybeal, 2018).
Stream Characteristics
Collect stream (or other hydrologic channel) characteristics while standing just upstream of the crossing and observing the 10 m observation reach upstream.
-
54. Stream Type (select one)
-
55. Stream Flow Status (select one)
-
a. Continuous flow: Visible surface water (flowing or standing) over the full length of the 10 m observation reach.
-
b. Discontinuous flow: Some portion of the 10 m observation reach is dry across the full width of the active channel.
-
c. Dry: A channel that has no flowing or standing surface water over the full length of the 10 m observation reach.
-
d. No data/Unknown
-
-
56. Stream Substrate Type (select one)
-
a. Coarse: Sand or larger substrate, usually 2 millimeters or larger. Will feel gritty when rubbed between fingers.
-
b. Fine: Smaller than sand, like silt or organic materials. Will feel slimy when rubbed between fingers.
-
c. Unknown: Not able to visually assess the substrate of the stream channel; no observation made.
-
d. No data/Unknown
-
-
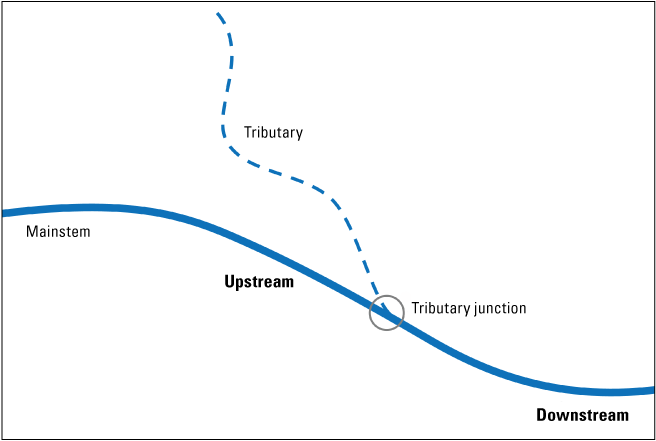
57. Tributary Junction (select one; fig. 18): If there is a visible tributary junction nearby the crossing, select if it is upstream or downstream of the crossing location.
-
58. Active Channel Width (enter number, in m, only visible when Natural channel, Leveed or channelized, Ditch or canal, or Other is selected for Stream Type; fig. 19): Record the active channel width of the stream. If there is more than one channel, indicate this in the notes and measure the width of the largest channel flowing through the structure. This is where there is evidence of active water flow. Look for changes in the amount of detritus and leaf litter, changes from stream substrate to terrestrial soil, and changes in vegetation.
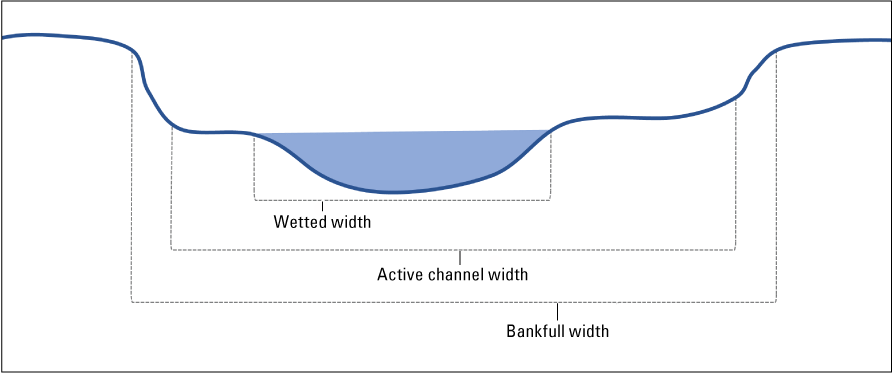
Figure 19. Stream widths cross-section. Wetted width: the area of the stream that is wet at the time of the survey. Active channel width: the area of the stream that is frequently affected by flowing water. Bankfull width: Measurement of water width when the stream channel is completely full, and additional water would overflow into the floodplain.
-
59. Max Water Depth: Measure at the time of survey, in m (enter number, only visible when Natural channel, Leveed or channelized, Ditch or canal, or Other is selected for Stream Type), the maximum water depth in the upstream 10 m stream observation reach.
Notes and Photos
-
60. Survey Notes (enter text)
-
61. Additional Photos (take in the Survey123 application) Take additional photos to help document issues with structure or road or aquatic organism passage.
Tips for Taking Effective Photos
The most useful photos show (1) the absence or presence of a stream channel and (2) a clear view of the absence or presence of surface water. This can be challenging to capture in locations with dense understory vegetation, where photos tend to be dark or out of focus.
-
a. Focus options: Usually, the focus point of your mobile device’s camera view can be directed to specific spots by tapping where you want the camera to focus. Doing this will adjust the brightness of the image in ways that can facilitate the best view of what you are focusing the photo on. In general, focusing on medium light regions can help avoid under- or overexposure of the photo.
-
b. If vegetation is a barrier to capturing a good photo, it can sometimes help to push vegetation out of the way before taking the photo to maximize the value of the photo.
-
c. Review photo while in the field: Examine the photo before saving the survey data to assess whether the image is worth including with the observation. There is always the option to delete the photo and take another one.
-
d. More than one photo is useful: Include additional photos to highlight or better capture specifics at the observation location.
-
e. No vehicles or people in photos: Please do not take photos that include people or vehicles in them if possible. Photos with people and vehicles are excluded from the RoadxStr archived data release to meet Department of the Interior privacy standards.
-
f. Switch between landscape or portrait orientation: Using different photo orientations may capture more information about the location.
-
g. Take a step back to capture more information: Moving back away from a crossing to capture the entire structure (especially for large structures) or moving closer to highlight a specific aspect of the crossing can help include more information.
References Cited
Dunham, J., Hirsch, C., Gordon, S., Flitcroft, R., Chelgren, N., Snyder, M., Hockman-Wert, D., Reeves, G., Andersen, H., Anderson, S., Battaglin, W., Black, T., Brown, J., Claeson, S., Hay, L., Heaston, E., Luce, C., Nelson, N., Penn, C., and Raggon, M., 2023, Northwest Forest Plan—the first 25 years (1994–2018)—Watershed condition status and trends: Portland, Oregon, Pacific Northwest Research Station, U.S. Department of Agriculture, Forest Service General Technical Report PNW-GTR-1010, 163 p.
Appendix 1. Supplemental Figures and Tables
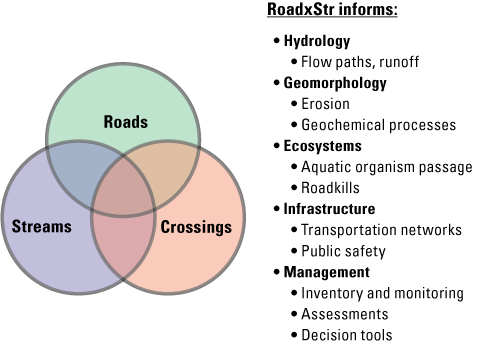
Overview of how each of the three main components of the RoadxStr survey (tables 1.1, 1.2) provides information about hydrology, ecosystems, infrastructure, and management.
Table 1.1.
Summary of road specific features associated with road-stream crossings tracked by a RoadxStr observation.[A brief description of each feature is included, along with a description of why it could be important for evaluating road-stream networks.]
Table 1.2.
Summary of crossing and structure specific features associated with road-stream crossings tracked by a RoadxStr observation.[A brief description of each feature is included, along with a description of why it could be important for evaluating road-stream networks.]
Appendix 2. RoadxStr Quick Guide
Observer and Location Information
Road Characteristics
-
8. Road Type (select one)
-
9. Road Surface (select one)
-
10. User-created Road (select one, visible when #9.3 is selected)
-
11. Road Condition (select all that apply)
-
12. Decommissioned Road Condition (select one, only visible when #8.8 is selected)
-
13. Road Vegetation Cover Type (select all that apply)
-
14. Roadside Ditch (select one)
-
15. Photo of Roadway (capture in survey)
Crossing Characteristics
-
16. Crossing Type (select one)
-
17. Number of Structures (enter number, default is 1, visible when #16.2 is selected)
-
18. Structure Alignment with Stream Flow (select one)
-
19. Flow Diversion Potential (select one)
-
20. Overflow Direction (select one)
-
21. Structure Type (select one, options auto-filter based on answer to Crossing Type)
-
22. Structure Material (select one)
Crossing Characteristics—Outlet
Questions only applicable to the selected Crossing Type will be visible.
-
23. Outlet Photos (capture in survey)
-
24. Outlet Grade (select one)
-
25. Outlet Configuration (select one)
-
26. Outlet Condition (select one)
-
27. Culvert Corrugations (select one)
-
28. Flow Status in Structure (select one)
-
29. Outlet Width (maximum, enter number)
-
30. Outlet Height (maximum, enter number)
-
31. Outlet Drop to Water’s Surface (enter number, visible when Above stream grade is selected for Outlet Grade)
-
32. Structure Length (enter number)
-
33. Slope of Structure (optional, fill in number)
-
34. Slope Units
-
35. Slope measurement method (select one)
-
36. Apron Material (select one)
-
37. Apron Length (enter number)
-
38. Apron Slope (select one)
-
39. Apron Drop to Water’s Surface (enter number)
Crossing Characteristics—Inlet
Questions only applicable to the selected Crossing Type will be visible.
-
40. Inlet Photos (capture in survey)
-
41. Inlet Grade (select one)
-
42. Inlet Configuration (select one)
-
43. Inlet Condition (select one)
-
44. Structural Issues (select one)
-
44.1. None
-
44.2. Breaks in structure
-
44.3. Fill eroding on sides of structure (including footings/foundations)
-
44.4. Blocked/plugged with debris
-
44.5. Bent/damaged inlet
-
44.6. Bent/damaged outlet
-
44.7. Bottom of culvert worn through
-
44.8. Water flowing under structure
-
44.9. Deformation/damage in other parts of structure
-
44.10. No data/Unknown
-
-
45. Physical Barriers (select one)
-
46. Internal Structures (select one)
-
47. Substrate in Structure (select one)
-
48. Substrate Type in Structure (select one, only visible when Continuous or Discontinuous coverage selected for Inlet Condition)
-
49. Inlet Width (maximum, enter number)
-
50. Inlet Height (maximum, enter number)
-
51. Rust Line Height (if present, enter number)
-
52. Road Fill Height (optional, enter number)
-
53. Overall Crossing Condition
Stream Characteristics
-
54. Stream Type (select one)
-
55. Stream Flow Status (select one)
-
56. Stream Substrate Type (select one)
-
57. Tributary Junction (select one):
-
58. Active Channel Width (enter number, only visible when Natural channel, Leveed or channelized, Ditch or canal, or Other is selected for Stream Type)
-
59. Max Water Depth (enter number, only visible when Natural channel, Leveed or channelized, Ditch or canal, or Other is selected for Stream Type)
For more information, contact
Director, Forest and Rangeland Ecosystem Science Center Corvallis Research Group
3200 SW Jefferson Way
Corvallis, OR 97331
fresc_outreach@usgs.gov
Or visit our website at
https://www.usgs.gov/centers/forest-and-rangeland-ecosystem-science-center
Publishing support provided by the U.S. Geological Survey, Science Publishing Network, Baltimore and Tacoma Publishing Service Centers
Disclaimers
Any use of trade, firm, or product names is for descriptive purposes only and does not imply endorsement by the U.S. Government.
Although this information product, for the most part, is in the public domain, it also may contain copyrighted materials as noted in the text. Permission to reproduce copyrighted items must be secured from the copyright owner.
Suggested Citation
Heaston, E., Winter, S., Bauer, S., Ronningen, T., and Dunham, J., 2026, RoadxStr user’s guide—For collection of road-stream crossing assessment field observations: U.S. Geological Survey Techniques and Methods, book 18, chap. B1, 32 p., https://doi.org/10.3133/tm18B1.
ISSN: 2328-7055 (online)
| Publication type | Report |
|---|---|
| Publication Subtype | USGS Numbered Series |
| Title | RoadxStr user’s guide—For collection of road-stream crossing assessment field observations |
| Series title | Techniques and Methods |
| Series number | 18-B1 |
| DOI | 10.3133/tm18B1 |
| Publication Date | February 26, 2026 |
| Year Published | 2026 |
| Language | English |
| Publisher | U.S. Geological Survey |
| Publisher location | Reston, VA |
| Contributing office(s) | Forest and Rangeland Ecosystem Science Center |
| Description | vii, 32 p. |
| Online Only (Y/N) | Y |
| Additional Online Files (Y/N) | N |