

Cisco (Coregonus artedi) and Bloater (Coregonus hoyi) Culture Manual
Links
- Document: Report (4.6 MB pdf) , HTML , XML
- Download citation as: RIS | Dublin Core
Acknowledgments
We would like to express our appreciation and gratitude to everyone who has participated in the Coregonine Research Program at the U.S. Geological Survey, Great Lakes Science Center, Tunison Laboratory of Aquatic Science. Without the support, guidance, and dedication of our staff members and collaborating agencies, the progress in Coregonine fish culture would not be possible. Special thanks and gratitude go to (1) all the staff at the Tunison Laboratory of Aquatic Science, specifically Jim Johnson and H. George Ketola; (2) staff at the U.S. Fish and Wildlife Service Northeast Fishery Center, specifically Mike Millard, Meredith Bartron, Steve Davis, Tom Kehler, and John Coll; (3) Bill Archambault (U.S. Fish and Wildlife Service, Hadley, Massachusetts); (4) staff at the New York State Department of Environmental Conservation Cape Vincent Fisheries Station, specifically Steve LaPan, Mike Connerton, and Chris Legard; and (5) staff at the U.S. Fish and Wildlife Service Jordan River National Fish Hatchery and White Lake Fish Culture Station. Major funding was provided by the Great Lakes Restoration Initiative.
Abstract
The primary objective of the Coregonine Research Program established at the U.S. Geological Survey, Great Lakes Science Center, Tunison Laboratory of Aquatic Science as mandated by the Great Lakes Restoration Initiative is to restore native coregonines, specifically Coregonus artedi (Lesueur, 1818; ciscoes) and Coregonus hoyi (Milner, 1874; bloaters) into Lake Ontario. This objective focuses on providing an alternative food source for top predators and improving the ecological function of Lake Ontario as it relates to native versus invasive species control. To complete this goal, hatchery techniques were developed to grow ciscoes and bloaters; these techniques are described in this standard operating manual.
Introduction
The process of rearing Coregonus artedi (Lesueur, 1818; ciscoes) and Coregonus hoyi (Milner, 1874; bloaters) for conservation and reintroduction in their native environment, such as Lake Ontario of the Laurentian Great Lakes (not shown), is a multiagency collaboration that includes adult brood collection, spawning, disease certification, genetic testing, egg incubation and development, larval and juvenile husbandry, marking, and release into targeted habitats. This standard operating manual addresses all these steps but does not identify/describe post release assessment to determine the efficacy of releases for restoration of conservation purposes.
Adult Brood Collection
Cisco
In late November to early December, adult ciscoes are captured on top of fractured bedrock shoals (Johnson Shoal: lat 44.053156 °N., long 76.162847 °W.; Herrick Shoal: lat 44.041584 °N., long −76.199374 °W.; Middle Shoal: lat 44.049960 °N., long 76.189174 °W.) in Chaumont Bay, Lake Ontario, New York (not shown; lat 44.06228 °N., long 76.15266 °W.) using Oneida style trap nets (with a car having a 1.2-meter [m] height x 1.2-m width and wings having a 1.2-m height x 6.1-m length; fig. 1) once the water temperature in the bay drops to less than 6.0 degrees Celsius (°C). Paired trap nets are connected at the cod end with the wings facing outwards to fish in opposite directions. With the assistance of the New York State Department of Environmental Conservation Cape Vincent Field Office, nets are set in the early morning and checked the next day.
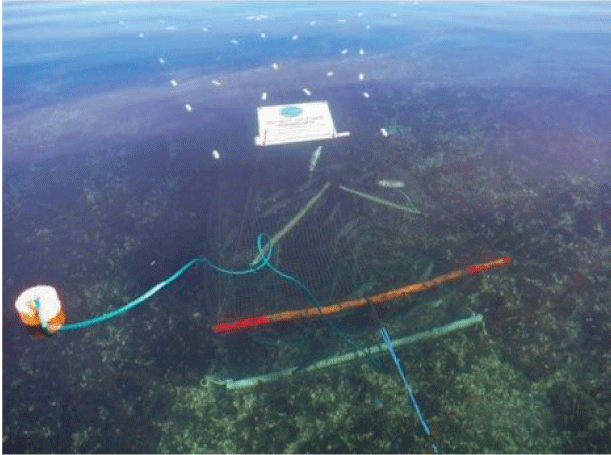
Collection of adult Coregonus artedi (Lesueur, 1818; ciscoes) from Chaumont Bay, Lake Ontario, New York, using Oneida style trap nets.
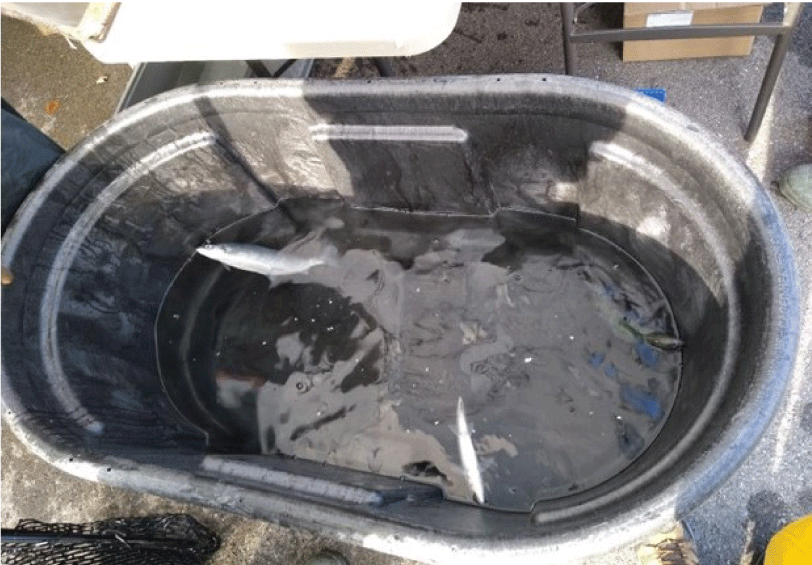
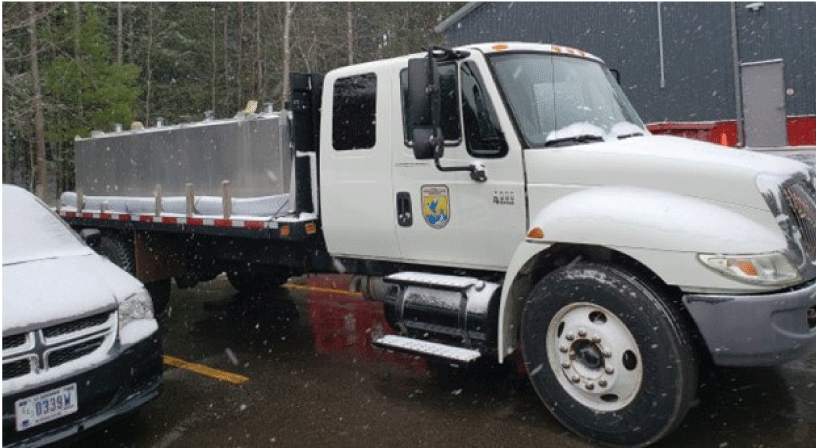
Adult ciscoes are retrieved from the nets and placed into a holding tank aboard a transport boat; then, they are driven to shore and placed into floating net pens. Fish are then loaded into an insulated transport tank (1,136 liters [L]) and transported to the U.S. Geological Survey, Great Lakes Science Center, Tunison Laboratory of Aquatic Science (TLAS) to be spawned (fig. 2). Noniodized granulated salt (5,000 milligrams per liter [mg/L]) and compressed oxygen are used to reduce stress and maintain adequate oxygen levels (80–90 percent saturation) during transport.
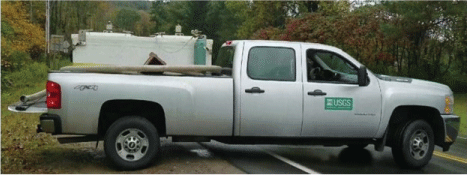
Transport tank used to transfer fish from the wild back to the U.S. Geological Survey Tunison Laboratory of Aquatic Science for spawning.
Fish are sexed and placed into separate 5,030-L concrete raceways (6.25-m length, 0.56-m height, 1.524-m width, fig. 3).

Adult Coregonus artedi (Lesueur, 1818; ciscoes) collected from the wild being held in an outside raceway (6.25-meter length x 1.524-meter width x 0.56-meter depth).
Bloater
Because bloaters are extirpated from Lake Ontario, fish and specimens are collected from two alternative sources.
Lake Michigan
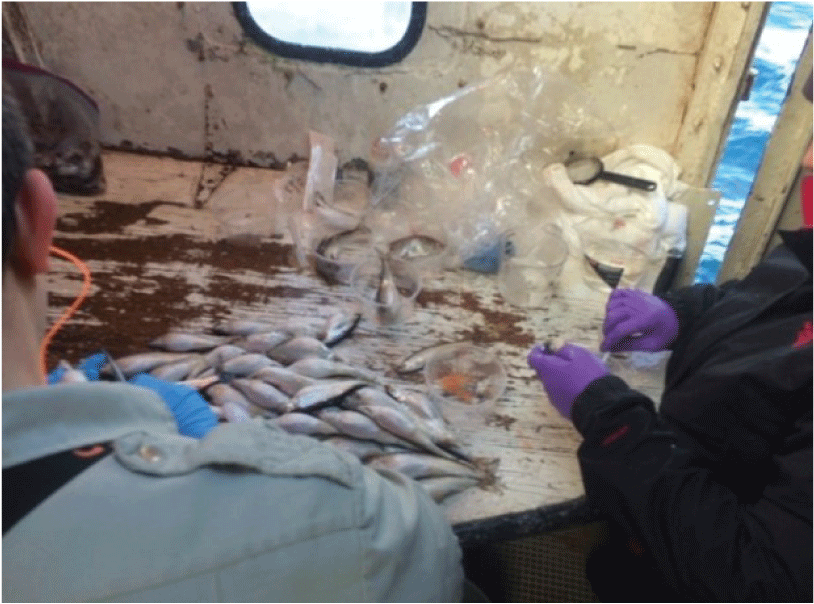
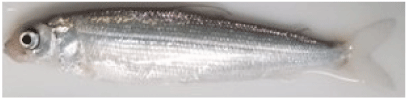
Wild adult bloaters are captured from the northern Door Peninsula, Lake Michigan, Wisconsin (not shown; lat 45.22458 °N., long 86.72999 °W.). In late January to early February, from the fishing vessel Susi-Q with the assistance of the U.S. Fish and Wildlife Service Jordan River National Fish Hatchery, adult bloaters are collected using standard lake bottom trawl (33 m x 2 m, fig. 4). Four tows are completed daily over a 6-week period. Fish are sexed and spawned aboard the fishing vessel.

Collection and spawning of adult Coregonus hoyi (Milner, 1874; bloaters) from northern Door Peninsula, Lake Michigan, Wisconsin (clockwise from top left, the fishing vessel Susi-Q, adult bloaters, crew collecting biological data, eggs from adult bloaters, eggs collected from adult bloaters, milt collected from adult bloaters).
White Lake Fish Culture Station
A captive brood stock originating from Lake Michigan progeny has been reared (age 3 and age 4 fish) at the White Lake Fish Culture Station, Sharbot Lake, Ontario, Canada (not shown), to supplement egg production. Fish are spawned and the eggs develop until eye up and are then shipped to TLAS.
Spawning
Cisco
Ciscoes spawn in late November or early December at TLAS. Fish are netted from the raceway and sedated in a holding tank with culture water and tricaine methanesulfonate (Syndel, Washington; 130 mg/L) to reduce handling stress (fig. 5). In about 3 minutes, fish begin to lose swimming equilibrium and are ready to be strip spawned.
Holding tank for adult Coregonus artedi (Lesueur, 1818; ciscoes) used for anesthesia.
Total length (in millimeters), weight (in grams), and a fin clip for genetic analysis are collected from each fish before spawning (fig. 6).
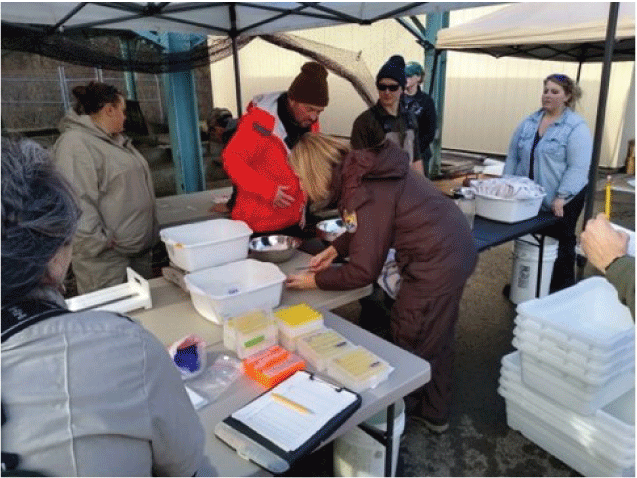
Collection of biotic data from adult Coregonus artedi (Lesueur, 1818; ciscoes) before being spawned.
Spawning ciscoes is a multistep process:
-
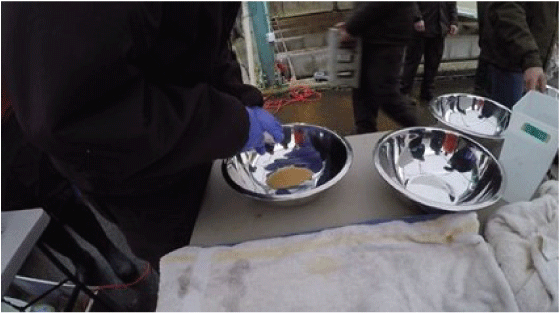
1. Rinse and dry anesthetized female ciscoes with a towel to maximize fertilization success and to prevent water prematurely entering the egg, which reduces the success of the sperm to fertilize.
-
2. Hand strip the eggs into a dry bowl by applying gentle pressure on the abdominal wall from the pectoral fins toward the vent in a downward motion (fig. 7). The eggs should flow freely from the vent into the bowl. If the eggs are clumpy, bloody, or discolored, dispose of them and do not use them.
-
3. To maximize the genetic contribution of the population, fertilize the eggs from each female with the milt of two randomly selected males.
-
4. Rinse the anesthetized male and then dry it with a towel to remove water contact with the milt when the males are stripped. Accidental water contact can cause the milt to activate prematurely before coming into contact with the egg.
-
5. Hand strip the milt of two male ciscoes into an egg-filled, dry stainless-steel bowl by applying gentle pressure to the abdominal area and sliding your hand toward the vent (fig. 8). Milt should flow freely from the vent into the bowl. If blood is observed, stop immediately and use another fish.
-
6. Gently mix the milt into the eggs with a feather (a Meleagris gallopavo [turkey] feather works the best); then, add 250 milliliters (mL) of culture water to activate fertilization for 1 minute (fig. 9).
-
7. Drain and rinse the fertilized eggs three times with 1 L of culture water per rinse.
-
8. Transfer the eggs to a clean bowl with culture water. Pool the fertilized and rinsed eggs with other spawn groups before protease and iodine treatments.
-
9. Treat the pooled fertilized eggs with 0.01 percent (0.1 milliliter per liter) protease solution to completely submerge the eggs for 10 minutes to counteract adhesiveness. After 10 minutes, rinse the eggs three times with culture water and then drain (fig. 10).
Expressing eggs from a mature female Coregonus artedi (Lesueur, 1818; cisco).
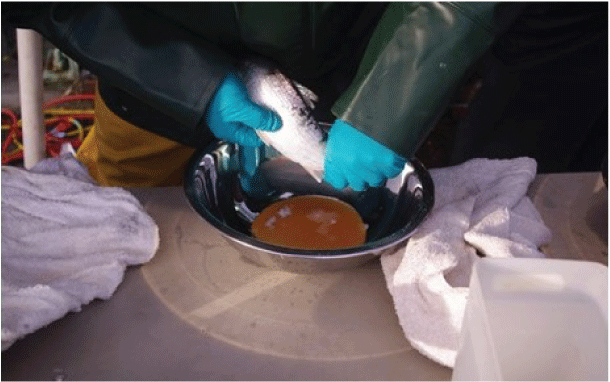
Expressing milt from mature male Coregonus artedi (Lesueur, 1818; cisco).
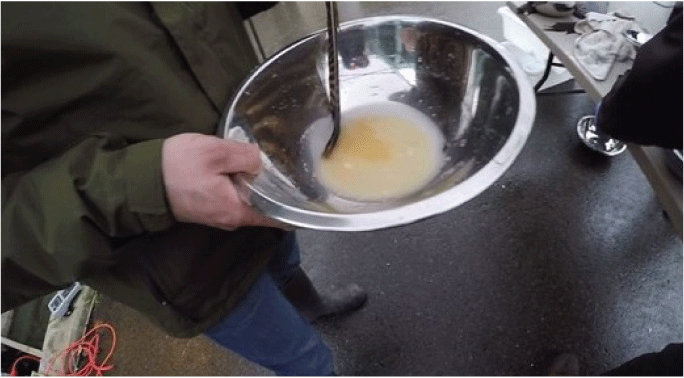
Activation of milt using culture water.
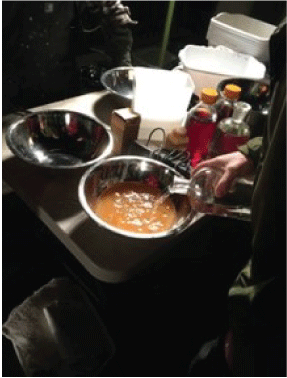
Protease immersion bath for recently spawned eggs.
Bloater
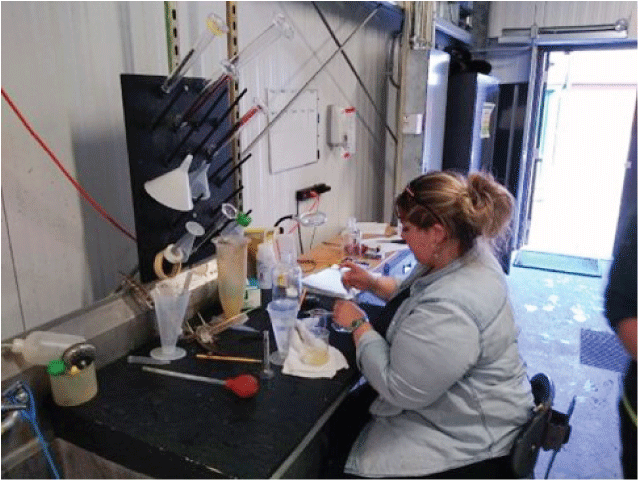
Biotic data (total fish length, in millimeters; fish weight, in grams; and a fin clip [for genetic analysis]) are collected before spawning aboard the fishing vessel Susi-Q and at the White Lake Fish Culture Station (fig. 11).
Adult Coregonus hoyi (Milner, 1874; bloaters) biotic data.
The detailed steps for bloater egg receipt are as follows:
-
1.A. Lake Michigan wild bloater eggs—Fertilized eggs from wild collections provided by the U.S. Fish and Wildlife Service Jordan River Fish Hatchery are immediately shipped overnight to TLAS.
-
1.B. White Lake Fish Culture Station bloater eggs—Eggs that have been recently fertilized or are at the eye up developmental stage are immediately shipped or driven to TLAS.
-
2. Once bloater eggs (green or eyed up) are received, they are disinfected with 100 mg/L of polymeric iodine (Argentyne) for 10 minutes.
Tumbling eggs in incubation jars.
Egg Enumeration
The steps in egg enumeration are as follows:
-
1. Measure the total volume of disinfected eggs in a graduated cylinder and distribute them into incubation jars (miniature egg hatching jars [14.5-cm x 29-cm cone]) at a rate of 300 mL per jar (fig. 13).
-
2. Adjust the flow so the eggs are continuously tumbled gently (1–2 L per minute, fig. 14).
-
3. To determine egg number, randomly siphon and measure 1 mL of eggs and transfer them to a petri dish (fig. 15). Count the number of eggs and repeat two more times. Average the three egg counts to get the average number of eggs per 1 mL. Multiply the average number of eggs per milliliter by the total volume of eggs to get the total number of eggs.
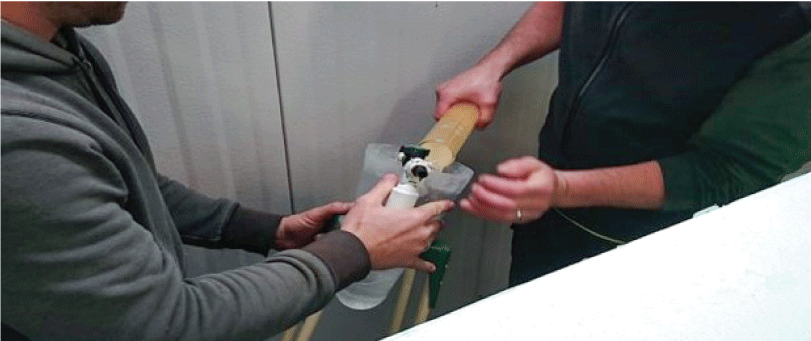
Enumeration of fertilized eggs using a graduated cylinder.
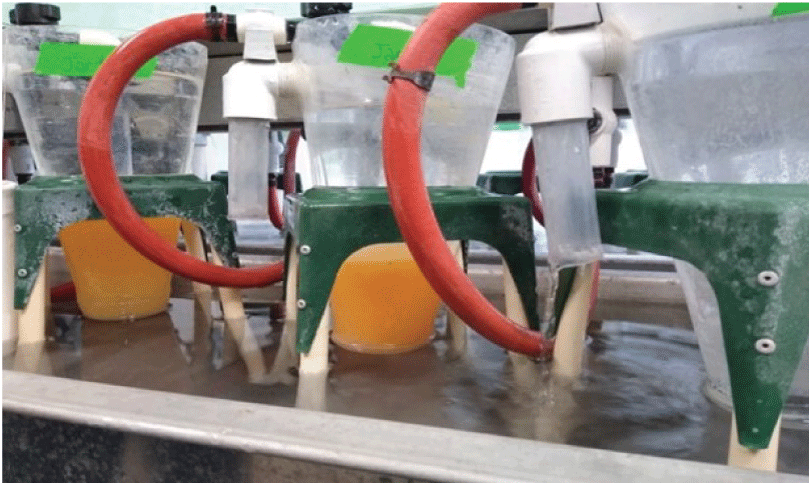
Tumbling eggs in incubation jars.
Technician measuring 1 milliliter of eggs and counting the total number.
Disease Certification
Currently, fish hatchery activities with ciscoes are dependent on wild sourced brood stock. Bloater fish hatchery activities are split between wild sourced brood stock and a captive brood stock at the White Lake Fish Culture Station. Inherent with wild and hatchery brood stock are disease risks. Fish disease surveillance practices are in place to minimize disease risks and egg/fish losses from possible outbreaks. This practice makes TLAS compliant with State and international (Great Lakes Fishery Commission) guidelines and regulations for release of production fish.
All wild sourced brood stock that are spawned are lethally sampled for disease (fig. 16). Bacterial cultures and tissues for bacterial kidney disease and virus screening are taken and tracked by respective egg incubation jar. Obviously, the vertically transmitted diseases (viruses and bacterial kidney disease) are of most concern for the culture of the offspring. Cultured bacteria assays are completed opportunistically for more complete data collection (U.S. Fish and Wildlife Service National Wild Fish Health Survey). Laboratory results are obtained while eggs are still incubating, and any vertically transmitted pathogen findings result in the elimination of only that jar (or jars) and not the entire year class. Egg incubation is done in isolation, via ultraviolet water treatment, in the exclusive incubation building.
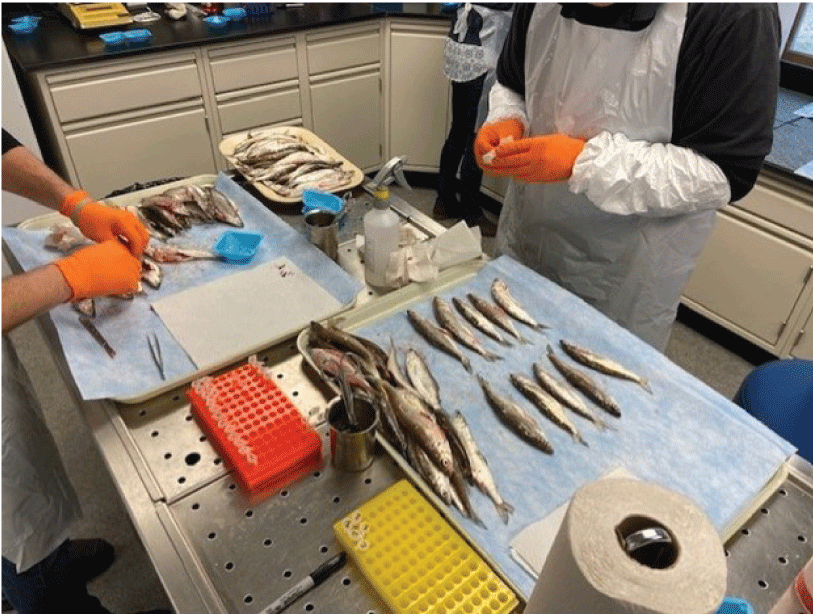
Subsample of adult fish that were spawned and are now being assayed for fish disease.
The adult brood stock disease certification for the fish that are spawned is usually in place around the time the eggs are eyed up. Once the adults that are tested are “clean,” the eyed eggs are inventoried and moved from the incubation building to the hatchery building where they hatch and continue to grow in larger round tanks.
At least 4 weeks before scheduled stocking/release, 60 fish samples are tested for all targeted pathogens (viral, bacterial, and parasitic). The suite of disease assays takes 28 days minimum, so testing is completed in advance to allow time for results and reporting.
Fish Disease Assays
Brood Stock
Sterile loops obtain a bacterial inoculum that is streaked onto brain heart infusion agar. Resultant cultures are incubated at 20 °C and presumptively identified by morphological and biochemical differentiation. Confirmatory identification is done using serological and (or) molecular methods.
A sample of kidney tissue is removed from each fish. Testing for bacterial kidney disease is by serology (fluorescent antibody test) and confirmed molecularly (polymerase chain reaction) via kidney and spleen tissues collected from all fish spawned. Tissues may be pooled together with as many as five fish per pool. Tissues are homogenized (1:10) and then centrifuged, and resultant supernatant is inoculated onto healthy monolayers of CHSE-214 Cell Line for Infectious Pancreatic Necrosis Virus (IPNV), Endothielial Progenitor Cells (EPC), and Atlantic Salmon Kidney (ASK) cells. These cultures are incubated at 15 °C, monitored for 14 to 28 days, after which, if no pathology is observed, inoculum is removed and reinoculated onto new, fresh cells for another 14 days. Any cell pathology is investigated via polymerase chain reaction for specific viruses (infectious pancreatic necrosis virus, viral hemorrhagic septicemia virus, infectious hematopoietic necrosis virus, and infectious salmon anemia virus).
Fry
Whole body fry are pooled together in five fish pools and homogenized, centrifuged, and inoculated in the same manner as the kidney and spleen tissues of brood stock.
Fingerlings
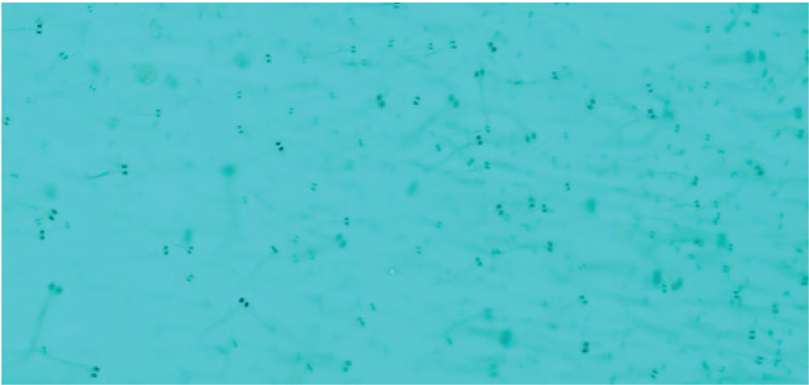
In addition to the bacterial inoculum streaked on agar, and the tissues screened for bacterial kidney disease and viruses as completed for the brood, cartilage from 60 heads is pepsin/trypsin digested, and the resultant centrifuge product is examined microscopically for spores resembling those of Myxobolus cerebralis (salmonid whirling disease). Any suspects are confirmed molecularly (polymerase chain reaction).
All previously mentioned laboratory descriptions can be summarized as follows. samples are collected and assays run at the U.S. Fish and Wildlife Service Northeast Fishery Center in Lamar, Pennsylvania, in compliance with the American Fisheries Society Fish Health Section Blue Book, U.S. Fish and Wildlife Service Aquatic Animal Health Policy, and the Great Lakes Fish Health Model Program for the following pathogens: Aeromonas salmonicida (Lehmann and Neumann, 1896; Griffin and others, 1953; bacterial furnculosis), Yersinia ruckeri (Ewing and others, 1978; enteric redmouth disease), Edwardsiella ictaluri (Hawke and others, 1981), and Edwardsiella tarda (Ewing and McWhorter, 1965), Renibacterium salmoninarum (Sanders and Fryer, 1980; bacterial kidney disease), salmonid whirling disease, infectious hematopoietic necrosis virus, infectious pancreatic necrosis virus, viral hemorrhagic septicemia virus, infectious salmon anemia virus, and Oncorhynchus masou (Brevoort, 1856) virus.
Cisco and bloater disease surveillance work is done by the U.S. Fish and Wildlife Service Northeast Fishery Center through funding from the U.S. Environmental Protection Agency Great Lakes Restoration Initiative.
Adult Brood Genetic Parentage Analysis
All adult ciscoes and bloaters spawned are genotyped for wild returning offspring comparison (fig. 17). Genotyping of ciscoes uses 12 microsatellite loci, consisting of Cocl-Lav4, Cocl-Lav6, Cocl-Lav27, Cocl-Lav32, Cocl-Lav61, Cocl-Lav68, Cocl-Lav69, BWF2, Cisco90, Cisco157, Cisco181, and Cisco200 (Rogers and others, 2004; Ramey and others, 2008). Amplified products were visualized on an ABI 3130XL genetic analyzer (Life Technologies), and alleles were scored by two independent readers using genotyping software (GeneMapper 5; Life Technologies). For quality control, 10 percent of the samples were reextracted and analyzed to ensure consistency of allele calls. Parentage assignments are done using population genetics software (Cervusver 3.0.7, Kalinowski and others, 2007), with parental baselines representing previous spawning of wild origin brood stock spawned at TLAS (Cortland, New York). Assignments with 0 or 1 mismatch among the offspring-parent-parent genotype triplet are compared to known spawning pairs for confirmation.
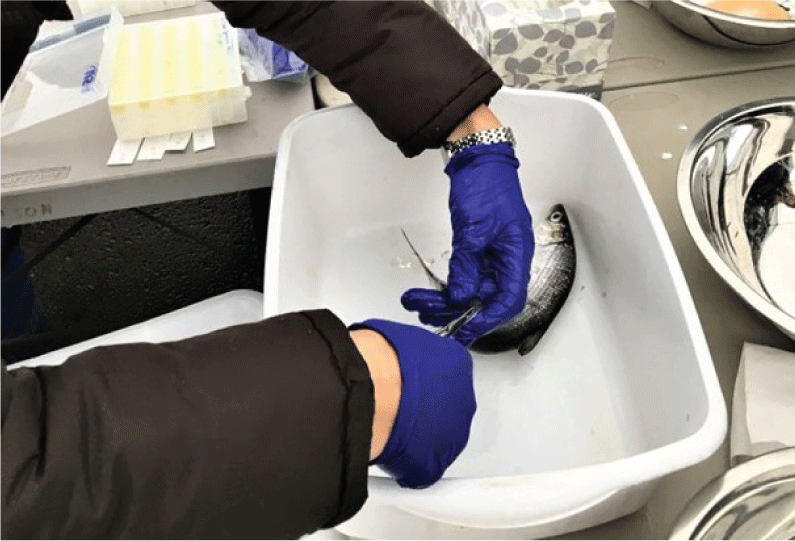
Caudal fin clip for genetic analysis.
Cisco and bloater genetic parentage analysis is completed by the U.S. Fish and Wildlife Service Northeast Fishery Center through funding from the U.S. Environmental Protection Agency Great Lakes Restoration Initiative and U.S. Fish and Wildlife Service National Wild Fish Health Survey.
Egg Incubation
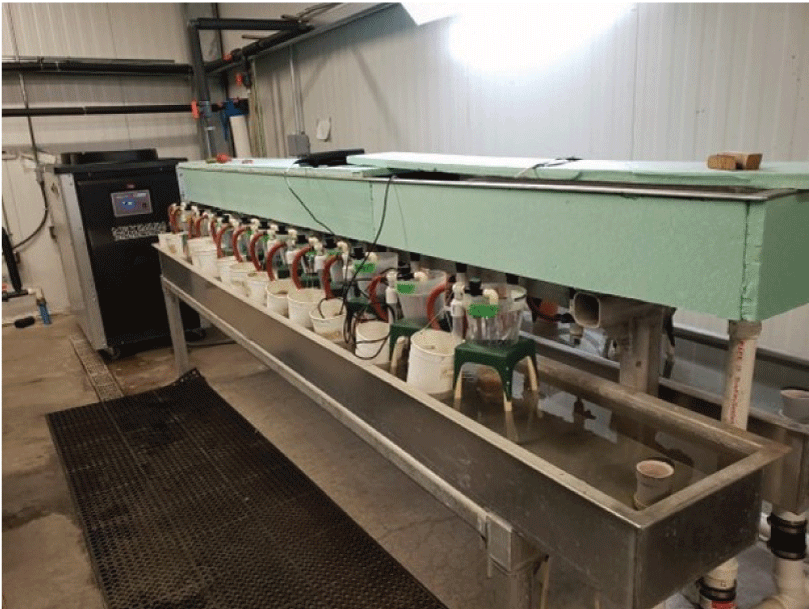
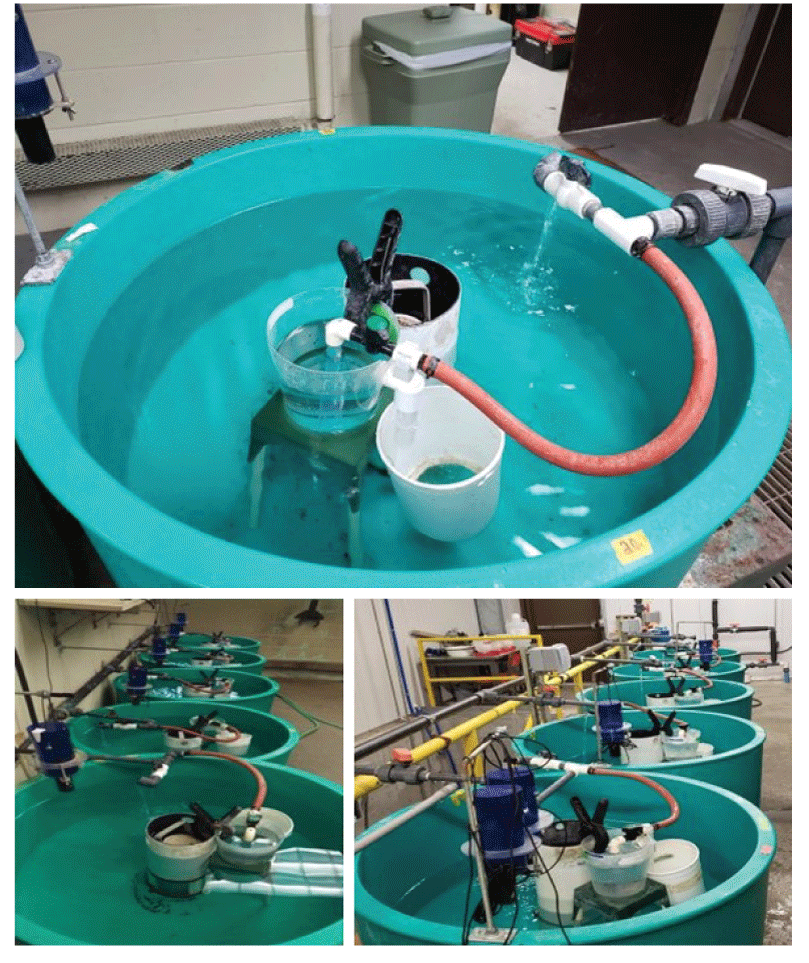
Culture water that is used for coregonine egg incubation is pumped through an industrial chiller and into a head trough that supplies water to the incubation jars by gravity (figs. 18, 19). Flows for each jar are adjusted independently on water lines from the trough to the jars to allow developing eggs to gently tumble. A mesh basket is hung under the jar outflow to collect any eggs that accidently flow out of the jars. Cisco and bloater eggs are incubated at 6 °C.
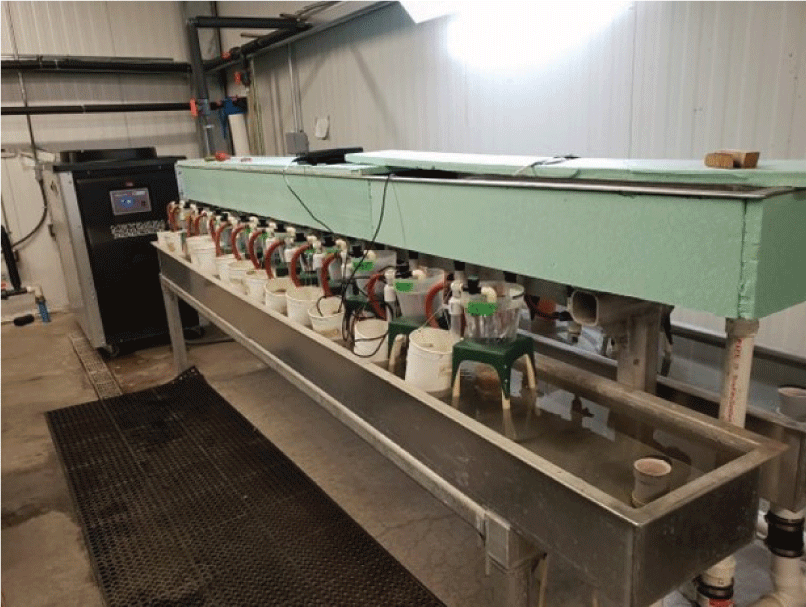
Incubation trough with incubation jars attached.
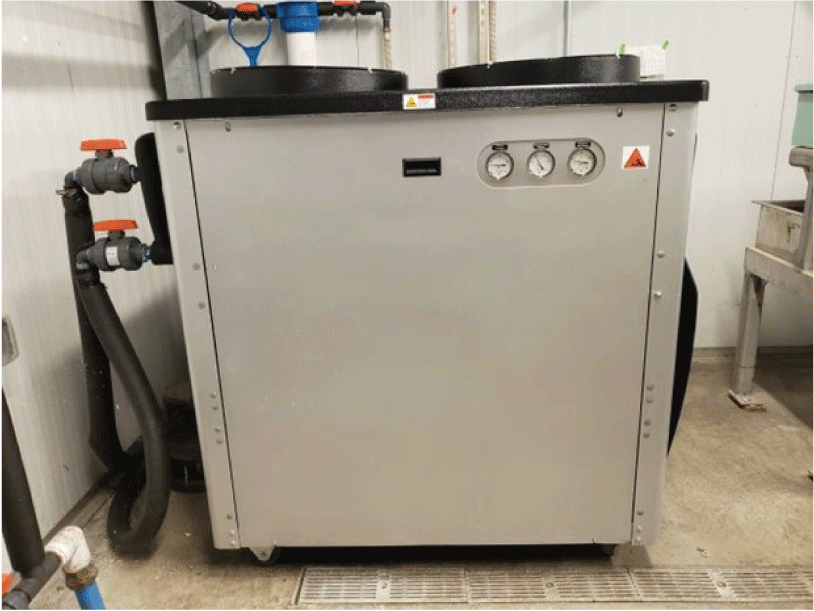
In-line water chiller.
Cisco and bloater eggs are prophylactically treated with a 1:600 formalin (flow-through) treatment for 15 minutes three times a week to reduce fungus growth. Once eggs reach the eye-up developmental stage, the eggs are shocked and the dead eggs are removed, leaving only live healthy eggs to continue to develop. After eye up, formalin treatments continue as needed at 1:6,000 for 60 minutes. Before hatch, and following disease certification, incubation jars are transferred from the incubation building into circular tanks to continue development.
Development
After the fertilized eggs are placed in miniature hatching jars, about 1 mL of eggs are viewed under a dissecting microscope attached to a microscope camera to monitor egg development (fig. 20). Weekly samples are taken from each hatching jar and photographed to track development using a digital microscope.
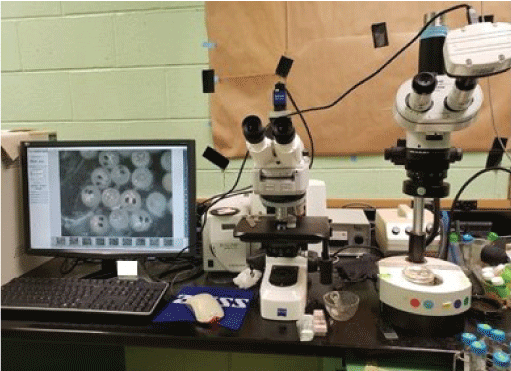
Digital microscope used to determine egg development stage.
Cisco and bloater milestone stages are identified and defined by TLAS staff and are noted as follows:
-
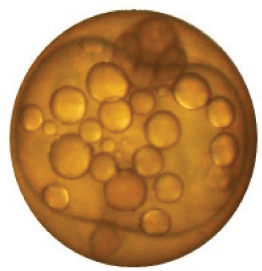
1. Fertilization—Recently spawned egg with the presence of lipid droplets in the egg that are spread throughout the egg and may migrate to the center of the egg (fig. 21).
-
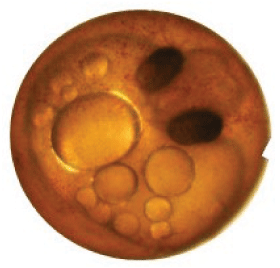
2. Notochord development—The presence of a “dimple” or “impression” on the chorion with the early formation of the head and body starting to form in the shape of a “bat with wings” (fig. 22).
-
3. Body and head formation—The early formation of the head with eye sockets (sockets are clear) and an embryo body (fig. 23).
-
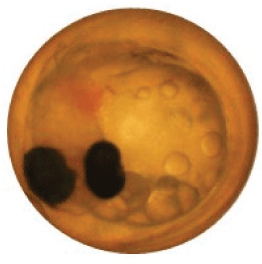
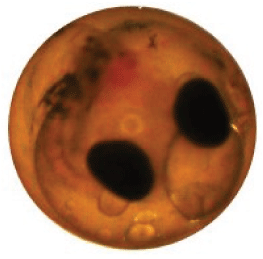
4. Eye up—The eye sockets are black with a more developed body wrapped around the yolk sac (fig. 24).
-
5. Heart and gill formation—The embryo is more developed and now resembles a fish larvae. Gill rakers are visible with the heart beating and capillaries with blood moving (fig. 25).
-
6. Pigmentation—The embryo has a “peppering” appearance with black pigment visible all over the body (fig. 26).
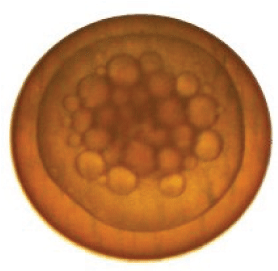
Fertilized egg with lipid droplets.
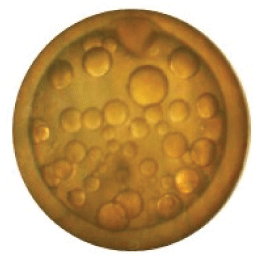
Developing egg with a notochord present.
Developing egg with a noticeable body and head present.
Developing egg that has eyed up.
Developing egg with an embryo that has a visible heart beating and gills moving.
Developing egg with an embryo that has visible pigment.
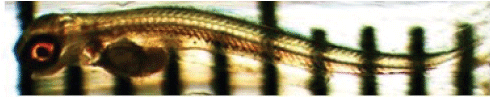
Newly hatched Coregonus artedi (Lesueur, 1818; cisco) larvae.
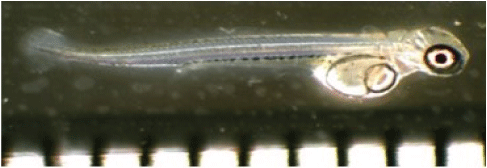
Newly hatched Coregonus hoyi (Milner, 1874; bloater) larvae.
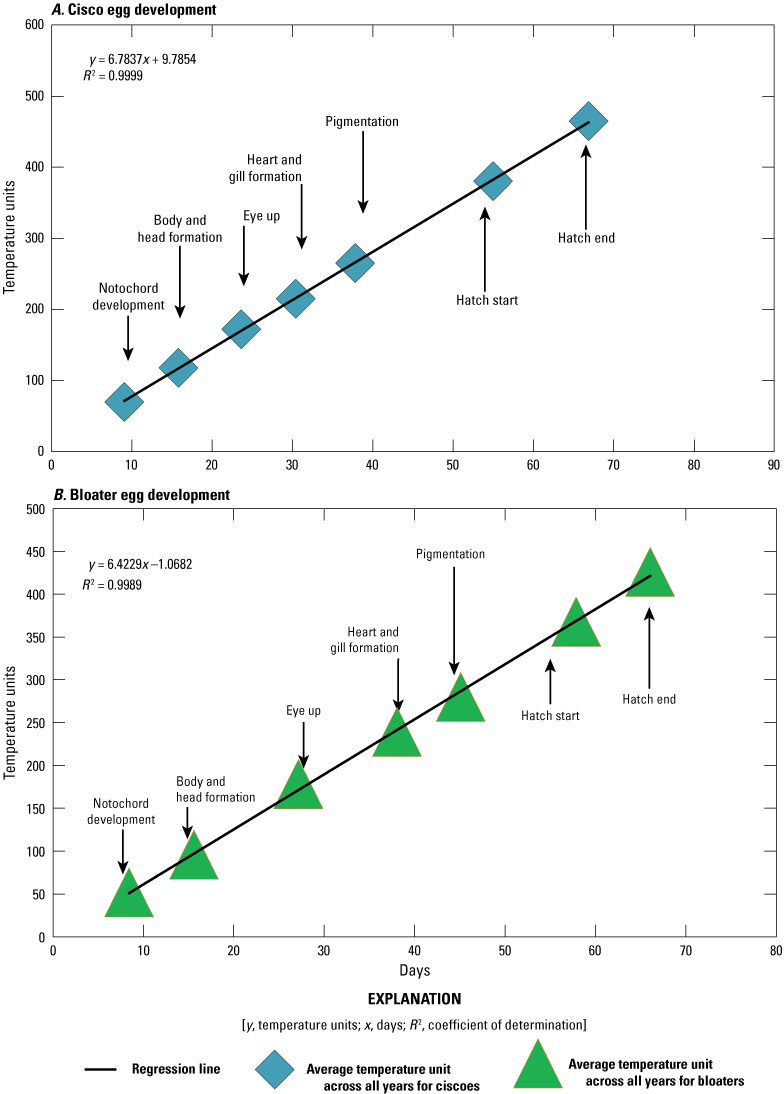
Relation among daily temperature units throughout egg development. A, Coregonus artedi (Lesueur, 1818; cisco) egg development; B, Coregonus hoyi (Milner, 1874; bloater) egg development.
Table 1.
Average temperature unit (plus or minus the standard error) and number of days (plus or minus the standard error) at each development stage.[Ciscoes refer to Coregonus artedi (Lesueur, 1818) and bloaters refer to Coregonus hoyi (Milner, 1874). °C, degree Celsius; TU, temperature unit; ±, plus or minus]
Larval Rearing
Near the start of cisco and bloater hatching, miniature incubation jars are transferred to 190-L circular tanks (fig. 30). The circular tanks have a center standpipe with a 750-micron mesh screen at the bottom and another 3-inch pipe inside to maintain water elevation. The tanks are designed so the water and waste exit the tank through the bottom of the standpipe. Miniature incubation jars are attached to the incoming water supply and placed inside each full circular tank. The tank water level is about one-half the height of the incubation jar, which helps to maintain a stable temperature. As the fry hatch in the jars, the upwelling current carries them from the jar into the tank.
Miniature hatching jars attached to 190-liter circular tanks to hatch and swim out and into.
Newly hatched larvae will absorb the yolk sac in 7–10 days at 9.5 °C (fig. 31). At about 3–4 days posthatch, we begin a light hand feeding about 6–8 times per day. Once we observe about 50 percent of the larvae to have feed in their gut, we begin a full ration of pelletized feed (Otohime A2) at about 10–12 percent of body weight. Feed is delivered by a vibratory feed system every hour 24 hours a day. Circular tanks are carefully cleaned daily by brushing the tank walls in a soft circular motion creating a current that moves waste material and dead larvae to the center. Waste is siphoned from the tank into a bucket where dead fry can be accounted for and live fry returned to the rearing unit.
Newly hatched fry (less than 1 day old) in circular tanks.
Feeding
To maximize growth, ciscoes and bloaters at TLAS are continuously fed using a combination of automatic 24-hour vibratory feeders and daily hand feeding (fig. 32). Total fish weight for each tank or raceway section is evaluated every 2 weeks to ensure adequate feed is supplied (table 2).
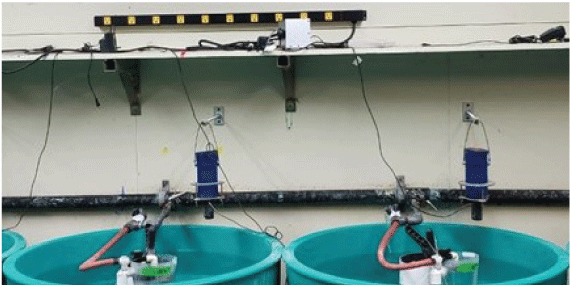
Automatic vibratory attached overhanging hatchery tanks.
Table 2.
Approximate Coregonus artedi (Lesueur, 1818; cisco) and Coregonus hoyi (Milner, 1874; bloater) monthly feeding guide at 9 degrees Celsius.[This is a guide so feed should be increased or decreased based on observations in the rearing unit. When transitioning to larger feed sizes, mix smaller and larger feed sizes together and feed 4–5 days before entirely feeding the larger feed size. mm, millimeter]
To determine total fish weight, complete the following steps:
Chemical Marking
Mass marking of ciscoes and bloaters with a fluorescent chemical is an effective technique to differentiate hatchery raised fish from wild fish with very little handling. Fish are marked at an early life stage where the chemical binds to calcified structures and is visible under ultraviolet light.
Calcein Immersion—Fry
Calcein (SE-MARK, Syndel USA) is an accepted chemical under Investigation of New Animal Drug guidance to chemically mark ciscoes and bloaters weighing less than a 2-gram (g) fish weight threshold. The steps for mass marking ciscoes and bloaters with calcein follow Chalupnicki and others (2016) and are detailed as follows:
-
1. Remove fish from normal feed regiment 1 day before chemical marking.
-
2. Set up three marking tubs on a table that are each in another tub filled with culture water and ice to maintain hatchery temperature during chemical marking (fig. 33).
-
3. Make a 1.5-percent (60 g of salt/4 L of culture water) saline water bath and pour into marking tub no. 1 to create an osmotic gradient for calcein uptake.
-
4. For immersion of fish, dilute 1 L of calcein in 1 L of culture water to make 2 L of a 0.5-percent or 5,000-mg/L marking solution and place in marking tub no. 2.
-
5. Add 4 L of culture water to marking tub no. 3 for wash.
-
6. Add oxygen with a diffuser to each tub in order to maintain saturation.
-
7. Monitor temperature and oxygen with oxygen meter.
-
8. Make sure to have two stopwatches to keep track of immersion time.
-
9. While oxygen is saturating and temperature is adjusting in marking tubs, turn water supply off to one green tank. Collect cisco fry from the tank and place them in a bucket that has a fine screen mesh on the bottom and is placed in another bucket in hatchery water.
-
10. When all fry are collected from the tank, slowly lift the bucket with the screen bottom up and transfer to tub no. 1 that has 1.5-percent saline for 4 minutes. Common fry behavior during this process includes erratic swimming.
-
11. After 4 minutes has elapsed, lift the bucket up, drain saline water out, and transfer the fry to tub no. 2 that has 0.5-percent calcein for 4 minutes. Common fry behavior during this process includes erratic swimming.
-
12. After 4 more minutes have elapsed, lift the bucket up, let as much of the calcein drain off as possible, and place the fry in tub no. 3 for wash. Lift the bucket up and down slowly three times to remove excess chemical.
-
13. Place the screen bottom bucket back in the bucket of hatchery water for transport back to the tank.
-
14. Wash the fry out of the bucket by tilting the bucket downward above the tank and dumping hatchery water through the mesh screen with another cup.
-
15. The fry may still swim erratically but will return to normal behavior within an hour.
-
16. Record and remove dead fry daily and verify color mark 8 days later.
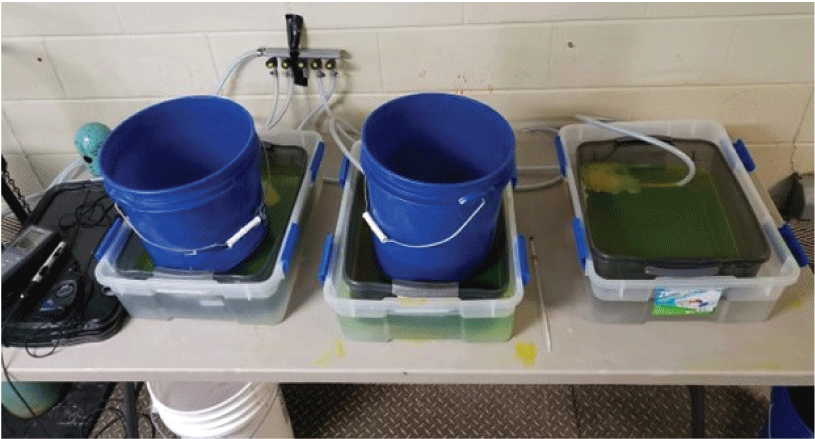
Chemical baths for mass marking Coregonus artedi (Lesueur, 1818; cisco) and Coregonus hoyi (Milner, 1874; bloater) fry with calcein.
Calcein Verification—8 Days Postmarking Fry
Verification of the chemical mark is a critical step in the process to ensure proper retention. Viewing of the chemical marker can be done 8 days after procedure has taken place. The step for the verification process are listed below.
-
1. Remove 10 fry from the fish production tank.
-
2. Anesthetize the fry with tricaine methanesulfonate (125 mg/L).
-
3. Immediately place the fry on a glass petri dish with the head facing to the left.
-
4. In a dark room, place the petri dish under a dissecting microscope equipped with a microscope camera, an epifluorescent ultraviolet light (excitation, 450–490 nanometers [nm]; emission, 515 nm), and a Zeiss filter set no. 09. When ultraviolet light is directed on fry, calcein fluoresces green (fig. 34).
-
5. Mark retention is graded on a four-point scale: no visible mark = 0, dimly visible mark = 1, clearly visible mark = 2, readily visible bright mark = 3.
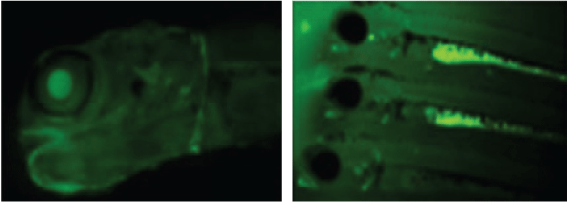
Coregonus artedi (Lesueur, 1818; cisco; left) and Coregonus hoyi (Milner, 1874; bloater; right) fry calcein verification.
Oxytetracycline
Manufactured Feed—Fingerling
Oxytetracycline (OTC) is an accepted marking chemical that has been successfully used to chemically mark several species of fish. TM200 (Bio-Oregon, Longview, Wash.) is a manufactured feed that has OTC mixed in during the feed-making process and is available for purchase with a veterinarian’s prescription (fig. 35). The steps for marking ciscoes and bloaters with OTC are detailed in this section.
To determine total fish weight from each raceway, use the following steps:
-
1. Scoop a net full of fish.
-
2. Determine the mass of the fish (in grams).
-
3. Count the number of fish in the weighed mass.
-
4. Divide the weighed mass by the number of fish to get the weight per fish.
-
5. Repeat three times and average.
-
6. Use the total mass of the fish in the raceway to determine the amount of OTC feed needed.
-
7. Use 3.75 g of OTC per 254 g of fish, or 1.87 percent of the total biomass.
-
8. OTC feed comes in many sizes; use the size that is appropriate for the fish.
-
9. Feed for 10 days.
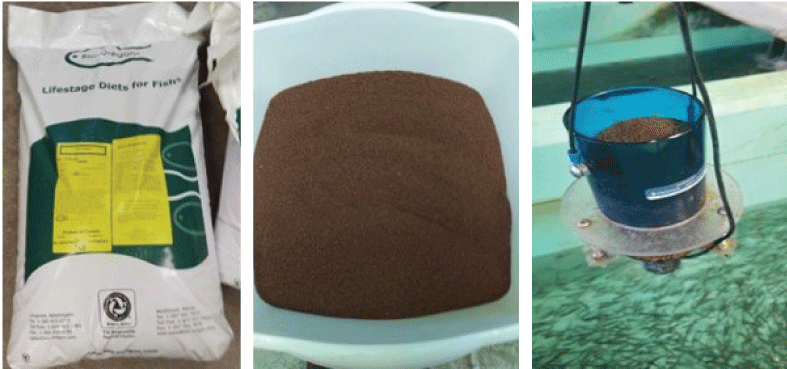
Oxytetracycline manufactured feed (1-percent Terramycin) from Bio-Oregon.
Prestocking Mark Verification—Fingerling
Verification of the chemical mark before fish are released is another critical step in the process to ensure proper retention. The step for the verification process are listed below.
-
1. Remove 10 fish from the production tank.
-
2. Anesthetize with a lethal concentration of tricaine methanesulfonate (300 mg/L).
-
3. Using a scalpel, remove scales on either side of the dorsal fin and place them on a microscope slide in two rows (10 scales should fit on 1 microscope slide).
-
4. Record fish sample information (using the format Species.Year.Site/Code.Fish no.) on another microscope slide and then place that slide on top of the microscope slide with scales on it.
-
5. Hold the pair of microscope slides together with cut pieces of labeling tape, making sure not to cover up the scales.
-
6. Make an incision on the ventral part of the fish to open up the belly cavity. Move organs aside, use a pair of forceps to remove 5–10 rib sections, and place the rib sections in a scale envelope.
-
7. Place small cut pieces of the rib in labeled silicone tray slots. For embedding media, mix 15 mL of resin and 2 mL of hardener in a cup and stir for 2 minutes. Fill in a syringe and pour over otolith and ribs. Make more as needed using the same ratio. Let dry and cure for 24 hours.
-
8. Cut the sample into thin slices using a jeweler’s diamond saw.
-
9. Use fine grit sandpaper to remove coarse cut marks from the sample.
-
10. Mount the sample on a microscope slide with a drop of super glue.
-
11. In a dark room, place the petri dish under a dissecting microscope equipped with a microscope camera, an epifluorescent ultraviolet light (excitation, 450–490 nm; emission, 515 nm), and a Zeiss filter set no. 09. When ultraviolet light is directed on fish structures, calcein fluoresces green (fig. 36) and OTC fluoresces reddish yellow (figs. 37, 38).
-
12. Mark retention is graded on a four-point scale: no visible mark = 0, dimly visible mark = 1, clearly visible mark = 2, readily visible bright mark = 3.
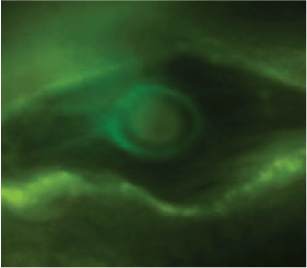
Prestocking calcein verification on rib samples.
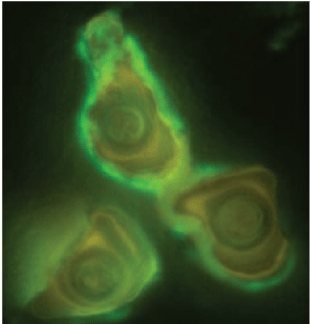
Prestocking oxytetracycline verification on rib samples.
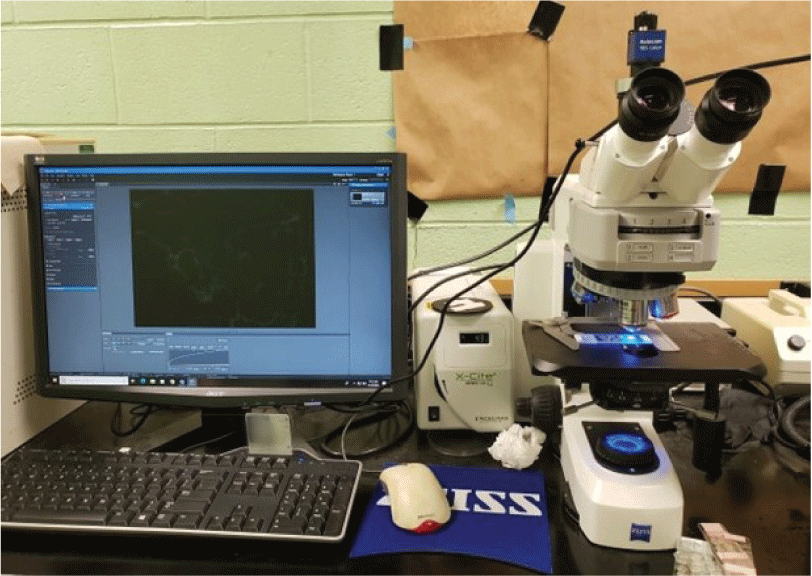
Digital microscope with ultraviolet light attached for calcein and oxytetracycline verification.
Stocking
Fish raised at TLAS are held on station for as much as 1 year and either stocked as a fall fingerling (ciscoes) or a spring yearling (bloaters). A New York State Department of Environmental Conservation hatchery truck equipped with six 950-L tanks (fig. 39) or a U.S. Fish and Wildlife Service hatchery truck equipped with four 1,136-L tanks (fig. 40) is used to transport fish to the stocking location.

New York State Department of Environmental Conservation transport truck for Coregonus artedi (Lesueur, 1818; cisco) stocking in Irondequoit and Sodus Bays, Lake Ontario, New York.
U.S. Fish and Wildlife Service transport truck for Coregonus hoyi (Milner, 1874; bloater) stocking in Lake Ontario.
The average weight of fish is used to determine proper stocking mass for the transport vehicle. The detailed steps in preparation of stocking are as follows:
-
1. Weight sample fish 1 week before the stocking event. For each raceway/tank of fish, complete these steps:
-
2. Upon notification of the scheduled stocking day, take the fish off feed 2–3 days before stocking to depurate them. This will reduce ammonia production in the transport vehicle haul tanks and, in general, reduce transport stress.
-
3. On the day of stocking, add enough clean, granulated salt to each box to achieve a 0.5-percent salt solution (19 g per 3.8 L of water). Standard hatchery truck tank volumes are about 950 L or 250 gallons, so 4,767 g or 10.5 pounds of salt per box will create the correct concentration. A low concentration of salt in the transport tanks will aid in osmoregulation and again reduce transport stress.
-
4. Fill each transport tank with about 950 L (about 250 gallons) of culture water while mixing the salt into solution.
-
5. If equipped, and before loading fish, turn on the oxygen cylinder/stones and supersaturate the water in each box (110–120 percent).
-
6. We have been successful at hauling bloaters and ciscoes at 48–72 grams per liter (0.4–0.6 pound per gallon) on about a 3-hour trip. To achieve these densities, we use a displacement gauge while loading each box of fish.
-
7. Once the hatchery truck is completely loaded and the fish are stable, drive to the stocking location, stopping once about halfway to check on the status of the fish.
-
8. Use a dissolved oxygen meter to monitor and adjust oxygen levels during loading and transport. Oxygen levels should be about 85–90 percent saturation until the fish are off the truck.
-
a. Ciscoes are stocked in Lake Ontario bays (Irondequoit Bay, Sea Breeze, N.Y.; Sodus Bay, Sodus Point, N.Y., fig. 41) with the use of the New York State Department of Environmental Conservation stocking pontoon boat (fig. 42).
-
b. Bloaters are stocked in offshore waters of Lake Ontario (Oswego, N.Y., fig. 43) with the use of a landing craft contracted by the New York State Department of Environmental Conservation (fig. 44).
-
Fingerling Coregonus artedi (Lesueur, 1818; cisco) stocked into Lake Ontario bays.
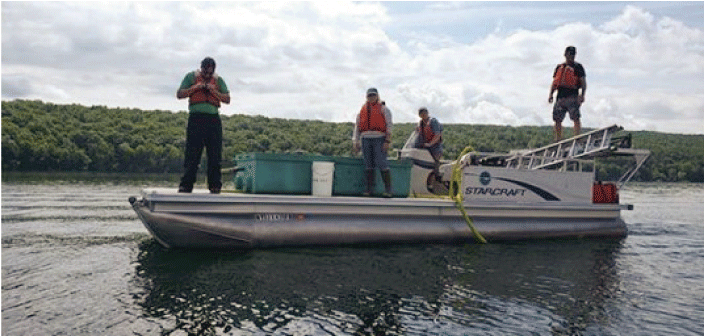
New York State Department of Environmental Conservation stocking pontoon boat.
Yearling Coregonus hoyi (Milner, 1874; bloater) stocked into Lake Ontario.
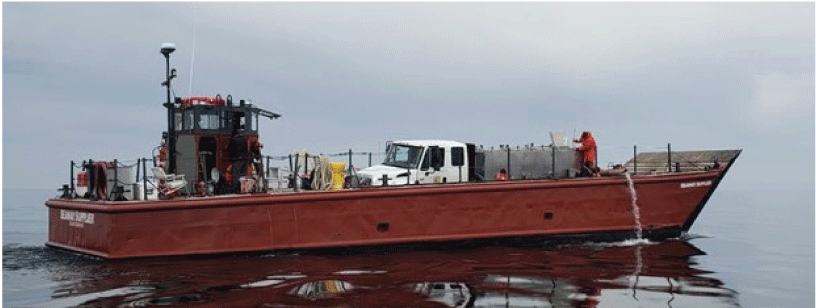
Contracted stocking landing craft.
Record Keeping, Data Management, and Reporting
The proper documentation of daily fish culture practices, observation, and measurements is a critical step that is necessary during all fish culture duties. At TLAS, all documentation is written down in weatherproof notebooks (for example, “Rite In The Rain”) that detail all daily fish culture processes. This information is immediately transcribed into a computer database, which ensures no loss of data and allows us to review data from previous years at any time. Reports that summarize the collection of adult fish from the wild, spawned eggs or eggs received, survival of larvae/fry/fingerlings on station, and the stocking of fish are written and submitted to the New York State Department of Environmental Conservation annually.
References Cited
Chalupnicki, M.A., Mackey, G.E., Nash, K., Chiavelli, R., Johnson, J.H., Kehler, T., and Ringler, N.H., 2016, Mark retention of calcein in cisco and bloater: North American Journal of Aquaculture, v. 78, no. 2, p. 148–153. [Also available at https://doi.org/10.1080/15222055.2016.1143419.]
Kalinowski, S.T., Taper, M.L., and Marshall, T.C., 2007, Revising how the computer program CERVUS accommodates genotyping error increases success in paternity assignment: Molecular Ecology, v. 16, no. 5, p. 1099–1106. [Also available at https://doi.org/10.1111/j.1365-294X.2007.03089.x.]
Ramey, A., Graziano, S., and Nielsen, J., 2008, Isolation and characterization of microsatellite loci from the Arctic cisco (Coregonus autumnalis): Molecular Ecology Resources, v. 8, no. 2, p. 357–359. [Also available at https://doi.org/10.1111/j.1471-8286.2007.01955.x.]
Rogers, S.M., Marchand, M.-H., and Bernatchez, L., 2004, Isolation, characterization and cross‐salmonid amplification of 31 microsatellite loci in the lake whitefish (Coregonus clupeaformis, Mitchill): Molecular Ecology Resources, v. 4, no. 1, p. 89–92. [Also available at https://doi.org/10.1046/j.1471-8286.2003.00578.x.]
Conversion Factors
International System of Units to U.S. customary units
Temperature in degrees Celsius (°C) may be converted to degrees Fahrenheit (°F) as follows: °F = (1.8 × °C) + 32.
Supplemental Information
Concentrations of chemical constituents in water are given in milligrams per liter (mg/L).
For more information about this publication, contact:
Director, USGS Great Lakes Science Center
1451 Green Road
Ann Arbor, MI 48105
734–994–3331
For additional information, visit: https://www.usgs.gov/centers/great-lakes-science-center
Publishing support provided by the
Rolla Publishing Service Center
Disclaimers
Any use of trade, firm, or product names is for descriptive purposes only and does not imply endorsement by the U.S. Government.
Although this information product, for the most part, is in the public domain, it also may contain copyrighted materials as noted in the text. Permission to reproduce copyrighted items must be secured from the copyright owner.
Suggested Citation
Chalupnicki, M.A., Mackey, G.E., and McKenna, J.E., Jr., 2024, Cisco (Coregonus artedi) and bloater (Coregonus hoyi) culture manual: U.S. Geological Survey Techniques and Methods, book 2, chap. A20, 25 p., https://doi.org/10.3133/tm2A20.
ISSN: 2328-7055 (online)
| Publication type | Report |
|---|---|
| Publication Subtype | USGS Numbered Series |
| Title | Cisco (Coregonus artedi) and bloater (Coregonus hoyi) culture manual |
| Series title | Techniques and Methods |
| Series number | 2-A20 |
| DOI | 10.3133/tm2A20 |
| Publication Date | January 18, 2024 |
| Year Published | 2024 |
| Language | English |
| Publisher | U.S. Geological Survey |
| Publisher location | Reston, VA |
| Contributing office(s) | Great Lakes Science Center |
| Description | viii, 25 p. |
| Online Only (Y/N) | Y |
| Additional Online Files (Y/N) | N |