The WTS-Tr and WTS-P Instruments- Getting Started
The menu-driven software for each instrument may be accessed from the personal computers communications (com) port through the bulkhead connector (stamped "C" on the end cap of the WTS controller housing) using a supplied communication cable with a DB25 to DB9 adapter. This configuration permits a direct link from the communication cable to a standard RS 232 serial port on a personal computer. The overviews and setup configuration of the communications cable for both WTS-Tr and WTS-P models are displayed in Figure 1A and Figure 1B, respectively.
Some caution should be exercised in choosing a compatible PC for communication with these instruments. We have experienced difficulty in accessing menu items in both units using some newer PCs using Windows 95 or 98. A full test of all menu functions should be undertaken prior to actual field deployment of the instrument. The problem has been ascribed to an incompatible registry and/or power management feature in some of the newer laptop operating systems. Further information about this issue is detailed by the "Customer Support Bulletin 2001-5" on the McLane Laboratory website. The terminal emulation program "pump142" accesses the WTS-Tr software. The programs "crosscut" or "ProComm" may be utilized to access the WTS-P model. A directory should be setup on the PC with the corresponding emulator programs (available from McLane Laboratories) in order to complete the link between the PC and WTS instrument.
WTS-Tr Communication Procedures
A stepwise procedure for communicating with the WTS-Tr follows:
- After connecting the communications (com) cable to the six-pin communication bulkhead connector on the controller housing (labeled with a C), type "pump142" to start the terminal emulation program.
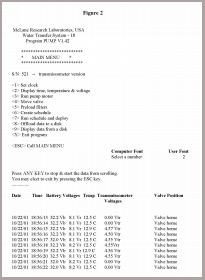
- Upon connecting with the AT-WTS instrument, a prompt will appear: "Do you wish to communicate to the instrument (Y/N)". A reply of "Y" will lead to the following: "Enter COM port number (1 to 4)"; enter the appropriate number of the com port (1), and the PC will attempt to awaken the instrument. The statement "attempting to access instrument (press ESC to stop)" followed by "acquiring initial information from instrument" should appear on the screen followed by the main menu (Figure 2). The menu features are user driven and are easily accessed by typing in the desired keystroke after the prompt.
If there is no response after one minute, repeat the above steps making sure the communications cable is secure and properly connected to the appropriate bulkhead communications connector on the controller housing and the PC. The batteries inside the controller housing should be new and properly connected as well.
If still no response, disconnect both batteries for 30 seconds. Reconnecting the batteries should reboot the system and reestablish communication with the WTS unit. If this procedure is unsuccessful, contact McLane Laboratories for further assistance.
- A reply of "N" will inform the pump program that instrument programming is not desired. Following the "N" command, the only option is to examine a previously downloaded data file using main menu option 9.
It is often desirable to have a record of the sequence of commands such as the inputs, software responses, deployment, and recovery data. A file containing this record may be created prior to establishing communication with the WTS-Tr by using a DOS pipeline (>) command. All screen displays will be echoed to a disk file containing all user /instrument interactions. The user types the following command upon the initial DOS prompt: pump142>file name and continues to complete accessing the WTS-Tr instrument as previously described in procedure steps 1-3 in this section.
If the user has already communicated with the WTS-Tr and is working within the main menu and wishes to make a pipeline file, pressing the F1 function key will bring up a window allowing input of a disk file name that will save all work after that juncture. The F10 key is a general help feature displaying all the soft key functions and operations within the WTS file structure. Active data logging saved to disk can be observed from the bottom right screen display from the message "log open".
- The most reliable way to close a file and save it is to simultaneously press ALT-4. You will be returned to the DOS prompt and the newly created file will appear in the directory. Specific files may be copied from the laptop directory to diskette using the standard DOS copy command.
WTS-P Communications Procedure
To communicate with the WTS-P unit and to save command files, Crosscut or ProCom can be used. Features of both programs are described below. For both programs, the enhanced software in the WTS-P unit results in a slightly different screen display and menu initialization procedure than in the WTS-Tr unit.
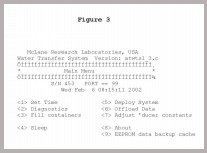
- At the DOS prompt, type crosscut to initialize the program. The screen display with a pull down menu bar across the header will appear. Press Ctrl-C until the main menu is displayed (Figure 3). If other characters appear on the screen, recheck the cable connections, the battery, log-on procedure and retry.
- Access the main menu, and select "comport" from the pull down menu at the top of the page and select "capture file". A dialogue box will appear in which to enter a file name for the purpose of echoing and saving any ensuing screen commands. The "capture file" message will appear on the bottom right of the screen display indicating all keystrokes and text appearing on the screen are being logged to the newly created file. Creating this file is possible at any time when working within the main menu by following the previous steps. Soft key equivalent features are also available from the "F10" soft key and "Help" menu.
- The main menu is also user driven and typing in the desired menu number after the prompt will access individual menu items such as "Diagnostics" and "Deploy System".
An additional enhanced feature of this software is that previous data from the screen display may be viewed by positioning the mouse on the right hand scroll bar and dragging the pointer up to access previous screen displays.
- Pressing ALT Z or selecting "capture file" from the "comport" pull-down menu will close the file and the "file closed" message will appear at the bottom of the screen.
- Pressing the Ctrl- C key will return the user to the main menu. Pressing ALT-Q or selecting "quit" from the pull down "file" menu will quit the program and return the user to the DOS prompt. The newly created file should appear in the directory.
The user may not be able to conveniently access the WTS-P software using the crosscut program due to a similar registry problem previously described for the WTS-Tr instrument. Details and appropriate editing of the registry on the user's personal computer is addressed on the McLane Laboratory website under customer service at http://www.McLaneLabs.com.
The use of the terminal emulator program ProComm will also allow the user to access the menu of the WTS-P instrument in the event that communication using the crosscut program is unsuccessful. However the enhanced software conveniences (pull down menus and mouse features) are unavailable with the ProComm software.
- Type ProComm after the DOS prompt and press the "Ctrl- C" keys to access the main menu. The main menu display and menu items are virtually identical to those of the crosscut program.
- Alt-F1 will open a dialogue box in which to enter a file name and capture the data to file. A "Capture File" notation will be displayed in the lower register of the display screen. Subsequently, all keystrokes will be saved to file.
- Alt F-4 will close the file and save it to the directory.
|